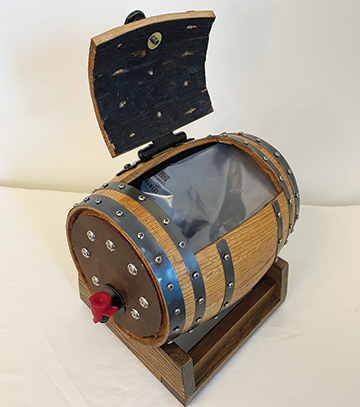
Build Your Own Crusher
The challenge I was looking for in winemaking was doing it the Old World style: picking, crushing, and pressing the grapes myself. Since we live in the heart of a grape-growing region, northeast Ohio, the grapes were not a problem. Some of my co-workers have grape vineyards, so any leftovers were mine free of charge.
But there was still a problem; I had no crusher. I looked around at different styles and even checked out the crushers at local wineries. That sparked a few ideas, and I decided to build my own. It was almost grape season, so I had to work fast. Combining my two hobbies, woodworking and winemaking, I came up with the crusher to fulfill my needs.
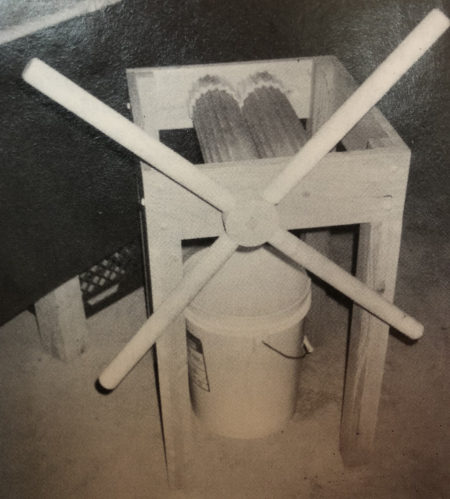
The Crusher in Use
The crusher consists of two roller cutters controlled by two gears that are turned by a large handle. The crusher is supported in an open box frame with legs. Moving the handle turns two gears that are on square axles. The gears turn the two roller cutters (also on these axles). The roller cutters are 14 inches long and 1/2 inch apart.
This 1/2-inch separation makes the crusher perfect for the wide variety of grapes I usually get. Changing the dimensions of the gears will change this distance, if your needs are different.

While turning the handle I put a handful of grapes between the two roller cutters, which break the skins of the grapes. Under all of this I put a five-gallon bucket to catch the grapes as they fall through.
Tools
- Table saw to cut the legs, frame of the crusher, the gears, roller cutters, and the axles
- Router to make the gears and roller cutters with teeth
- Router with a dovetail jig to assemble the frame
- Drill press for drilling all of the holes straight
- Wood lathe to turn all of the round parts and make the cutters, gears, handle, and the round ends on the square axles
- Clamps to hold parts together while the water-proof glue dries
Materials
- For the roller cutters: 150 inches of cherry board, 3/4 inch thick by 5 inches wide (to create 10 15-inch-long boards)
- For the axles: 24-inch length of cherry board, 3/4 inch thick by 5 inches wide
- For the gears: 28 inches of cherry board, 3/4 inch thick by 5 inches wide (or other wood, such as ash)
- For the frame: 76 inches of oak or other wood, 51/4 inches wide by 3/4 inch thick (for four 19-inch lengths); 128 inches of 21/2-inches-square wood (for four equal-length legs); material and size will vary by design
- For the handle: 64 inches of ash, 13/4 inches square (for four 16-inch lengths); plus 71/2 inches of cherry board (or other wood), 3/4 inch thick by 5 inches wide; 3-inch-long piece of cherry, 3/4-inch square
- Elmers tight bond glue
- Water-based varnish (after you finish assembly, give the whole thing about two coats)

Prep the Axles
Cut a piece of cherry board 24 inches long. Rip the board on the table saw into strips, exactly 3/4 inch wide. The finished piece uses only two axles, so you will have extra axles to help you support your work on the lathe.
The Roller Cutters
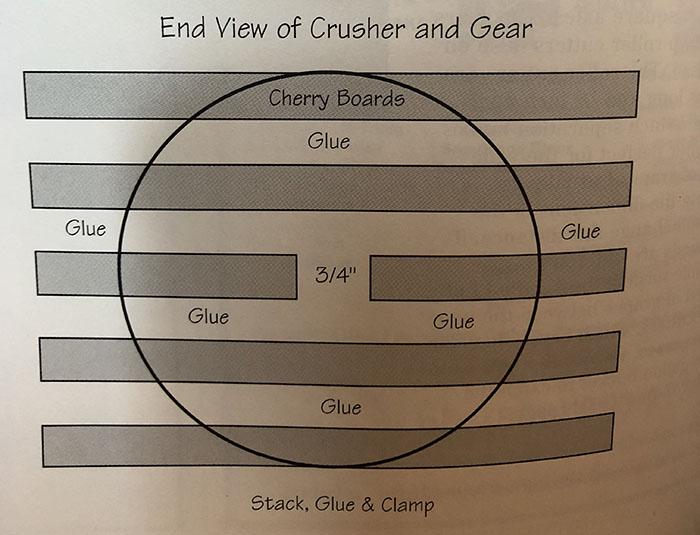
Each roller cutter takes five 15-inch-long, 5-inch-wide cherry boards. You will stack the boards, one on top of the other, to form a 15-inch long, 33/4-inch-tall rectangle (which you will make into a cylinder using the lathe). The 15-inch length gives you a little extra to square off the ends later; the cutter rollers will be 14 inches long.
Stack two boards. Rip the third board in half on the table saw. Place the two halves 3/4 inch apart on the second board, and top with the remaining two boards. This 3/4-inch channel down the center is for the axle. You are ready to glue the pieces together.
At this point it is a good idea to carefully slide the axle into the channel to get a tight fit, but be careful not to get glue on the axle. Apply glue and clamp the boards together with c-clamps. Now check that the square axle slides in and out of the channel fairly easily.

Construct the second roller in the same way. Set the rollers aside to dry for at least four hours. You will be turning these pieces on the lathe at a fast rpm, and you don’t want them flying apart.
Once the glue is dry, you need to use the lathe to round out the rollers. Then use the router to create the teeth.
First, set the rollers up in a wood lathe. This is where I found the extra axles came in handy. Cut the axle so about 1 inch sticks out at each end of the cutter.
Start the lathe at a slow speed until you get a more balanced and rounded roller. Change to faster speed and turn the roller down until you get the diameter you want. The finished diameter of my rollers is 3 7/8 inches.
After turning both to the same diameter, you will need to make a jig (guide) to mount on your lathe. Offset the router jig from the center to accommodate a router with a 1/2-inch straight cutting bit. A bit with a 1/2-inch shaft works best. Your jig will need to be well built and secured to the lathe. My lathe has locks on it, so I can turn the roller, run the router parallel with the roller, then turn and lock it in place.
Gears
The gears are constructed in the same way as the rollers: layering the wood, ripping the center piece to accommodate the axle, and gluing the pieces together. The diameter of the gears needs to be a little bigger than the rollers.
The size of the gears creates the separation between the rollers and thus regulates the type of crush. My gears were 5 inches in diameter to start with (before rounding them in the lathe). You’ll need two gears, but they only need to be 2 inches wide. I found ash worked well, but if you have enough cherry, then use it. The finished diameter of my gears is 45/16 inches.
Axles
The finished axles will be square in the center, where they run inside the gears and rollers. They’ll be round on the ends, where they spin in holes drilled in the frame. One axle will be 19 inches long. The other will be 21 inches long (one end of this axle goes through the frame to connect to the handle).
You will need to turn the ends of the axles on the lathe. Turn 3/4 inch on both ends of the short axle down to 1/2 inch in diameter. Turn one end of the other axle to match. The other end will hold the handle, so you need to turn at least 23/4 inches down to 1/2 inch in diameter. Now you can slide the gears and cutters onto the axles, leaving 1 inch between the gears and rollers.
Frame
You are building a four-sided box frame supported by four legs. The frame is 19 inches square (if you alter this dimension, you will have to alter the length of the axles). You can design your own frame and build it to suit. Cut all boards for the frame to size and drill a 1/2-inch hole for the axles all the way through in opposite sides of the frame.
Fit the axles in the holes; they should turn freely. Put a little cooking oil in the holes if necessary. Now assemble the frame itself. Dovetails work the best to connect the box’s four sides because of the strength and glue surface, but if you don’t have a dovetail jig, don’t worry; use any type of joint you can. Dry fit these pieces first before you do any gluing.
Legs
Build the crusher to fit your own needs. I built mine tall enough so that a five-gallon bucket fits underneath it. My crusher’s legs are 21/2 inches x 21/2 inches x 32 inches long. The legs can be any length that works for you.
Now you can glue up the frame and legs, making sure everything is in its proper place.
Handle
To make the handle, start with four pieces of ash, 13/4 inches square by 16 inches long. Put these pieces in the wood lathe and turn them down until they are 13/8 inches in diameter. On one end of each piece, turn 1 inch (length) down to 1 inch in diameter.
To tie all four handles together, you need to construct a circle similar to the roller. It should be 33/4 inches in diameter and 1 1/2 inches wide. Leave it round (without the teeth), with the square hole.
Drill four 1-inch holes 1 inch deep around this center for the handles. To attach the handle to the axle, you need to build an adapter. Cut a piece of cherry 3 inches long by 3/4-inch square. (A piece from the extra axles you ripped will work.) This piece fits into the hole in the handle’s center. Drill a 1/2-inch-wide hole in one end 1 inch deep to accept the end of the long axle.
Coat the assembly with a couple of coats of varnish. You will get many years of use — and many harvest’s worth of wine — out of your creation.