Create Your Own Great Labels
 Labels are an extension of your personality; they mirror the winemaker’s soul. The wine in the bottle is the culmination of months, sometimes years of effort. Labeling your wine can further express your effort and pride.
Your individual taste and purpose, along with a few key guidelines, are the essential factors in designing a label. There are many procedures for designing and producing labels. The suggestions outlined here are but a few methods. These ideas are intended to be a starting point for your creativity and to suggest some ways to express it. Practice designing labels using computer programs or graphic tools you are comfortable with. This is the only way to become more proficient.
Creative Design
What should you put on your wine label? Content is a matter of individual preference. Typically, the type of grape or style of wine is included. If the wine is a blend, create a proprietary name. A famous example of this is Opus One, a blend of Bordeaux-style grapes that can’t be labeled as a varietal. A proprietary name is also helpful if, for instance, your Chardonnay does not taste like a classic Chardonnay.
A batch number or code is helpful for making notes in your logbook for comparative tasting. If you are making wine from concentrates, it is important to add the date bottled to ensure that your wine does not get too old. If your wine is from grapes, other fruit, or vegetables, a vintage date — the year the fruit was harvested — acts as a marker for when the wine should be drinkable.

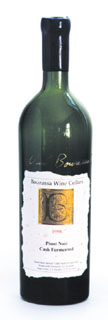
Commercial wineries make sure the brand name is the most prominent item on the front label. Other standard information includes varietal or type of wine; appellation, if appropriate; vintage; and terms such as “estate,” “limited bottling,” and other notes of distinction. For that extra touch, consider adding the winemaker’s signature to the front or back label.
The back label generally restates the brand name, then restates the wine type, vintage, and appellation. What follows in smaller type is a description of the wine itself and how it was produced, a description of the winery, or perhaps key numbers about the wine (acidity, degrees Brix, alcohol content).
The back label provides the home winemaker with a great opportunity to express how he feels about winemaking or one wine in particular. Take this opportunity to brag a bit, teach people a little about winemaking, crack a few jokes, or remind people to return the (well-rinsed) bottles when they’re done.
A Few Design Tips
The size of your label should suit the bottle. For Bordeaux-style bottles (bottles that are tall with a defined shoulder and neck), the label should be no taller than 6 inches. For Burgundy-style bottles (tapered from about half way up the bottle) the label can be a maximum of about 31/2 inches high.
The design of the label dictates its width. Avoid making disproportionately wide labels; the contents of the label will disappear when the bottle is rotated. The rule of thumb is to have a label that can be read entirely without turning the bottle.

There are a few basic design rules that will help you make an attractive label. First, keep a 1/8-inch margin around the label with no text or graphics. In some instances you can let a photo run off the edge for effect, but never put type close to the edge of the label. Likewise, keep borders at least 1/8 of an inch from the edge, and don’t use them at all unless you are very confident with the computer program you are using to create your label. It can be difficult to get a border to look completely even all the way around the label.
Choose colors to achieve your purpose. If you want to create an upscale or formal mood, use muted tones such as subdued blues, burgundies, and greens. For a more fun mood — wines made for a celebration, for example — choose primary colors. If you use a background color or print on colored labels, remember to use dark letters on light backgrounds and light (or bright) letters on dark backgrounds. If the label can’t be easily read, choose something with more contrast. Headlines can be as colorful as you like, but keep small text (the back label, for example) black or white.
Both photos and clip art make nice graphic elements, but use only one per label. More creates clutter and confusion. If you have a paint program on your computer, consider using it to colorize your clip art. Graphics should be proportionate to the size of the label. If the graphic you choose covers the entire label, fade it so the printing will not be lost in the graphic. Remember contrast: Be sure to use dark type over light-colored art and light-colored type over dark art.
If you want to put a graphic in the center of the label, place it lower than exact center. This will prevent the label from looking, in the vocabulary of graphic artists, top heavy. The alternative is to “anchor” the photo with a strong, bold headline. Center the text top to bottom if you place a graphic on the left or right side of the label. Use square or rectangular graphics in this instance.
Using Text
 The text elements on your label should match the wine or the effect you wish to create. Use text sparingly if there are graphics on your label. If you have a lot to say, create a back label. Script-type fonts are generally used in softer labels such as wedding labels. Go easy on script, though. It can be hard to read. An important rule to remember is to avoid using more than two fonts per label. You can use more, but your label will look more funky (think skateboarder chic) than clean and professional.
Put the main idea in larger type. There are two basic kinds of fonts, serif and non-serif (or sans serif). Letters in serif fonts have little lines or feet at the bottom, like the text font in this article. Non-serif fonts have no lines underneath, like the headline font for this article. As a general rule, serif fonts look more formal, and graphic designers use them primarily as text (small print) rather than headline fonts.
Some non-serif fonts, such as Arial, are good for small print. They create a more modern feel than many serif fonts do. But some non-serif fonts can be hard to read as small print. The most important rule is to make a label that is appealing to the eye and represents the idea you wish to project.
Type and graphics are not the only elements with which to be creative. A label does not have to be square or rectangular. Some of the most original labels are unconventional shapes. Leaves or barrels or any appealing shape will produce an interesting diversion from any limit in design or color.
 Another nice effect is to tear the label rather than cut it. Parchment paper is the best choice for this. The rough edges give a more medieval look to a label. For every design there are many treatments.
Choosing a Program
Once you have decided on the look and information you want for your label, setting up and printing are the next steps. If you don’t have a computer, use a pen, paper, and a little imagination to make a unique label. Then use a color copier to reproduce it. Otherwise, you can choose among many computer programs for setting up. Choosing the correct one depends on the design elements you want on your label. If your label is mostly text, a good word-processing program is sufficient. For labels that have graphic elements, a drawing or publishing program is the best choice.
The following instructions are generic and fit most recent computer programs. The instructions are for an 81/2-by-11-inch sheet of paper containing four labels per page. When using a word-processing program, such as Word, WordPerfect, or Ami Pro, set the page to portrait or landscape depending on the dimensions and whether the image is vertical or horizontal.
Next, set the margins to accept two labels wide and two labels deep. Format the document to two columns. Some word-processing programs allow you to add text blocks. These are boxes that contain your text that you can freely position on the page. This gives you a lot of flexibility, because you are not held to a single format for a full page.
Type the information you wish and format it for size and font. Copy and paste this information for the other three labels. Adjust the position of the lower two labels by adding carriage returns (paragraphs). If you wish to insert a graphic, use the graphic tool in your word processor. Most word-processing programs let you wrap text around a graphic in several ways. Look in the instruction manual or help menu for the procedure for your word processor.
Another method using a word processor is to set up a table. Set the page orientation and margins, set up a two-column by two-row table, and expand it to the page margins. Type the text into one block of the table, then copy and paste it to the other three. Some programs will not allow you to place a graphic in a table, in which case a drawing or a publishing program is necessary.
Publishing Programs
Publishing programs, such as Microsoft Publisher, Print Perfect, and Print Studio, let you have greater freedom in design of a label. By overlaying different design elements, such as text and graphics, a multi-layered, professional-looking label is possible. Design programs also often come with built-in clip art. Again, the instructions that follow are generic in nature and for a four-label layout on standard paper.
First, set up your page orientation and margins. Set rulers so you can adjust the positioning of your label. Define text blocks to match the size of your labels. If you are using graphics, set them inside your text blocks. Add text and group text and graphics boxes. Copy and paste to the other labels.
You can also add flexibility with a graphics program such as Paint Shop Pro, PrintMaster, or Print Artist. Label programs, such as Labelmaker, Avery Label, and wineLabel, allow you to print pre-formatted labels or define custom sizes for labels. They have the advantage of simplicity. You just add your text and print. Some label programs, however, do not let you add graphic elements. If graphics are a feature you want on your label, make sure that the label program you are using allows you to add graphics. If you are using self-adhesive labels, such as Avery labels, check the number or style of labels.
Your computer program might have them listed in the “tools” section under labels. If the software does not recognize the label description, it will likely let you define a label. If the label sheet you have does not have a dimension template, measure the margin, the horizontal and vertical dimensions of the label, and the number of labels across. Set the margins and enter any other information the program asks for. You will be prompted to enter the information you wish on the label. This method works for plain paper as well self-stick labels.
Making It Stick
It is important to choose the correct medium for your application. Self-adhesive paper is convenient but may be difficult to remove. This is a consideration if you reuse your bottles. Some labels have a water-soluble adhesive that can be easily removed by soaking. Plain paper is acceptable and is available in many colors and patterns. These are useful if your only choice for printing is black and white. Use a liquid glue stick to apply plain paper to the bottle.
When you print your label, there are some considerations. Most ink-jet printers have water-soluble inks. This can cause the ink to run if the wine is chilled and condensation appears on the label. Another consideration is the surface of the paper you are using. Glossy paper can cause ink to run or splatter during printing. Matte paper may cause the inks to dull.
There are two solutions to these problems. Use paper that is specifically designed to work with ink-jet printers. Some printers allow you to set the print head for use on glossy papers. To ensure your ink will not run under moist conditions, seal the label with a clear hobby spray or a spray used for fixing pastel or charcoal. A light mist will do. If you wish a glossy appearance, choose a gloss-finish sealer. A satin-finish sealer will brighten up dull finishes but will not make them shine. Look in a hobby or art store for these sprays.
Labels printed on laser printers do not run, but your design elements will be black and white. Combining a graphic paper and plain black text can make a very interesting label.
When you are satisfied with the design of your label, take time and some precautions in applying it to the bottle. Always let your bottle come to room temperature. Applying a label to a cold bottle might cause your label to wrinkle or pucker. If you have not sealed your label, inks might run. Ensure that your bottles are clean and free of moisture. A towel or cloth with stripes is a good guide for lining up your label. Place the towel in your lap and lay the bottle on top of the towel. Keep the stripes at right angles to the length of the bottle. Apply the label using the lines to align the label horizontally and vertically.
Whether your label is black and white or a vivid, multi-colored work of art, the final word is yours. A well-thought-out label expresses the pride you feel in your wine. The finished product is the outward expression of the heart and soul of the winemaker.