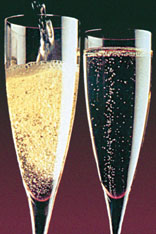
 Has this ever happened to you? You bottle what seems to be your next, greatest batch of wine, carefully set it aside to age for as long as you can possibly stand it and, when you go to open a bottle . . . pop! A gush of foam follows the cork and the wine fizzes audibly.
While sparkling Shiraz or bubbly Beaujolais might be a winemaking failure, don’t despair. You’ve joined the ranks of champagne makers and are heir to their accidental discovery.
Yes, I said accidental. Originally, champagne wines were intended to be fizz-free. You see, the Champagne region of France is just as far north as you can get and still grow vinifera grapes successfully. The climate there is quite cool. It’s so cool, in fact, that occasionally, after the wine was vinted in the fall, the cold weather would halt its fermentation before it completely finished. In the spring, the bottled wine would start fermenting again in the warmth, producing carbon dioxide and fizzy wine.
Now, this was the 18th century, before Louis Pasteur discovered the action of yeast in fermentation. Without knowing how to control fermentation, the French did the obvious — they got stronger bottles that wouldn’t burst under the pressure of the gas. At that time the British, introduced to “sparkling champagne” by ex-pat Frenchmen, enjoyed the lively drink, but only in small amounts. Even with stronger bottles, few commercial wineries would have been willing to lose up to half their production to shattering glassware!

To slow the spread of bubbly even further, this original “sparkling champagne” had a layer of yeast sediment in every bottle. This was not appealing to all tastes, needless to say! Before champagne could become popular, it needed to be more commercially acceptable.
Women’s (and men’s) work
Modern champagne owes a lot to one woman: Madame Clicquot. (Dom Perignon? Nope, he was an astute wine blender and oenologist, but the stories about him “drinking stars” are just good advertising copy. See the sidebar for the straight goods.) Nicole Ponsardin married a vineyard owner named Clicquot in Champagne in 1798. When he died seven years later, this shrewd, tough-minded woman took over managing the company. Under her hand, the process of removing sediment from bottles (remuage) was developed. The riddling table, necessary to speed the process, was also developed. She also worked tirelessly to develop export markets, even in the face of wartime blockades and Napoleon’s drive for a French empire.
These leaps forward, combined with other advances — such as an improved understanding of fermentation, increased knowledge of corks and the ability to measure correct sugar dosages — lead to low breakage rates and the superbly fizzy, sediment-free wines we enjoy today.
Your work
Ahh, glorious champagne, our companion at celebrations and important events. It christens our ships, welcomes our New Year and gently helps the caviar and oysters along the path to culinary nirvana. True champagne has no peer — and you can make it at home! If you’re adventurous and would like to do it yourself from the get-go, with the ease of use and consistent results you get from a wine kit, here’s how to do it all.
Important safety warning
You could always tell a champagne cellar master in the old days. He was the guy with one eye, no ears and a hook for a hand. A fully-pressurized bottle of champagne has enough internal pressure to turn a 750 mL bottle into a razor-flinging, vintner-shredding hand grenade. This is because the fermentation process creates tremendous pressure. Champagne bottles are subjected to over 90 psi (4,700 Torr) of pressure — three times the tire pressure of a 747 and up to five times the pressure found in beer or soft drinks! Only proper champagne bottles can be used to hold champagne. Any other bottle will shatter, causing a dangerous shower of glass shards.

Proper champagne bottles can take this kind of pressure. They are very heavy, made from thick glass and have a deep punt (indentation in the bottom of the bottle). They also have a lip to accommodate a crown cap (like a beer cap), with which they are normally sealed during secondary fermentation and lees ageing, and before disgorgement (more on this later).
A note of explanation here: This article is about the traditional method for making champagne by carbonating wine inside bottles with the addition of a dose of sugar equal to about 24 g/L (3.25 oz./gallon). Now, it’s possible to simply take a still white wine and artificially inject carbon dioxide into it, much the same as is done with commercial beer. This process involves much lower pressures, and thus smaller, thinner and lighter bottles can be used to contain this “sparkling wine.” These bottles are simply not sufficient for proper “methode traditionelle” champagne. Still not sure if they’re proper champagne bottles? AHHHH! Didn’t you read the warning above? Don’t use ’em if you’re not certain. Ask your wine kit retailer, and choose only those that are designed to hold proper champagne.
Choosing a base wine
Champagne is actually quite tart for a table wine. Next time you have a bottle of French Brut (dry) champagne, pour a half-glass in a heatproof measuring cup and microwave it until it boils for just a second. This will drive off the carbon dioxide gas. Cool it immediately and taste it. Ick! Ooh! Sour and sharp, champagne isn’t what you thought it was. However, with the carbon dioxide from the bubbles changing the flavor, that sharp tartness is transformed into blissful, creamy goodness. Those fizzy bubbles scrub the palate, changing flavor perceptions and making what would be a fairly aggressive still wine into a delicious carbonated treat.
With this in mind, you should avoid fruity, easy-to-drink kits. Many (al-though not all) kit Chardonnays are rather soft and fruity, with most of the structure provided by oak powder. They may not make the most appropriate sparkling wine. Any wine kit that comes with an F-pack (post-fermentation sweetener) won’t be a good candidate either. Such sweeteners usually contain enough sorbate to prevent the bottle fermentation. If they don’t, the yeast will merrily consume all of the sweetener, plus all of the sugar you add as well, and will over-carbonate the wine. (Go back and read the warning above.) If you were thinking of using an F-pack kit and leaving the pack out, be aware that those sweetening packs often contain more than simple sugar. They can also contain acids, grape essences and other flavor components, without which the wine may not taste very complete. So skip those kits and choose a dry, still wine instead.
Good candidates include Sauvignon Blanc, dry Rieslings and anything your kit manufacturer’s literature describes as “crisp” or “dry.” A favorite of mine for sparkling wine conversion is Ruisseau Blanc, which mimics the famous French wine Pouilly Fuissé. Ask your retailer for more advice, keeping in mind that the wine shouldn’t exceed much more than 11% alcohol to start. Also, oak is a no-no as it tastes awful in champagne. Take my word for it.
Necessary equipment
You will need thirty champagne bottles (see that warning), thirty wire hoods (for holding the stopper down), a wire-hood twister and either thirty crown caps or thirty plastic champagne stoppers. And, of course, you’ll also need the wine kit of your choice. You’ll also need a full-face safety mask, heavy gloves, a rain slicker and hat (yes, I’m serious). Finally, you’ll also need a bit more patience than usual for making a wine kit.
One word about crown caps: champagne bottles from different countries have different cap diameters. Double-check with your retailer that their stock of crown caps will fit your bottles and that they have a capper that will fit them onto your bottles. Often it’s easier just to use a plastic stopper.
Preparing the wine base
- Produce your 6-gallon (23-L) wine kit (white or rosé) in the normal way up to the stabilizing and clearing day. Do not add the sulfite or sorbate (the stabilizers). This is very important because these packages contain enough sulfite and potassium sorbate to prevent the wine from carbonating properly.
- On the stabilizing and clearing day, dissolve 1/4 teaspoon of metabisulfite powder in 1/2 cup (125 mL) of cool water and add to the wine. This amount will prevent the wine from oxidising, but will not hamper yeast during bottle carbonation. Add the fining agents, following the kit instructions. Remember: Do not add the stabilizers!
- Wait 10 days.
- Observe your wine. When clear (you may need to wait an extra few days or a week), it is ready to be made into sparkling wine. Don’t bother filtering it as it will go cloudy again in the bottle during the refermentation process.
Bottling
- Rack the wine from the carboy into a sanitized primary fermenter. Avoid disturbing the sediment. Make your tirage by dissolving 1-3/4 cups (325 mL) white table sugar in 2 cups (500 mL) boiling water. Stir thoroughly and gently into wine.
- Carefully rehydrate one package of champagne yeast (Lalvin EC-1118 is an excellent choice, but there are others), following these instructions exactly: Stir the yeast into 1/5 cup (50 mL) of water at 100 °F (40 °C). Leave it to stand for 10 minutes, then stir yeast thoroughly but gently into wine.
- Siphon your wine into the champagne bottles, leaving one inch (2.5 cm) of space at the top of the neck.
- If your champagne bottles accept crown caps, cap them now. Otherwise, insert plastic stoppers and wire them down using wire cages and a wire-twisting tool. Remember, using anything other than a proper champagne bottle could result in dangerous breakage: Do not attempt to use non-champagne bottles! (Go back and read the frightening warning again!)
- Store bottles on their sides at 65–75 °F (19–23 °C) for two months to carbonate. (While traditional champagne secondary fermentations are conducted cooler than this, field results with kit wine show that this can produce inconsistent results.)
Testing
Stand a bottle upright in your refrigerator for one week. Carefully de-cap the wine and taste it to determine if it’s finished carbonating. It should be delightfully fizzy and, while still quite green, it should show the crispness and palate-pleasing character of sparkling wine. You may now choose to go straight to the drinking process, or proceed on to the advanced stages of riddling and disgorging.
Drinking (the easy way)
If you don’t wish to go through the riddling and disgorging process, which is time-consuming and can be messy, simply store the bottles upright in boxes to allow the sediment to collect on the bottom. Wait two months for the wine to develop in flavor and chill before serving.
When serving, pour carefully, leaving the last half-inch of wine in the bottle, to prevent sediment from being transferred into your glass.
Riddling (remuage)
After two months, invert the bottles (place them cap down) in wine boxes to allow the yeast sediment to collect in the neck of the bottle. To assist this sediment formation, raise each bottle about 2 inches (5 cm), twist sharply 1/4 turn, then drop back into the box. This is called riddling, and it should be repeated once a day for two to three weeks. (When riddling, please wear gloves, long sleeves and a face shield or eye protection.) The inverted wine should then be aged for approximately one month, until it is completely clear.
Preparing your topping wine
Because the sediment collects in the neck of the bottle, you will be able to remove it. This is called disgorging. However, disgorging results in the loss of a small amount of wine, so it’s necessary to top up bottles to avoid low fill levels and oxidation. For your topping wine, choose something similar to your sparkling wine base and chill it; you’ll need between 50–100 mL (1/5–1/3 cup) per bottle. Ensure that the wine is thoroughly chilled before use.
In French champagne-making, sugar is added to the dosage. However, kit wines have much lower levels of acid than grapes from Champagne do, so adding sugar isn’t usually desirable. However, if you have a sweet tooth, check the sidebar for appropriate sugar levels. It’s a bit tricky to decide how exactly to get the right amount of sugar in each bottle when you aren’t exactly sure how much dosage you’ll need, so be prepared to accept a bit of variability.
Freezing
Remove the sparkling wine from the box (still inverted) and place in your freezer, inverted. If you’ve got room for a wine box in your freezer, this is easily accomplished. If not, carefully prop the bottles up with available materials: pizza boxes, caviar containers, bits of Jimmy Hoffa or whatever you happen to have.
Allow the bottles to chill. Monitor them frequently and, when ice crystals form a solid plug in the neck of the bottle, it is ready to be disgorged. (Do not allow bottles to freeze completely: They will break, releasing wine inside your freezer and causing your wife to belt you with a frying pan).
Freezing can also be done by immersing the neck of the bottle in a solution of ice and salt (brine), chilling the bottle thoroughly beforehand. However, the freezer method works well and very quickly. Just keep monitoring the bottles to make sure they don’t freeze solid.
Popping the cork
This is best done outdoors — or in a room where the walls, floor and ceiling can easily be washed — due to possible gushing of the carbonated wine. Please wear gloves, long sleeves and a face shield or eye protection and a rain slicker or poncho when handling the bottles.
- Remove the bottle from the freezer. Keep it inverted at all times.
- While holding the bottle upside-down, remove the crown cap or undo the wire and carefully pop the cork. The pressure will free the cork and push the sediment out of the bottle in one step. As it gushes free, cover the neck of the bottle with your thumb and turn it right side up. (You need a quick thumb and a dab hand to avoid losing much wine!) Do this once and you’ll see why we recommend doing it outdoors. By the way, our technical editor accomplishes this successfully inside his house by using a five-gallon (19 L) bucket set to catch the plug and ice, but my wife is having none of it.
- Once the sediment is ejected from the wine, top the bottle with your dosage (topping wine). Be careful to pour the topping wine down the side of the bottle to prevent foaming.
- Immediately re-cork with a sanitized plastic stopper. Wire down securely.
- Age your wine for at least a month before trying it.
Sparkling wine will improve tremendously with age. While it may be tempting to drink it all as soon as it is disgorged, try keeping back a few bottles for a year or more. You”ll be delighted with the results.

Wine kits contain all the ingredients you need to make a great wine, but the catch is that you have to actually make it. To get from a collection of ingredients to sharing a bottle of wine with some friends, you will need the proper equipment, an understanding of your kit’s contents and a feel for the basic steps and procedures for making wine. In this section, learn about the basic skills…

Nearly 700 wines made from kits were entered into more than 30 different categories and judged in the 2018 WineMaker International Amateur Wine Competition. So which kits made the best wines? Here are the top 100 scoring wine kits according to the judges.

