On April 17 learn early to mid-season grape growing techniques for your small-scale vineyard with “Backyard Vines” Columnist Wes Hagen. Register now to ensure a smooth start for your vineyard this spring!
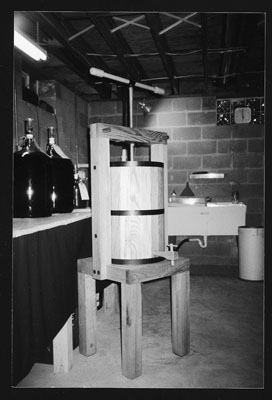
I live in the heart of a grape-growing region in northeast Ohio, so getting my hands on top-quality fruit is no probem. I’m also an avid woodworker and had a great time last year building my own crusher. I wasn’t content to stop there: A wine press, which presses the juice from the crushed grape pulp, was my next big project.
I like to build things that look old but are still functional. In other words, I wanted my winepress to have an antique feel, but I needed to be able to keep everything clean and sanitized. So I started by doing some research, checking out presses of all different styles and sizes. Then I figured out the plans and got to work. Here are step-by-step instructions.
THE LEGS
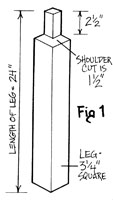
Start by cutting the 3-1/4-inch stock for the legs to length, 24 inches. You’ll need four of these. From the rest of that same stock, cut two more pieces to 36 inches. These will be your uprights. Now take the 1-1/2-inch-thick by 3-3/4-inch-wide stock and cut to length. Two pieces will be 20 inches long, and the other two will be 16-3/4 inches; with the legs, these pieces will be part of the frame. Take one leg at a time to the table saw. On one end of the leg, mark down 2 inches on two sides only. Set the saw depth at 1 inch. You will need to cut a shoulder on top of the leg. Run the leg back and forth until you have nibbled away all of this material. Do all four legs this same way (see Figure 1 for the finished leg).
THE FRAME
Take the 1-5/8-inch by 3-1/4-inch stock that you already cut out. Drill two holes in each end, big enough for a Number 6 drywall screw, and counter-sink these holes enough for 1/2-inch plugs. Place a leg behind the board you are about to drill to figure out where to locate these holes. Do the same with the other legs.
Take the remaining two pieces and join all four legs together using the drywall screws. Remember to use the waterproof glue on all of these pieces. Set aside to dry.
THE BREAD BOARD
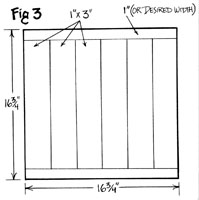
This piece will be 16-3/4 inches by 16-3/4 inches (or whatever the inside measurement of your base is). Using the 1-by-3-inch stock, cut these boards to length; in my case, they were 16-3/4 inches long. You’ll need to glue enough together to make this bread board 16-3/4 inches wide (see Figure 3).
Use the waterproof glue and clamp it, then set aside to dry. Go back to the base and cut some board to fit inside, where the breadboard will rest. These can be scraps. When everything has dried, cut the breadboard down to size so it fits the opening. Don’t force it in because you may need to remove it later for cleaning.
THE UPRIGHTS
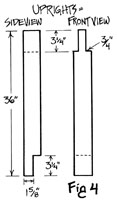
You will need only two of these for your press. Use the 3-1/4 inch-square material that’s left from the legs. Cut the length to 36 inches. On the bottom end, you’ll need to make a shoulder cut with the table saw. Set the blade height at 1-5/8 inches and measure up from the bottom of the leg 3-1/4 inches. Now nibble away the material a little at a time. When you’re finished, turn the uprights to the top. Again, measure down 3-1/4 inches from the top and set the height adjustment at 3/4 inches. Nibble away, but this time, do it on two opposite sides (see Figure 4).
After this is complete, you can attach the uprights to your base using the 1-inch black walnut or oak dowels. These uprights have to be attached very well. Drill two 1-inch holes through the uprights and into the base, using c-clamps to hold them in place. Glue and drive dowels in. Let set to dry. Repeat for the other side.
THE CROSSPIECE
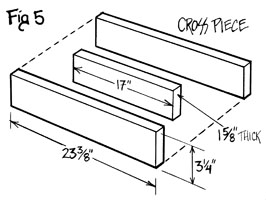
I glued up three pieces of oak, rather than cutting out the ends. You will need two pieces 3/4-inch by 23-3/8 inches long, and one piece that’s 1-5/8 inches by 17 inches long (see Figure 5).
After this piece has been glued and dried, set it across the two uprights to check the fit. If it fits well, go on to the next step, which is drilling one hole 1-inch in diameter in each end, all the way through the upright and to the other side. The 1-inch dowels will not be glued and need to be longer so you can pull them out later, because the crosspiece is supposed to be removable.
THE HARDWARE
You will need one 1-inch threaded rod 24 inches long, a matching nut, and a piece of steel that’s 3-3/4 inches wide by 8 inches long and 1/8-inch to 1/4-inch thick. Drill 4 holes 1/8-inch in each corner and a 1-1/8-inch hole in the center for the threaded rod. Weld the nut over the 1-1/8-inch hole, making sure the rod will go through fine. Take a piece of pipe that’s 1-inch inside diameter by 2 inches long and weld it onto the end of the threaded rod. This is where your 1-inch diameter handle will go through. Screw the steel plate with nut under the crosspiece, with the nut facing down (see Figure 6).
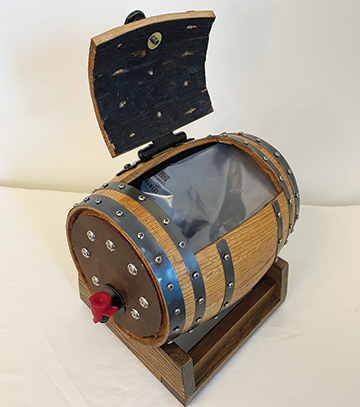
THE BARREL
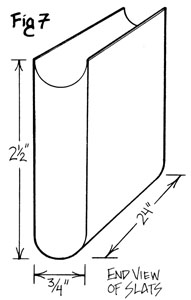
You’re going to cut 21 staves, each 2-1/2 inches wide by 24 inches long and 3/4-inch thick. You’ll need a router table, a 3/4-inch core-box router bit and a 3/4-inch bull-nose router bit. One side of the stave will be convex; the other side will be concave (see Figure 7).
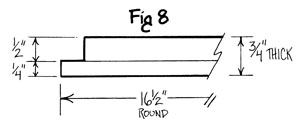
After both sides have been routed, make a 1/4-inch slot at one end of the slates 1/2-inch up from the end. This is where the bottom of the barrel will fit. Go about 1/4-inch deep. Now glue enough oak to make the bottom, at least 18 inches square. The finished circle has to be 16-1/2 inches round. Cut this out by any means you can; I like to use a router and a circle jig that fits on the router base. This cuts a perfect circle every time. Next, adjust the circle jig inward towards the center of the circle, about 1/4 inches. Rout around your circle, but only go half way down (see Figure 8). Now comes the fun part.
ASSEMBLY
An extra pair of hands will help with this part of the project. You’ll also need a ratcheting tie-down strap. Start to assemble the staves to the round base of the barrel. If you have a good fit, things will stay in place for you. When all of the staves are in place, put the tie-down strap around the barrel (you may need to use more than one strap). No need to use glue here—as you can see, the staves should stay in place very well. Tighten the straps a good amount. Now take some metal bands, like the ones lumberyards use to bundle lumber for delivery (that’s where mine came from). You’ll need a pop-rivet gun for this step. Wrap a metal band around the barrel. Hold the band as tight as you can, overlap the ends about 2 inches, then mark the band for length. Take it off, cut it with tin snips, and pop-rivet the ends together. I flatten the rivets with a hammer a little bit. Work the band down the barrel until you reach the middle. At this point you may need to tighten the tie-down straps a little more. Do the same step for the top and bottom bands, then release the tie-downs. This should complete your barrel for now.
THE SPIGOT
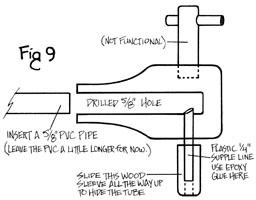
This was the most challenging part of the whole project. I wanted the spigot to have an “old” look, so here’s what I did. Start with a square piece of oak 1-5/8 inches square by 6 inches long. Turn this piece on the wood lathe until it looks like an old spigot (or any style you wish). Now comes the hard part: drilling the holes (see Figure 9).
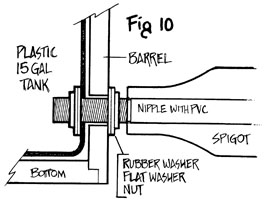
When drilling these holes use a vise and drill press for safety and to drill the holes straight. After this step you will need a plastic 2-inch nipple (buy 1 or 2 extra just in case). You need to drill the hole large enough to slide over the 5/8-inch PVC pipe. Using electrical box connector nuts, screw one on the nipple, then slide the nipple on the PVC pipe and glue the nipple to the pipe. Turn your attention to the barrel and plastic 15-gallon water tank. Set the tank in the barrel. With a drill and a 7/8-inch drill bit, drill through the side of the barrel and plastic tank about 1 inch from the bottom. With a rubber gasket and flat washer, assemble everything together. Tighten inside nut with pliers (Figure 10 shows a close-up view of the finished job).
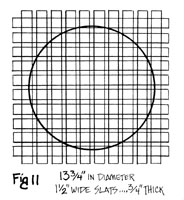
SPACER BLOCKS The final steps are the spacer blocks. The first one will allow the juice to run out of the barrel (see Figure 11).
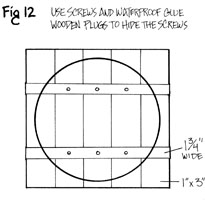
This is accomplished the same way as the barrel base, using the router and a straight bit. The next plate is the one that presses on top of the grapes. Make this the same way as the step above, but with one difference: This plate will be solid with no spaces between (see Figure 12).
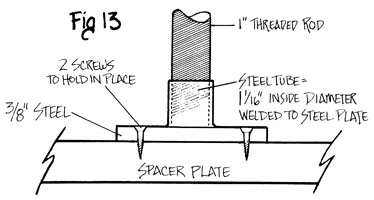
The only other thing to do for the spacer plates is to keep the 1-inch threaded rod in place (see Figure 13).
Now get some burlap bags, set them in the plastic tank and fill it with grapes. Fold the burlap over the top of the grapes, set the spacer plate on top, attach the crosspiece, screw the handle down and slowly apply a little pressure at a time. This press works great for me. Good luck making yours, and happy home winemaking!


 Go back to the base and cut some board to fit inside, where the breadboard will rest. These can be scraps. When everything has dried, cut the breadboard down to size so it fits the opening. Don’t force it in because you may need to remove it later for cleaning.
 These uprights have to be attached very well. Drill two 1-inch holes through the uprights and into the base, using c-clamps to hold them in place. Glue and drive dowels in. Let set to dry. Repeat for the other side.
 If it fits well, go on to the next step, which is drilling one hole 1-inch in diameter in each end, all the way through the upright and to the other side. The 1-inch dowels will not be glued and need to be longer so you can pull them out later, because the crosspiece is supposed to be removable.
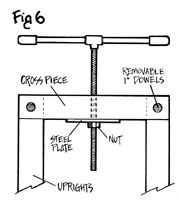


 After this step you will need a plastic 2-inch nipple (buy 1 or 2 extra just in case). You need to drill the hole large enough to slide over the 5/8-inch PVC pipe. Using electrical box connector nuts, screw one on the nipple, then slide the nipple on the PVC pipe and glue the nipple to the pipe. Turn your attention to the barrel and plastic 15-gallon water tank. Set the tank in the barrel. With a drill and a 7/8-inch drill bit, drill through the side of the barrel and plastic tank about 1 inch from the bottom. With a rubber gasket and flat washer, assemble everything together. Tighten inside nut with pliers (Figure 10 shows a close-up view of the finished job).