Wine To Go Layout
Every year I get together with my high school buddies for a reunion of sorts. We play golf, deal some cards, grill some steaks, and of course, drink wine. I have always had the responsibility for appropriating the wine for the group. This used to mean making a run to the local discount wine store and finding reasonably good wine at an affordable price. Now that I make my own wine, the expectation is that I bring my homemade wines to our annual outing. Since the location varies each year, it is frequently out of the state and requires a long drive — or often a flight — to get to that year’s venue. This poses a logistical problem on how to get my wine to the venue destination at a reasonable cost and without damaging the bottles. Unless you are a registered winery, shipping wine is problematic and full of restrictions. Even if I did ship the wine, the cost would be substantial due to the weight, and there is no telling how the wine will be handled in the process. This got me brainstorming on creating a container that I could pack my wine in for safe travel.
Since my latest gathering required flying, I decided to design a protective box to airline specifications. If you want to bring wine on a plane, while no airline will allow you to pack wine in your carry-on luggage, all the airlines that I looked into allow you to check the wine in. Most of the airlines are consistent in their dimensions and weights of the checked in luggage, before there is a surcharge. Most airlines measure the cumulative dimension of the package, by adding the length, width, and depth of the package. Most of the airlines require that check-in luggage dimensions not exceed 62 inches (157 cm) and a maximum weight of 50 pounds (23 kg), or you are charged a premium. Most airlines seem to be charging $25 per piece of checked-in luggage, assuming it meets the 62-inch, 50-pound (157 cm, 23 kg) rule. However, Southwest Airlines allows two standard weight and dimension checked-in pieces of luggage for free! The weight of a 750-mL bottle of wine is 3 pounds (1.4 kg) per bottle. With the goal of transporting a case of wine (12 bottles at 36 lbs./16 kg), this left me with 14 pounds (6.4 kg) for the case and packaging.
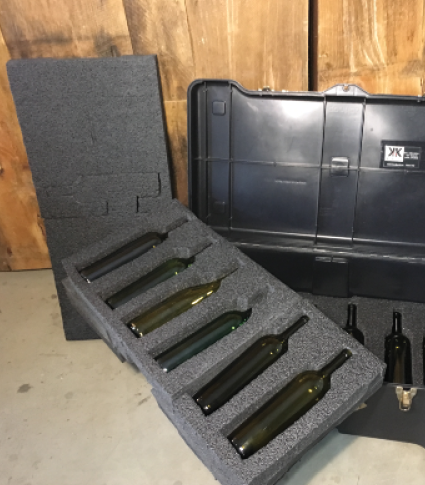
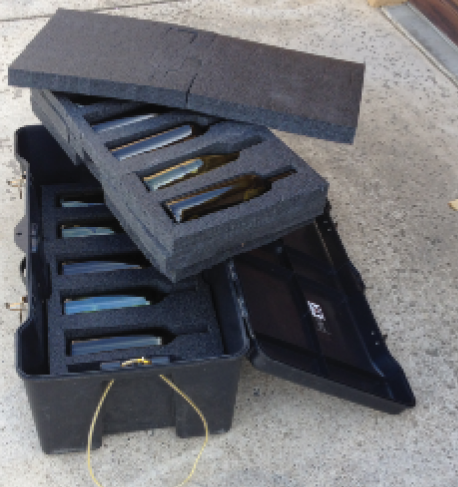
With this information in hand and the expectation from my buddies that I bring a sampling of this year’s vintage, I knew that I had to come up with a solution to this problem. I looked through the garage and found a large plastic case that was being used in my winery to store hoses, beakers, filters, and various other bits and pieces of equipment. I quickly found a cardboard box for those items and the plastic case became the base of my wine carrying case. The benefit of this case is that it met the dimensional requirements, has a hard shell, has wheels, and is lightweight.
Searching through the recycle bin at work (with permission), I found that we regularly threw away commonly used LDPE (Low-Density Polyethylene) foam pieces. The foam is firm, yet flexible, and could provide a snug fit for the bottles. The LDPE material is commonly used in shipping heavier products that require substantial shock dampening capability. The material can also be glued together relatively easily, so different shapes and thicknesses of discarded LDPE could be adhered together. I used one and a half inch thickness of this material, which is overkill, but it was available and free. If you want to build a box like this of your own, you can source the LDPE from Amazon, or try asking your local packing/shipping store where they source it.

Now, I have a container that meets the airport requirements of 62 inches (157 cm) and weighs a total of 47 pounds (23 kg), when fully loaded with twelve bottles of wine. The bottles are very secure and have protection that is far greater than is necessary. The first time I used the carrier, the agent asked what was inside and I told him it was wine. He asked if I would open it up so he could check it. He was so impressed, he showed the other agents. It was given the green light and the wine safely made it to its destination. If you can’t find a plastic case like mine, a regular suitcase could also be converted using the same materials. You could also convert part of a suitcase for wine and leave space for clothes. It’s just a matter of priorities!
To make my portable wine case easier to move around, I added rope and a handle that would allow me to comfortably roll the carrier behind me. The handle can tuck into the box if you’re checking it in at an airport (which airlines require). I am very comfortable that the bottles could withstand a 4-foot drop (1.2 m) of the carrier, in any direction. I’m not sure the outside plastic carrier would survive that kind of drop, but hopefully a few “Fragile, Handle With Care” stickers on the outside of the carrier will help my wine receive the care it deserves. This is a project that didn’t cost very much to create, but it does takes some time to collect the foam, glue everything together, and cutting the patterns out. I now have a case that I will be able to use for years to come wherever I choose to travel. As long as I continue to improve my winemaking abilities, I know my high school buddies will appreciate it too!
Materials
Low-Density Polyethylene (LDPE)
foam pieces
Duct tape for pattern
HDX Multi-Purpose spray adhesive
Plastic case or suitcase
Tools
Scissors
Serrated knife
Sharpie® marker
1. Make the Bottle Pattern

To make the pattern for the bottle in the LDPE, I used three overlapping strips of (checkered) duct tape on a non-stick surface. Holding a Bordeaux bottle over the tape, I traced the outline of the bottle on to the tape. I made the pattern narrower on the long sides of the bottle by 1/8th of an inch on each side, to assure the bottle fit snugly. Using scissors, I then cut out the pattern of the bottle. I found that the pattern for the Bordeaux bottle worked fine for a Burgundy bottle as well, even though the Burgundy bottle is wider in the bottom and narrower at the top than the Bordeaux.

2. Cut the Patterns Out
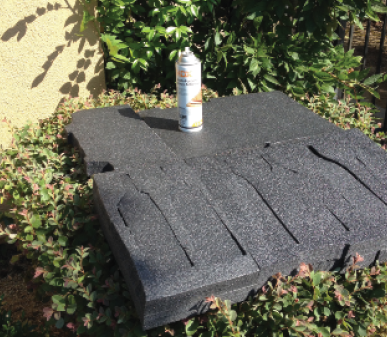
Multiple sheets were glued together to get 3 inches (7.6 cm) total thickness, which is the thickness of a wine bottle. I tried using a jigsaw, razor blade, and a hand saw, but what ended up being the best solution for cutting through the LDPE was a serrated steak knife. Use care when cutting, however, to make nice vertical cuts.
3. Glue the Sheets Together
I tried a few different glues to stick the sheets together; Gorilla glue, hot glue gun, and spray adhesive. I found that HDX Multi-Purpose Spray Adhesive, available at Home Depot, worked the best. Following the instructions on the can, I sprayed both sides and left them to dry for around 5 minutes. I applied light pressure, holding the sheets together until they dried. The bond is surprisingly strong.

4. Gluing the Bottom Layer
After the bottle patterns were cut out, I needed to glue a bottom layer on to hold the bottles in place and provide protection on the bottom of the case. I temporarily put the foam pieces that I had cut back in place, and then glued the bottom sheet to the layer with the patterns cut out. I was sure to remove the cut out pieces before the glue dried, which takes only a few minutes.

5. Fitting the Bottles in the Container
A little trial and error are necessary to give the bottles a snug fit in the container. This requires placing the bottle and seeing if any HDPE needs to be cut away to make space. It is better to take a little material off at a time and test fit, then to mistakenly take off too much material, so take your time.