Maximizing Cellar Space
Piggybacking on Bob Peak’s “Home Winery Design” story on considerations to design your own winery and cellar, I thought it prudent to also discuss ways to get the most from your winemaking space. As you have probably noted, there is a LOT to think about. Each winemaker’s situation is likely very unique to them and perhaps not all of the considerations presented apply due to what you might be starting with. They are, however, worthy of review regardless of whether you are just starting out, or you are thinking about improving or expanding your existing space.
Most of us are challenged to make the best use of an existing space that may also be shared with other household functions. To maximize the space we have, the primary points presented here are: Leveraging vertical space as well as placement and mobility of wine containers.
But before getting into these two primary points, a few words about using a space for wine production and cellaring. If you are handling containers with wine or transferring/racking wine between containers, there is a very high chance that at some point in time you are going to get spillage and wind up with wine on the floor. This may occur no matter how hard you try to prevent it from happening.
In my worst-case scenario, I had a bottle of wine that I was pulling off an upper rack fall onto a 5-gallon (19-L) glass carboy, causing both to shatter and spilling their contents onto the floor of the cellar. What a mess to clean up! I had to temporarily relocate most of the cased goods and aging wine to an outside location so I could squeegee and vacuum all of the spilled wine on the floor. Case in point, have a game plan for spillage. Consider these points:

• If you are in some sort of garage space with a concrete floor, consider getting that concrete sealed so wine does not stain.
• Do not store materials, especially cased goods that will be impacted by getting wet, directly on the floor.
• If your winery/cellar space does not have drainage for spillage, invest in a wet-dry vacuum for fluids.
• NEVER set glass carboys directly on concrete floors, especially if full, as even the minor impact of glass to concrete can break the glass. I use rubber material like an anti-fatigue mat to place carboys on.
• Make it easy to move your wine containers by the use of physical aids, such as pumps or lifts, and strategic vertical placement. This last point about moving materials is one that this article will pursue further.

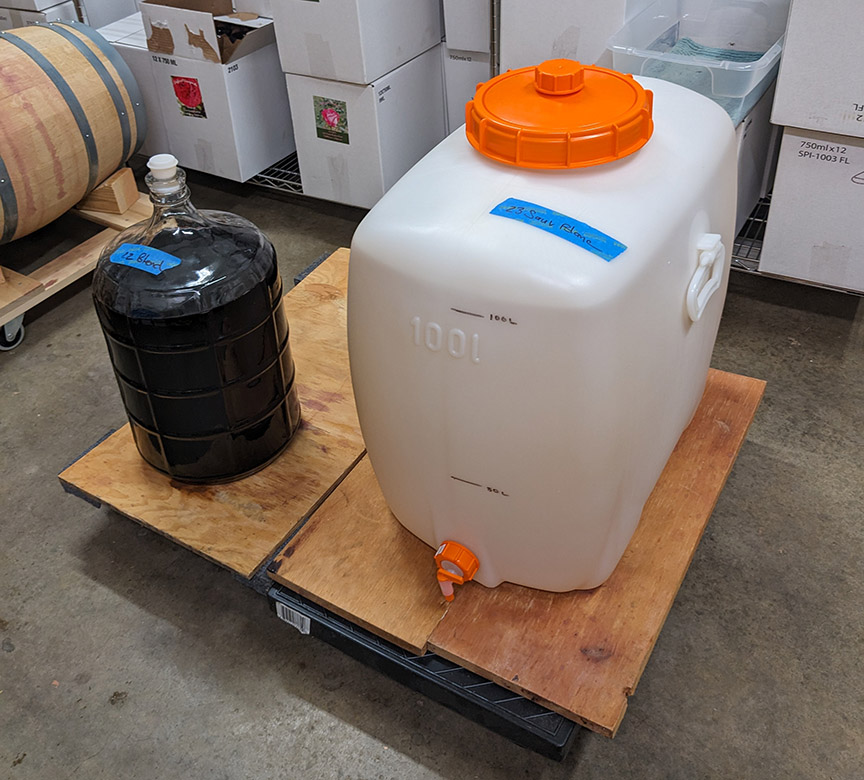
Whether you make 6 gallons (23 L) of wine or 200 gallons (757 L), you know that filled wine containers can be extremely heavy and difficult to move. Moving 3- or 5-gallon (11.5- or 19-L) carboys is pretty doable for most people, but a 6.5-gallon (24.5-L) glass carboy filled with wine is going to weigh about 70 lbs. (32 kg) and be much more difficult to pick up and move. When I have wine in carboys, I like to rack wine using a siphon instead of a pump, as this is much gentler on the wine and will minimize oxygen exposure. Therefore, I need to have the originating wine container placed higher than the receiving container. When thinking about storage locations of these sized vessels, whether it be glass or other material, keep in mind where these transfers are going to occur so you can minimize excessive handling of heavy containers.
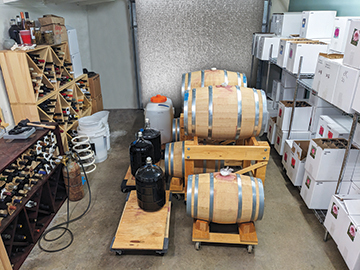
If you are going to deal with greater quantities of wine, and therefore larger (and heavier) containers, then lifting and siphon transfers are pretty much out of the question. Transfers with a pump are essential. For this reason, I store all of my production wine on flat dollies so I can move it in place for transfers, filtering, etc.
My winery/cellar space is 22 x 12 feet (6.7 x 3.66 m), which originated from an unused stall in our garage. This may be larger in scale than most home winemakers, but I make over 100 gallons (380 L) of wine yearly, with five different varietals from our estate vineyard. This space is dedicated specifically to winemaking and is used for post-fermentation production, cellaring of wines before bottling, and finished case/bottle storage. I need the flexibility of being able to move wine containers around depending upon the production step and access to a specific wine container. I therefore put my production wines on these dollies, with the exception of wine that I have aging in barrels. I probably have at least a dozen dollies on hand.
If you are going to store wine containers during the aging period on shelving, take into consideration that you will need sufficient space above the container to do transfers. You probably need about 3 feet (1 m) above a carboy to insert the racking cane. Otherwise, you will be moving wine containers to another location for transfers, then back to its storage location. And again, moving a 6.5-gallon (24.5-L) carboy on and off a shelf is very difficult and dangerous if it is made of glass.
As my wine production volumes grew over the last few years due to vineyard expansion, all of my red wines now go into small format barrels for aging. I have both 14.5-gallon (55-L) and 29-gallon (110-L) barrels. The concepts of mobility are even more important now, as having a barrel sitting at a static location is just not effective for making the best use of space. I looked extensively for a resource for a stand that the two barrel sizes could fit on and a way to move these heavy beasts around in a confirmed space. Ultimately, I had to get creative and use some basic woodworking skills to make my own solution.
I took both concepts of mobility and vertical storage in mind to engineer the racks. An image of the finished products in my winery space is shown below. As you might note, these were simply rolled into place for the photo.
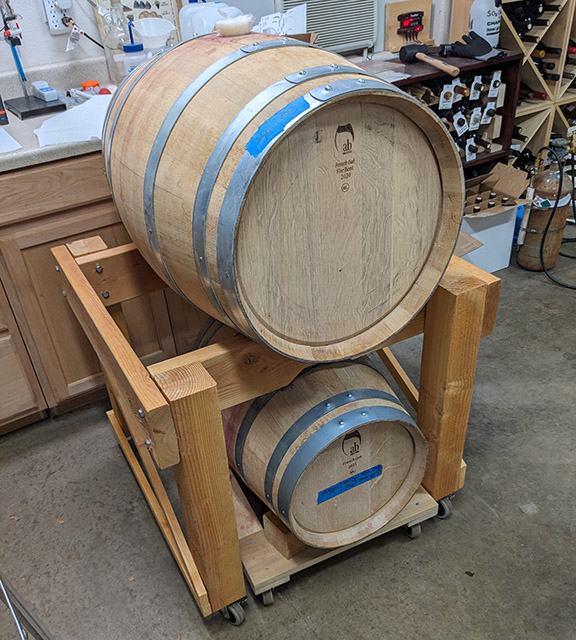
When I started using barrels I had just one 14.5-gallon (55-L) barrel, so the original design of the mobile rack was based on that barrel size. As my production volumes grew, I added the 29-gallon (110-L) barrel. I took the same rack concept and adjusted the dimensions for the longer and wider size requirement. The image and dimensions you see in Figure 1 are for the 29.5-gallon (110-L) barrel, but you can adjust them to fit your own barrel needs.
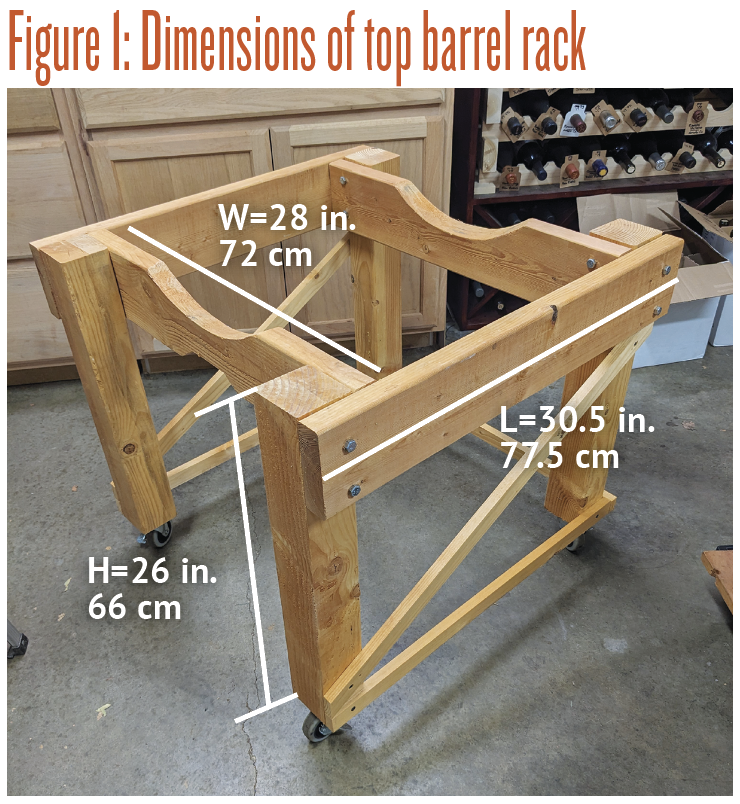
In the first design build I had to cut out a small section in the front 2×6 for the bottom barrel’s bung to slide underneath. The height dimension provided in the image increased the leg height slightly so that the cut-out is not required. Due to space constraints, I am not providing details of a complete build, assuming this is enough info and imagery to get you started. Also note that the barrels you use may have slightly different dimensions than mine, but chances are they will be pretty similar.
Basic woodworking skills are all that is needed. Probably the most important part of this is getting the 4×4 legs cut to the exact same length at 26 inches (66 cm). The same goes for the 2×6 length and width pieces. This will help things square up and also keep the legs from being tipsy on the floor. Because of the weights involved with full barrels, use at least 3-inch (7.5-cm) casters. Note that with the 26-inch (66-cm) leg height, the 14.5-gallon (55-L) barrel properly positioned on its mobile rack should be able to roll underneath the larger barrel and rack. Here is a little more detail to help with the build.
• To keep costs down, I used general framing lumber, but I made a point to select straight and unwarped pieces.
• Use 3⁄8 x 4-inch (0.95 x 10.16-cm) hex lag screws with washers to fasten the 2×6 pieces to the 4×4. Use 1⁄4 x 11⁄2- inch (0.635 x 3.81-cm) hex lag screws for the casters.
• The width dimension allows that corresponding 2×6 to fit inside the outer 2×6 lengths.
• Vertical placement of the lag screws for the outer 2×6 lengths are offset slightly to those of the interior 2×6 widths so that the four screws going into the 4×4 do not interfere with
one another.
• To give a little extra leeway for leveling and squaring things up, redrill holes for the 2×6 pieces slightly larger than those into the 4x4s.
• Fasten things loosely at first, then set the rack right side up on the floor to square things up and tighten all of the screws.
• You will need to determine the radius of the barrel at the point where the barrel will rest on the inner 2×6 width, and then use that radius to cut out the shape for the barrel to rest on. These dimensions of the rack have the barrel sitting at about the same location of the second hoop. It works best to first create a template of the radius cut out of cardboard. I did the added step of beveling that cutout with a jigsaw to match that of the barrel’s shape.
• If you build a similar rack for a 14.5-gallon (55-L) barrel, then the length would be 24.5 inches (62.2 cm) and width is 22 inches (55.9 cm).
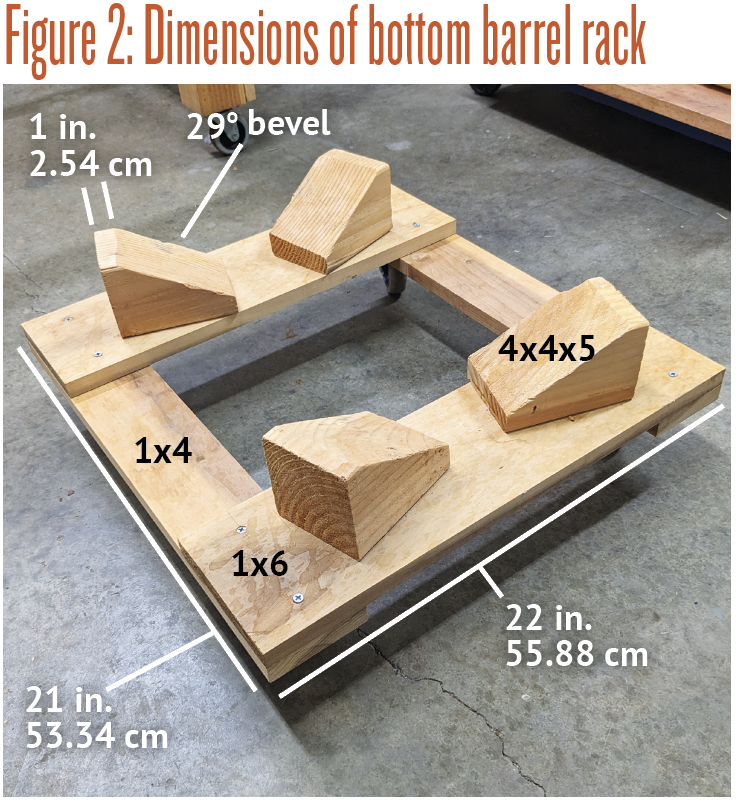
The 14.5-gallon (55-L) barrel rack that fits underneath the 29-gallon (110-L) rack is much simpler in construction (refer to Figure 2). I decided to use 1×4 and 1×6 pieces of poplar since the wood is a little harder than pine. Since there are no legs, there are no issues with squaring and leveling. The barrel sits on 4×4 blocks cut to 5 inches (15 cm) in length with another angled cut at 29 degrees for the barrel to sit on. These blocks are screwed onto the platform at an angle to coincide with the shape and angle of the barrel. 11⁄4-inch (3.2-cm) wood screws are used to put the base together. 21⁄2-inch (6.4-cm) screws are used for the blocks screwed from underneath. The 3-inch (7.5-cm) casters are fastened with 1⁄4 x 11⁄4-inch (0.635 x 3.2-cm) hex lag screws. It is important to place the blocks on the frame so that the barrel will be at the perfect height to fit underneath the upper barrel rack.
Going Up
The concept of nesting mobile barrel racks brings me to the point about making best use of open vertical space within the cellar. Most home winemakers are probably using some form of shelving for storage. Most of the shelving available tends to be stationary and sits in one place. However, I like the flexibility of mobile storage provided by restaurant-style wire shelving with casters. You can see these on the right side in the opening picture of this story.
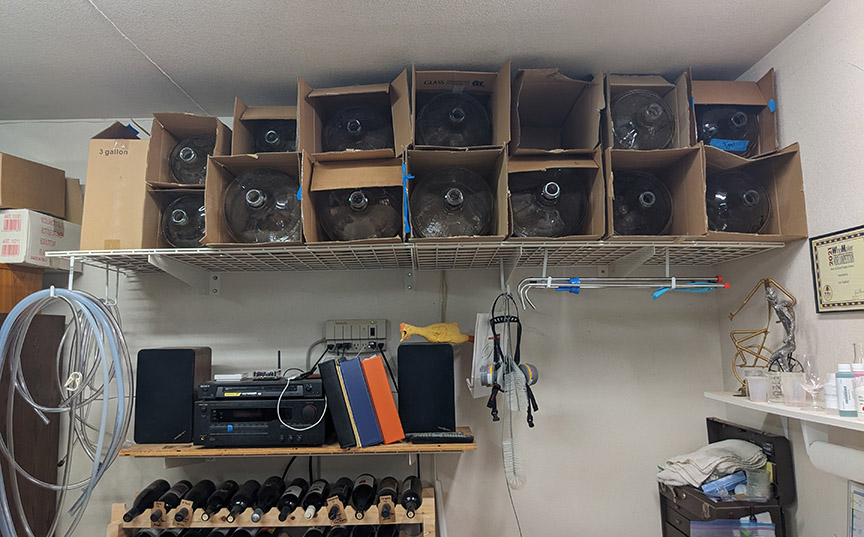
I also leverage available vertical space further with wall shelving placed near the ceiling. I’ve found that wire shelving is great for this and is readily available online. They offer shelving up to 24 inches (61 cm) in depth and rated for heavy weights. They also have handy attachments that provide hangers for other items like tubing and racking canes, as shown in the photo below.
I hope that I’ve offered some new insights to help with your winery/cellar design. Because everyone’s situation is unique, I understand that some specific ideas and solutions that work for me may not work for you. But the concept of mobility and vertical storage is one that should be in the forefront of every home winemaker’s mind when considering how to best utilize the space you have.