 Chocolate and wine are perhaps the most classic pairing in the world of wine. There is a plethora of ways that the flavors of chocolate and wine can complement each other, and there are almost unlimited combinations of the two with specific varieties and vintages matched to exotic chocolates from around the globe. Pairing chocolate and wine is so popular that there are books written on the topic and many wineries host chocolate and wine pairing parties to demonstrate how the properly selected chocolate will enhance their wines.
Some winemakers are taking the next step in this classic combination by infusing chocolate flavor directly into their wines. I first encountered chocolate wines when visiting a winery in northern New Mexico about a decade ago. When the winemaker was describing how the wine was made, I imagined chocolate milk but with wine in place of milk and I was all but certain that it would be terrible.
I could not have been more wrong. At its base, the wine was a well-balanced red blend complemented by a solid and palate-forward chocolate taste with a hint of sweetness. With this wine, the winemaker had been able to capture the essence of the chocolate/wine pair in a single package. Needless to say I bought a couple of bottles that day and have restocked my collection of these bottles numerous times since.
As my journey in home winemaking progressed, I began to wonder how I could make my own chocolate wines. I was especially interested in this question because I lean towards making dry, bold, non-grape fruit wines that pair quite nicely with deep, dark chocolates. My research into how to make chocolate wines led me to options ranging from adding cacao nibs during primary fermentation to adding chocolate bars into carboys after the wine had been clarified. I also found that there are many chocolate dessert-style wines available as kits, however those styles are different from what I sought to make. Unfortunately, none of my research provided a structure for the systematic evolution of chocolate infusion processes. So I developed a process, and hope you will find it useful in your chocolate winemaking endeavors.
Chocolate Sources
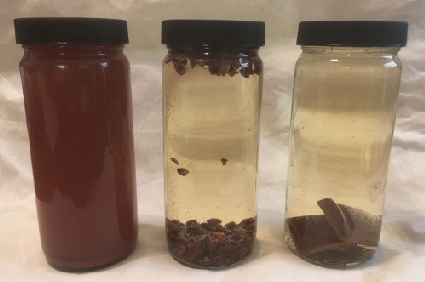
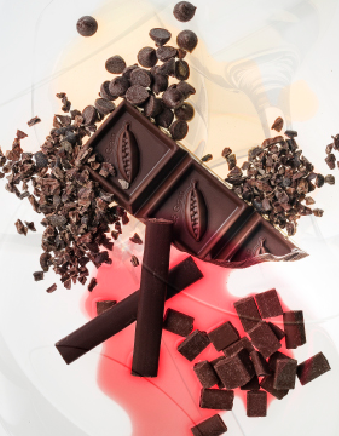
While there may be other possibilities to get chocolate flavors in your wine, the three that I have experimented with myself are cacao nibs, chocolate sauce, and chocolate bars.
Cacao Nibs
Cacao nibs are dried, de-husked, and crushed cacao beans and the easiest way to access raw chocolate flavors and smells. There are a number of commercially available cacao nib products, and they can typically be purchased in health food stores. Since sugar is not typically a part of the production of cacao nibs, they are quite bitter, but have strong chocolate bouquet and taste.
Chocolate Sauce
Commercially, there are a multitude of chocolate sauce options that can be considered for use in flavoring wines. Chocolate sauces are also easy to make, and making your own sauce allows for a high degree of control over the flavor not only of the sauce, but also over the eventual chocolate flavor and sweetness applied to your wine. A simple recipe I found for making chocolate sauce combines equal parts cocoa powder, granulated sugar, and water. Bring the mixture to a gentle boil and immediately reduce heat to a simmer for 15 minutes. A dash of vanilla can be added if desired. The recipe can be customized by changing the types of cocoa powder used as well as the ratio of cocoa powder vs. sugar.
Chocolate bars
Perhaps the easiest way to impart a chocolate flavor into your wine is to simply toss a chocolate bar into your carboy. Starting from the wide range of commercial chocolate bars to choose from, it is possible to infuse a huge variety of sweetness, bitterness, and cacao punch into your wines. Using commercial chocolate bars is limiting, however, in that you cannot change the flavor of the specific bar. In turn, this limits the quality of the chocolate flavor you impart into your finished wine to the flavor profile of the source chocolate bar. Customization can be achieved, however, by combining various amounts of different chocolate bars to achieve the desired flavor. My personal go-to for when I use this method is often a whole 3 oz. (85 g) bar of Endangered Species 88% cocoa and 1⁄2 oz. (14 g) of a Moonstruck 68% cocoa bar, but this will vary based on the type of wine and your personal tastes of what you are trying to achieve.
Choosing your chocolate addition
While you could make a batch of chocolate wine by throwing a bunch of cacao nibs into a 6-gallon (23-L) carboy of your most recent Merlot, doing so without first assessing how the nibs would impact the flavor of your final product is not the best place to start. Given the variety of sources of chocolate and the difficulty of predicting how much chocolate flavor will be imparted for a specific wine, the best way to approach this problem is through experimentation. Using small amounts of a chocolate source added to small volumes of wine for varying contact times will allow you to explore a variety of combinations without jeopardizing your entire batch. Additionally, rather than using your wine you could also use a commercial wine with a flavor profile similar to your wine for the testing process.
As with any experiment, key to the process is careful note taking. In this case, the main factors that need to be recorded are the source of the chocolate, the amount of the chocolate source added, the volume of wine it is added to, and the exposure time. I have found that 250 mL of wine makes for a good test volume, and it is relatively easy to find jars of that size for these experiments. Critically, the jar should have a tightly fitting screw cap or other closure that is as airtight as possible to ensure the wine is preserved during the exposure time.
When conducting a chocolate extraction test, as with everything else in winemaking, cleanliness is key. Start by cleaning the jars with soap and water and rinsing thoroughly. Jars should then be sanitized using a standard bisulfite solution (1 teaspoon of potassium metabisulfite in water) for 20 minutes and then emptied. If you are testing either cacao nibs or commercial chocolate bars, the desired amount of the nibs or bar should be added to the jar along with the potassium metabisulfite solution so that these items can be sanitized as well.
Once the jars and nibs/chocolate (if used) have been sanitized (or if you are using chocolate sauce, the sauce has been added to the jar) it is time to add the wine. Fill the jar as full as possible with wine to minimize air bubbles during the extraction time. If you are conducting multiple experiments simultaneously, make sure to label the jars in some way so that when you go to taste the results you will remember what conditions you used for each jar. Cap the jar with the lid and, if you want extra air protection, you can also tightly wrap the jar in plastic wrap.
Keep the jars in a dark place, such as a cupboard or cabinet, but take them out once a day to give each jar a gentle shake to make sure the contents of the jar are well mixed. During extraction, and depending on the wine you are flavoring, you may notice a slight darkening of the color of the wine. This will only be noticeable for white wines or lighter fruit wines, and is likely the result of extracting various pigments from the chocolate.
After enough extraction time has passed, it is time to taste your test wines. This should be done as you would taste any of your other creations — be sure to have a clean palate and observe color/clarity of the wine, bouquet and taste. All of these flavoring methods will result in suspended solids in your wine, and on the test batches you should be able to decant enough for samples from the extraction jars, provided you do not shake the wines for about 12 hours before testing. Once you have determined the right chocolate source, the right amount of chocolate, and the right amount of exposure time, you are ready to flavor a large batch of wine.
Determining what type and how much chocolate flavoring to impart to a wine will be a personal choice based on the desired characteristics of your finished wine. Do you want dry with a hit of dark chocolate? Do you want sweet with a chocolate-forward taste? These factors should steer your extraction experiments and selection of chocolate sources. Here are some suggested starting points for your experiments based on my experiences:
Cacao Nibs tend to impart a very strong and very bitter chocolate taste into wine coupled with a strong chocolate bouquet, and are probably not suitable for most wines. Big bold reds like Zinfandels and Cabernets, as well as sweet dessert wines like Ports are the exception to this rule and can stand up to the strong tastes of cacao nibs as long as the nibs are used sparingly. A good place to start here is to add 5–10 grams of cacao nibs to your 250 mL wine sample and allow for a two-week exposure time.
Chocolate Sauces are easy to make and provide a great deal of control over imparted chocolate flavors, although the wines flavored with sauces will require extensive filtration. Using 1⁄4 to 1⁄2 of a teaspoon of sauce in a 250 mL sample volume of a medium-body wine and a contact time of one week is a good starting point for this method. As pointed out earlier, you can easily tailor your sauce to impart the desired chocolate flavoring and sweetness by varying the core recipe of the sauce.
Chocolate bars are the easiest way to produce a chocolate wine. A good starting point is to use 0.3–0.4 oz. (8.5–11 g) of chocolate for one week to flavor 250 mL of a medium-body wine. Using a high cacao dark chocolate will impart more of a chocolate flavor with little additional sugar, while a lower cacao chocolate will add both chocolate flavor and sweetness.
Scaling up to a full batch
Scaling up is simply a matter of increasing the amount of chocolate source to match the desired volume of wine that you want to flavor. Use the same steps to prepare the chocolate source as described earlier and scale up the amount of chocolate and wine proportionally to combine in a jug or carboy. Keep this container in a dark area and remember to give it a stir daily.
Once the proper exposure time is reached, you will almost certainly find the need to filter your wine. This is because, no matter what chocolate source you use, some solids will be suspended in the bulk of the wine. These solids are residuals of your chocolate source, and typically have strongly bitter tastes that will lead to off-flavors being introduced into your wine. Filtering options depend on the chocolate source and batch size of your wine. If you are doing a smaller batch of a gallon or two (4 or 8 L) and using either cacao nibs or chocolate bars, the wine can be successfully filtered using a sanitized coffee filter. Larger batches or the use of a chocolate syrup will most likely require a commercial wine filter due to the need to transfer larger volumes of wine and to remove the smaller particles in the case of wines flavored with chocolate sauce. After the wine has been filtered, bottle as you would normally and enjoy!
Choosing Your Chocolate (sidebar)
With the wide variety of both wine styles and types of chocolate to choose from, determining which chocolate you should use to make your chocolate wine can be daunting. Probably the best way to start is to take a look at classic wine/chocolate pairings. There are a number of great resources you can use here, including the Wine Folly blog (www.winefolly.com), guidelines provided by chocolatiers such as Brix Chocolate (www.brixchocolate.com), or books such as Dare to Pair: The Ultimate Guide to Chocolate and Wine Pairing.
The type of chocolate and the amount used should complement your wine as opposed to overtaking it. Deep, heavy, dry reds like Zinfandel and Cabernet Sauvignon will need a strong chocolate flavor added to be able to compete with the natural flavor profile of the wine. As you move to lighter reds like Merlot, Chianti, or Pinot Noir, a lighter chocolate bar can be used. White wines will probably best be flavored by either small amounts of a dark chocolate if you want a dry final wine or a milk chocolate for a wine with some residual sugar. Keep in mind that you can always add more chocolate to the wine to increase the flavor.
Probably the easiest way to determine, at a glance, the intensity of chocolate flavor in a chocolate bar is to look at the percent cacao (or coca, depending on the manufacturer). High-quality milk chocolates will typically have 30–50% cacao while dark chocolates will usually have 60–80% or higher. Dark chocolates will also typically have very low sweetness, while milk chocolate will typically be sweet, and this sweetness will be conveyed to your wine during infusion.
I recommend avoiding chocolates containing extra ingredients like caramel or nuts for this process as these flavors will complicate, and possibly spoil, your final wine. As with any ingredient you use in your wine, the higher quality ingredients will result in a higher quality final product.
Chocolate Apricot Wine Recipe
I recently made a variety of chocolate fruit wines using the techniques described in this article. One of my favorites from this batch was a chocolate apricot wine that I shared with my extended family at a dinner party. I prepared the base wines using standard recipes, and after the wine had been completely clarified, I flavored 1-gallon (4-L) batches using a combination of 88% cacao and 68% cacao chocolate bars to balance desired sweetness and chocolate flavors/aromas.The process I used is as follows:
1. Thoroughly clean a 1-gallon (4-L) glass jug.
2. Add a 3 oz. (85 g) chocolate bar containing 88% cocoa and 1⁄2 oz. (14 g) of a chocolate bar containing 68% cacao.
3. Fill the jugs about 20% full with a standard potassium metabisulfite solution and agitate the contents periodically during a contact time of at least 20 minutes to sanitize both the jug and the chocolate.
4. Pour out and discard the potassium metabisulfite solution.
5. Fill the jug with apricot wine and cap with an airlock.
6. Allow the wine to stand for one week, stirring thoroughly once per day.
7. Clean and sanitize a second 1-gallon (4-L) jug and sanitize a funnel and coffee filter.
8. Filter the extracted wine into the second jug.
9. Bottle wine following your typical bottling regimen.
