 How can a professional viticulturist walk into any vineyard, look around for five minutes, and understand all the problems, deficiencies and areas to be improved while I see a vineyard that looks just fine?
Context and experience. That’s it.
The bad news:
• It takes skill to see emerging problems. There is no substitute for 20 years of farming sense.
• Most obvious problems in the vineyard are beyond repair, at least this year. Mildew and rot, once visible, usually produce defective wine.

• Neglected vineyards make bad wine — backyard or commercial. If you want a vineyard to see out your back window, move next to a vineyard. Vines make terrible landscaping—unless you love to see mildew-coated leaves in summer.
The good news:
• You will learn and make better wine every year. Farming winegrapes is the greatest skill in a winemaker’s repertoire. Nothing impacts wine more than observation skills in the vineyard.
• Growing grapes will teach you more about winemaking than working in a cellar. Be honest: Cellar work is moving liquid from one vessel to another and doing dishes. The real heroes of winemaking rarely see a carboy or barrel.
• You can travel, visit vineyards and wineries, and tell your family it’s related to your vineyard. Exploit the fact that you have a home vineyard by using it to plan your excursions and vacations. If your spouse complains, mention the fact that you are committed 100%, and what’s wrong with commitment?
• There are cultivars being released every year that make better wine in many regions of North America. Don’t always try to grow Cabernet or Pinot Noir. Norton and Chambourcin make better wine in some places.

• The Internet makes study and travel easier than ever. Enter something from my articles that you don’t understand into Google, and then click “images” to see all the pretty pictures we couldn’t fit into this column.
• The vines don’t know if you’re a pro or an amateur. If you do the right thing, they will respond. Vines adapt and are hard to kill. That’s a nice way of saying you have another chance next year to make great wine.
The thesis:
Diagnosing vineyard problems requires far more skill and experience than most backyard viticulturists possess.
The hard solution:
Study viticulture and visit vineyards at least ten times a year for ten years and you will begin to be professionally competent and vineyard problems will become visually obvious.
The easy solution:
Do your best to pre-balance your vineyard with modern design, irrigation, fertilization, care and hard work. Then as each problem, disease or pest arises, learn how to work through and improve the issue, make a notch on your belt, and get ready for the next problem.
This is sequential, problem-solving, home viticulture: The subject of this issue’s “Backyard Vines.”
Head problems off at the planting pass:
100 hours minimum in study: If you plant a vineyard without at least 100 hours of careful and devoted study, reading, taking classes, visiting local growers, etc. expect to add 100 hours of hard work for every hour of study you neglected. That means if you do zero study, expect an additional 1 hour a day per home-sized vineyard (or 10,000 hours over a 25 year span of the vineyard’s life) to fix the problems that could have been addressed by planning and education. Smart decisions in planning will save enough time in farming that you can expect to carefully farm a nice backyard plot in a few hours every weekend, and 3-4 weekends a vintage working 8-12 hours.
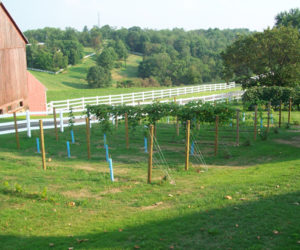
Trellising matches vigor: If I am consulting on a vineyard and time is not an issue, I suggest growing a few vines throughout the backyard and seeing how they grow for a year. If the vines show low vigor (less than 3 feet/0.9 m of cane growth), I suggest a vertical shoot positioned trellis, or VSP.
With medium vigor 3-6 feet (0.9-1.8 m) of growth, I recommend a wider spacing between vines on VSP and maybe a kicker cane added to permanent cordon arms to allow a little more crop. For high-vigor soils/climate, quadrilateral/split canopy trellises are suggested, which can get complicated and expensive, but pay off with larger yields.
Grow what belongs on a proven rootstock: My suggestion is to go grow the varietal/rootstock combination that makes the best wine close to your house. If you have lots of extra money and sanity, try to prove that you can grow Pinot Noir in Virginia. But if you want some return on investment that is in potable form, follow the successes in your locale. Taste with as many local winemakers and growers as possible, bring them booze and salami, and ask as many questions as you can. Every successful query means another few hours saved from unnecessary tweaking from poor vineyard layout.
Stay one step in front of mildew/rot: I’d say 90% of failures in home winemaking come from poor spray scheduling and mildew/rot in the fruit. Keep your fruit zone as open as the sun/sunburn allows, and never have more than one leaf layer between the sun and your fruit. Make sure your fungicide sprays are actually penetrating your canopy and providing efficient coverage. You may need to look into a sprayer that gives better pressure and gets the materials into the vine’s interior. Never use a greater concentration of material than is suggested on the label. It will not improve efficiency or solve existing problems. Learn from last year: If you had a mildew infection in June, make sure to spray heavier in May. Proper fungicide application begins at 4 inches (10 cm) of new growth, and continues through bunch closure, or in some regions, veraison.
The toolbox of detecting vineyard problems:
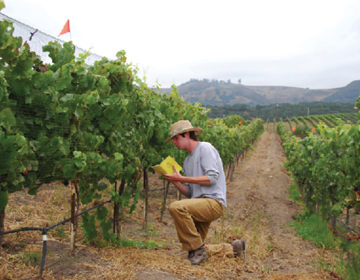
Eyes: Vines can tell you most of their needs by color. Green is healthy, yellow can be problematic early in the season, and if the vines turn red before they are going to sleep, that is usually an indication of virus. Grapes also change color as they soften and ripen as a visual indicator of ripeness to birds. The moment grapes turn red or golden, the fruit is palatable to an animal and the seed is viable to be spread. You can use your eyes to check the angle of a leaf blade to its stem, check growing tips and tendrils, dig to root level and observe irrigation efficiency, and the list goes on. At least 90% of vineyard management is visual.
Nose: If you smell volatile acidity, vinegar or a sharp, acrid aroma, then you may be smelling bird or insect damage in your own vineyard, especially on warm summer evenings. Some insects can also be smelled in the vineyard (or in the wine, eww!). Smelling your vineyard may also allow you to detect certain weeds or cover crop (such as wild fennel, wildflowers, etc.), and if you pay attention you can even smell the vineyard in flowering — one of my favorite aromas on the planet. Most grape flowers smell of orange blossoms and jasmine/honeydew.
Ears: On warm, summer evenings I can catalog the insects in my vineyard by the noises they are making. Even though that rarely impacts my farming practices, I like to know what’s crawling around. I can also hear birds as they flutter in to steal fruit, owls screeching, coyotes crying, and my guard dog howling. The sound of critters chasing one another is music: it means they are distracted from the crop of grapes. Listening is rarely used to detect problems, but the sounds of the vineyard are another world to experience and enjoy.
Home lab: A pH meter, a magnifying glass/microscope and a refractometer is all the lab equipment I keep on the vineyard. None are good for detecting problems, except for the microscope, which can be used to identify small insects and can
also give me a better look at odd leaves or other mystery finds in the vineyard.
Proper lab: This is the most important tool that you have besides a pair of trained eyes. Unless you are a trained agronomist and lab geek, you probably don’t know how to run a proper petiole analysis or a soil test. Having a lab that accepts grapevine tissue for analysis, as well as providing soil and water tests for suitability in winegrape production, will take a lot of pressure off you. You do not have to be an expert. Instead you have to be just savvy enough to recognize that there is a problem, take a proper sample and send it to experts for analysis.
The library: The combination of the Internet, magazines, and published books will serve you well. Every home winegrower should have one of these two books: UC Davis Grape Pest Management 2nd Edition. This is California-based, but covers most pests and diseases. A new integrated pest management (IPM) guide is out for the eastern US called: Pocket Guide for Grape IPM Scouting in the North Central and Eastern US that looks great as well — big pictures and very easy to use. Everyone needs Dr. Richard Smart’s Sunlight Into Wine — it changed the world of winegrowing more than any other book ever published. If you want more suggested books to read, check out the story “The Winemaker’s Library” from the April-May 2014 issue of WineMaker.
Important lab analysis:
• Soil suitability testing for varietal winegrape production (16-32 inches/41-81 cm depth before planting, and 12-24 inches/31-61 cm once every five years after planting.)
• Petiole sampling for nutrient status. (Only test leaves adjacent to flowering clusters, and take the sample carefully according to lab instructions/chain of custody.)
• Water suitability testing for varietal winegrape production: Once before planning the vineyard (first thing to do before making the final decision to design a vineyard), and then once every 3-7 years to check for changes.
What each part of the vine can teach us by observation:
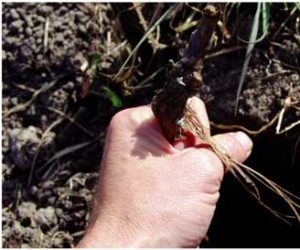
Trunk: Trunk diameter shows vigor. Make sure the graft union does not get buried, or scion rooting will occur. Try not to girdle, cut or hit the trunk with a mower or trimmer. Multiple suckers emerging from a trunk can show a spring vine’s water status and nutrient status. The more water and nutrients, the more suckers we would expect to see.
Growing tip: A vine in vegetative growth has tendrils that reach out further than the growing tip. When the tendrils pull back behind the growing tip, vegetative growth is slowing, and fruit ripening is beginning. Tendrils beyond the growing tip also show good water status in the vineyard during spring and summer.
Leaves: Dusty green and no larger than a man’s hand shows proper nutrient status and moderate vigor. Huge, shiny fan leaves mean an abundance of nitrogen. Also, the leaf blade should hang on the stem or petiole at a 90-degree angle. If the angle shrinks (acute), water status is low to deficient. If the turgidity forces a slightly obtuse angle (90 degrees +), the vine has more water than it needs.
Clusters: Should be clean throughout the season. Cap fall (at flowering) should be consistent and fairly swift. Clusters should be consistent from vine to vine. In a perfect world, every berry in a vineyard would be within 1-2 °Brix at harvest. This can be achieved with balancing each vine to hold 1 cluster for every 12 leaves.
Tendrils: Long tendrils mean healthy water status and a strong inclination to grow vegetatively. Pay attention to the delicate tips of young spring tendrils and shoots. If they brown and wilt, that is early-season Botrytis, and some copper or other fungicide should be applied.
Categories of vineyard problems to be detected:
Vigor: Does the vine have the health and vigor to make it through the season and ripen its crop? If the vine is overly vigorous, try to cut down water and never fertilize. If the vineyard is stunted, add a few gallons of water per week until water status looks better, and fertilize with a half cup of 15-15-15 fertilizer at budbreak, flowering, and veraison. But only use fertilizer on a struggling vineyard! Again, proper vigor is expressed by a 12-15:1 leaf to cluster ratio and your crop from one vine should always weigh between 5-10 times more than the material pruned off the same vine in winter.
Pests: Weeds, Japanese beetles, birds, mildew, Pierce’s Disease, deer, badgers, black rot or baboons. They all have one thing in common. We’d prefer they not show up on our vineyards. If something is eating, infecting, pestering or otherwise impinging on your viticultural contentness, find a way to balance, spray, confuse, or destroy the pest. Each pest has special controls, and most can be determined locally. Encourage diversity so nature keeps everything in balance by herself. That way you can watch the World Series while the feral cats eat the gophers.
Equipment: Still getting mildew with all those sprayers? May not be the sulfur — it may be the sprayer! Having top-notch vineyard equipment makes farming a pleasure. Make sure your clippers, loppers, sprayer and harvest equipment stay in good shape and they are providing proper efficiency.
Environmental: What about Louisiana humidity? Or Arizona heat? There are environmental factors that I cannot describe that are going to make grape growing tough. If others in your area are getting through the heat or the stickiness, they can likely help you learn to do it too. It’s always best to grow grapes where getting a harvest isn’t a miracle, but I do really respect those that coax deliciousness from inhospitable climes.
In the end:
1. Identify the problem. Take a picture, look it up in a textbook or try to find it on the Internet, or I recommend you post it to local winegrowing bulletin boards, or even on reddit.com/viticulture (I moderate it). Once you know the name of the weed, or the bug, or the type of mildew, go to step two:
2. Use your references to learn about the life cycle and potential controls/balancing of the pest. Remember that some pests are better managed than nuked — my mantra is to use the gentlest method to get meaningful control. Use the books I suggested, trustworthy Internet sites, and utilize the local winegrape growing community as often as you can.
3. Carefully record your attempts to identify, clarify and treat each issue, and carefully record whether each practice was successful and how it was timed. That way if you fail, you can scratch that methodology off your drawing board and return to frustration knowing the answer is growing closer.
Once you have your site selected, soil figured out, as well as irrigation; it’s time to start planning things like row and vine spacing, what type of wine grapes you are going to grow, and then finally what trellis system will best support those vines.
Grow your own grapes? Thinking of starting a backyard vineyard? Now is the time to plan your spring. Here is a list of suppliers where you can purchase grapevines and/or supplies for your home vineyard...

