Lifespan of a Wine Barrel
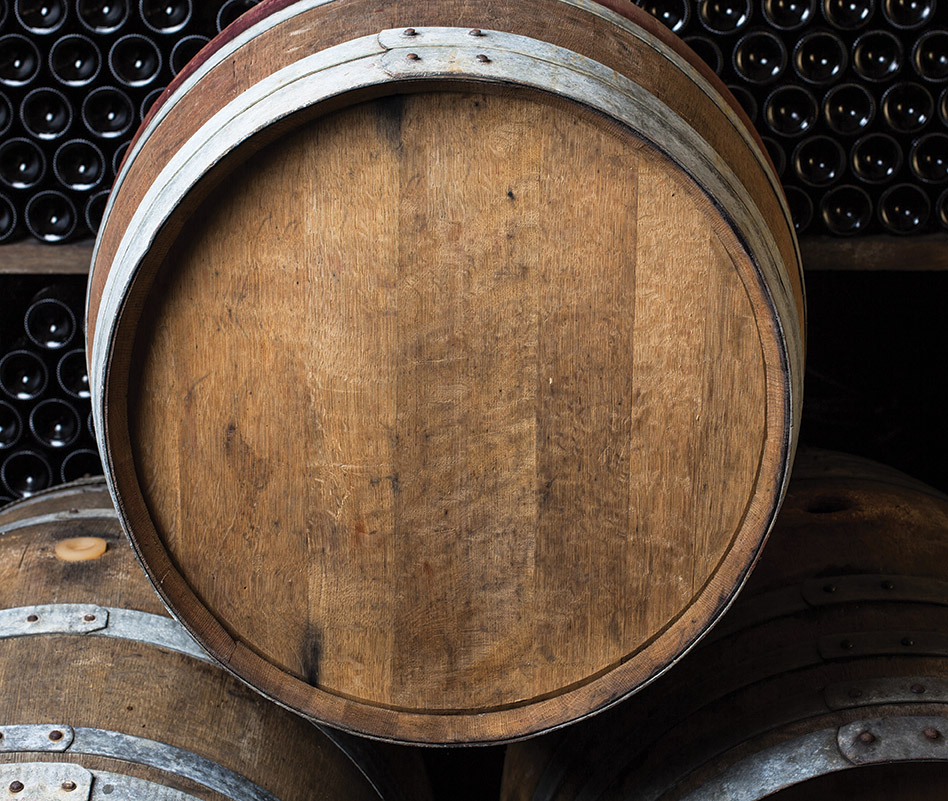
A barrel made of oak wood has been the preferred container for aging wine for hundreds of years. This remains true today despite modern advances in plastic, concrete, and stainless steel. Barrels maintain their popularity even though they are expensive, clumsy to handle and move about, and perishable. That last point — that a barrel “wears out” over time — is a key to its enduring appeal. A barrel not only contains wine, but contributes to it by giving up some of its own components to the flavor and aroma of the aged wine. Let’s take a closer look at what barrels contribute, how long these contributions continue, and what you can do with your barrel when it becomes neutral.
Many factors play into the lifespan of a wine barrel. Key characteristics include the type of oak used, the degree of toasting applied, and the size of the barrel. European oak forests contain two types of oak trees that are commonly harvested for barrels: Quercus robur and Quercus petraea (and both have several synonym names). The prominent oak species used for barrels in North America is Quercus alba. All are considered varieties of white oak and exclude the more porous red oaks that would produce much less effective containers for wine. While the white oak barrel woods are similar, there are some differences that influence wine during aging.
Choosing a barrel
All wine barrels allow for some evaporation during aging. Depending on humidity, temperature, and air circulation, different ratios of water and alcohol will be lost. At the same time, small amounts of oxygen are introduced into the wine while it is stored in a barrel. The micro-oxygenation contributes to the polymerization and “softening” of tannins and helps bring about a mature wine profile. When you choose a new barrel for your home wine program, the choice of American or European (French, Hungarian, or others) will probably be your first big decision. Some grape varietals are most often associated with French barrels and others with American, but — as with so many decisions in winemaking — it ultimately comes down to your personal taste. Try wines from producers you like for which you can get barrel information, and go from there.
The next big decision is size. Of course, there are practical considerations like whether it will fit through the door of your cellar, but equally important are the ways wine reacts in a given barrel size. In Concepts in Wine Chemistry, Dr. Yair Margalit cites the dramatic difference in surface-to-volume ratio for different sized barrels. A 20-liter (5-gallon) barrel presents 214 sq. cm of wood surface for every liter/quart of wine, while a 200-liter (53-gallon) barrel offers only 99 sq. cm per liter/quart. (The most common barrel size in North American commercial wineries is 225 liters/60 gallons, but many sizes are available). With twice the surface area for its volume, the small barrel presents more extractable material to the wine inside. As a result, it will either impart the same amount of extract in a shorter time, or more intense “oaky” extract if left for a standard time. About one year of barrel aging is common for many commercial wines, but that choice is also subject to personal preferences (and economic realities).

Treating the barrel
Regardless of the size, when you are ready to place your new barrel into service you need to soak it up. While they are checked for water tightness at the cooperage where they are made, subsequent storage and transportation may allow barrels to dry out and shrink slightly. Filling with clean, odor-free water (hot water works faster) will swell it back up and restore a tight fit before you put your precious wine in it. Transfer the water out, place the barrel in a bung-down position, and let it drain for a few hours before filling.
Reaping the early benefits
Once the wine is in the barrel, it begins extracting the components wine drinkers think of as “oakiness.” Descriptors like vanilla, toast, and coconut are often applied to barrel-aged wines. Most of the extracted materials are in a family of chemicals known as phenolics, as their structures are based on the fundamental building block, phenol. Among the phenolics are volatile (aromatic) compounds like vanillin, and mouthfeel phenolics like tannins. Some of the volatile compounds arise from initial breakdown of lignin in the oak wood during toasting, while the tannins come directly from the roughly 5 to 10% content they make up in the dry weight of oak.
Estimates vary, but Margalit cites an amount of 300 mg/L of phenolic compounds extracted from a new, 225-L (59-gallon) barrel in one year. One experiment he cites involved filling new French and American barrels with Sauvignon Blanc wine for three months, then emptying and filling again with fresh Sauvignon Blanc for another three months. The wines were subsequently analyzed for tannin content, with the original white wine very low in native grape tannins. Extraction of barrel tannins in French oak went from over 140 mg/L in the first fill to less than 80 mg/L in the second. The American barrel went from about 50 mg/L in the first to only about 35 mg/L in the second. Regardless of barrel size or wood source, dramatically lower extraction comes from subsequent fills. The late Byron Burch, my one-time business partner in The Beverage People home winemaking store, always advised a rule of thumb to avoid over-oaking with a new barrel: Store the wine about one week per gallon (4 L) of capacity. Naturally, as seen from Margalit’s figures, that time may need to be extended in repeat uses.
Because a new barrel quickly gives up lots of extractables, be sure to taste and monitor new wine in a new barrel. If you think you may be getting close to as much oakiness as you want, have another trusted taster verify your conclusions. As the oak level rises in the wine, your palate may adjust to it and fail to notice when it is going too high. To take your wine out of a new barrel before it has had sufficient bulk aging to stabilize and clarify, you will need an equal volume of neutral storage containers like a stainless steel tank, or glass or PET plastic carboys. In future vintages, or if you have another wine standing by, you will be able to leave wine in the same barrel for a longer period.
After the first use
The best way to keep a barrel is full of wine, but if you must take the wine out before you have another batch, you need to conserve your barrel. Generally, this means either storing it wet with acidified sulfite solution or dry after burning sulfur in it. For how-to details, refer to the article “Barrel Care Techniques” by Daniel Pambianchi at https://winemakermag.com/technique/barrel-care.

For commercial use, barrels are considered used up (described as having gone “neutral”) after four to six years. This general estimate is for standard 225-L (59-L) barrels and includes a full year of aging each time. At home, you may be using smaller barrels and refilling more frequently than once per year. My small barrel program is based on hectoliter, or 100-L (26-gallon) barrels. I have one French oak barrel I have used just once so far, an American oak barrel I have used about five times, and another French oak barrel that I have owned for 20 years and used more times than I can recall. While that last one is currently stored dry as a reserve in case I make more wine in any one year than I expected to, I keep it on hand in good condition. In 2014, after I had already used the barrel seven or eight times, it was set aside in dry storage. I happened upon a larger-than-expected lot of Sonoma Valley Cabernet Sauvignon grapes and, of course, made the wine. Upon pressing, I needed somewhere to put the wine and my only stainless steel tank was full of Chardonnay. I soaked up the old barrel, repeatedly filling it with unchlorinated well water. It took four days, but it eventually sealed. I considered it neutral by then, but it retained its value for storage and for the benefits of micro-oxygenation. I put the wine in it and began tasting once every couple of months. Much to my surprise, a pleasant oakiness began to emerge. After nine months in the barrel, I bottled a delicious wine with subtle but detectable oak-aging characteristics (and went on to win a gold medal with it). That taught me that although “four to six years” may work well as a practical guideline for commercial wineries, you shouldn’t count out an older barrel as long as it is mechanically sound.
That soundness — basically it doesn’t leak any more than a few dribbles — is the real mark of continuing utility in a barrel. Yes, it was expensive to buy in the first place. But now that you have it, even if you have added newer barrels for more oakiness to your program, that older barrel can be a very economical wine tank. You already own it, you have gotten the expected contribution to your wines from it, and you now have a container that requires only occasional maintenance to keep it on hand for any wine storage needs. You can even use oak alternatives like sticks or staves for oakiness while the barrel provides the micro-oxygenation. If you don’t use that extra barrel every year, I recommend dry storage since it can be held longer with little effort.
If an older barrel develops slight leakage but you want to keep it, there are a few techniques you can try. For small round holes (usually caused by boring beetles), you can purchase little oak cones called “spiles” that look like small golf tees. You drive the spile into the hole, then cut off and sand down the part still outside. For a weeping leak along a stave or at the junction of a stave with the head, you can apply barrel wax. This paraffin wax comes as a small block wrapped in paper. With the barrel empty, you need to get the area of the leak hot enough to melt the wax. You can use a heat gun or, as I do, gently heat the area with a propane hand torch. When it is too hot to touch, but not scorched, quickly rub the block of wax on the troublesome area. The heat melts the wax, the liquid wax soaks into the wood, and — usually — the leak is fixed. The wax is quite neutral and has no effect on subsequent batches of wine. For more specifics on repairing barrels, check out the second sidebar on page at the end of this story.
It is also worth noting that barrels, especially the 225-L (59-gallon) ones, are often “recoopered” after their initial lifespan of use. Specialized coopers buy the “neutral” barrels from wineries and grind or shave off the wine-soaked wood from the interior of the barrel. They may do that by completely disassembling the barrel, planing the wine-exposed surface, and assembling and toasting an essentially new barrel. Other techniques include removing one head and grinding the interior barrel surface with power tools or by blasting it with high-speed pellets of dry ice (solid carbon dioxide). If you live in a wine-producing region, you may be able to contract with a local recooper to process your barrel for a fee and then return it to you as described in the sidebar below.
Retiring a barrel
The time may come when an old barrel leaks too much or you just run out of the space to keep it after it is neutral. Keep in mind that you still have a nice piece of oak hardwood. To continue using the oak for wine, consider repurposing the staves as also described in the sidebar below.
If the barrel is mostly sound, you can cut a large hole in one end, plug up the bung hole, seal any leaks from the inside, and use your old barrel for rainwater collection at a roof downspout. Or you can emulate various artisans in wine country to rework old barrels into wine racks, furniture, and even draft wine service bars for parties on your patio. And of course we are all familiar with the classic wine barrel planters: Use a power saw to cut the barrel in half at the middle and get two planters from one barrel. Finally, used oak makes aromatic firewood. You can cut it into small pieces or shavings for use on a barbecue or in a smoker. Or leave the staves in bigger pieces for the fireplace or woodstove. There is even one Sonoma County winemaker who has a side business of catering large parties with pig roasts using his huge tow-behind barbecue. He fuels it entirely with old broken-down wine barrels and lets the lifespan of those barrels go whole hog!
Shaving Old Barrel Staves: Extending the Life of Old Barrels & Creating an Alternative to Oak Chips (Sidebar written by George Pikor)
I have been making wine at home for more than 30 years, starting with wine kits but soon moving to fresh grapes and frozen musts and juices. I was never satisfied with the results achieved using oak chips and sticks, partly due to the inconsistent quality of those products but also because you don’t obtain the micro-oxidation effects of aging a red wine in a barrel.
Investing in quality oak barrels is a big step for any new home winemaker. They are expensive, you have to make enough wine to keep a barrel full of wine at all times, and they need to be replaced after 4–5 years once they lose their ability to impart oak flavors to the wine. I have gained another 2–3 years of imparting oak flavors by having my neutral barrels professionally ground to expose fresh wood. Some argue that you don’t get the same impact with a re-coopered barrel but I have never been unhappy with the results. However, I was advised that you never re-cooper a barrel more than once and I have always heeded that advice.
Because I hate to throw anything away, once a barrel came to the end of its life, I would take it apart (prevents mold) and keep the staves. As barrel staves piled up, I came up with a plan to reuse these old staves one more time. First, I remove all wine-stained wood from each stave, then re-toast those staves, and finally place three whole staves into a 16-gallon (60-L) stainless steel container filled with red wine for a month or two to impart the level of oakiness I desire.
The Stave Shaving process
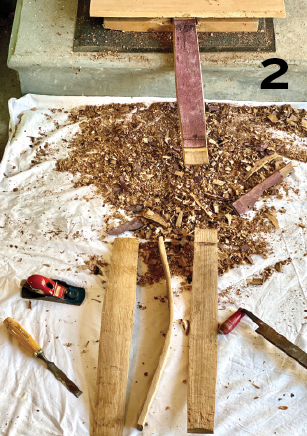
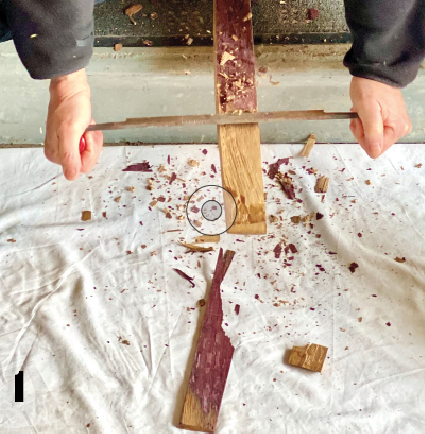
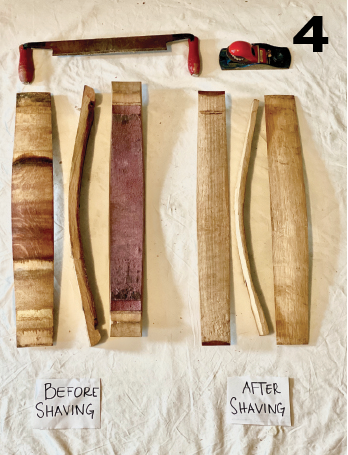
I purchased a carver’s drawknife (see photo 1) to remove all of the wood stained with wine from the inside of each stave. To shave the stave you need to secure it so it can’t move. If you have a large wood vice attached to a workbench this would be ideal. However, I don’t own such a beast, so I have cut a 2- to 3-inch (5- to 7-cm) notch in a 2×6 by 1-foot (30-cm) plank that will hold a stave and prevents it from moving backwards as I use the drawknife. Then I place a 1-foot x 2-foot (30-cm x 60-cm) piece of plywood on top of the 2×6 plank on my garage concrete step and I sit on the plywood so that the stave can’t move up or down. With the stave secure and sticking out between my legs (photo 2), I start to remove about 1⁄8 to 1⁄4 of an inch (0.3 to 0.6 cm) of wine-stained wood with the drawknife to get to fresh wood. You can go at the stave pretty hard with the drawknife to remove big chunks of wood. Once I have shaved half the length of the stave I turn it around and shave the other end.
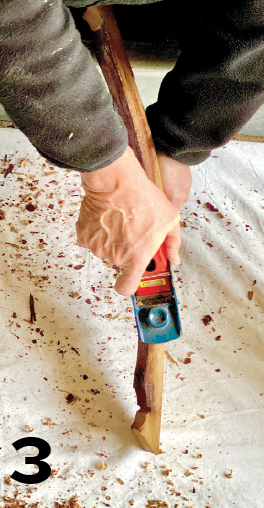
After exposing all of the fresh wood on the inside of the stave, I use either a small hand plane or the drawknife to expose fresh oak on the outer side of each stave. Not much wood needs to be removed here as I’m just looking to have clean fresh wood exposed on all sides of the staves before placing them in wine. I find that the hand plane is best for exposing fresh wood on the stave sides (photo 3). It takes about 45 minutes to shave three staves and makes quite a mess — one reason why I do the shaving in the garage.
Re-Toasting the Staves
The next step in my process is to toast my freshly shaved staves. I have found the fresh, untoasted wood gives a slightly harsh, woody flavor to wines so I re-toast the staves. I have read that medium-toasted barrels (my preferred level of toast) with their vanilla and caramel-like flavors are heated to a surface temperature of 350–400 °F (177–205 °C). To achieve this, I place three staves into a preheated oven at 375 °F (190 °C). Once I smell a noticeable baked caramel wood odor (15–25 minutes) I remove the staves from the oven before they begin to char or burn.
Obtaining the Desired Barrel-Like Flavors
I currently have a 30-gallon and a 60-gallon (110- and 225-L) French oak barrel that are at the end of their lives for imparting any oak flavors, which I use solely for the purpose of microoxidizing/aging my red wines. After about a year in these neutral barrels, I’m ready to impart the oak flavors I desire. I place three freshly toasted oak staves from a decommissioned 30-gallon (110-L) barrel into a 16-gallon (60-L) Cornelius keg (any open-top stainless steel container that would hold an entire stave will do).
I have roughly estimated that 3–4 staves, depending upon their size, is relatively close to the wood-to-wine ratio in a 30-gallon (110-L) barrel. This takes into account a smaller volume of wine in the keg and that wine is extracting oak flavors from all four sides of the staves while in the keg as opposed to just the interior side of the stave as a barrel. However, the number of staves used is probably not that important as it only increases or decreases the time the wine needs to stay in the stainless steel keg before the desired oakiness is obtained.
When I want a barrel-like fermented white wine, I wait for the fermentation to start in earnest, then add three freshly toasted staves to my 16-gallon (60-L) keg. I find that 1–2 months in the keg with three fresh staves produces a noticeable oaky character for both red and whites. After the first month I start tasting weekly and remove the staves from the wine once the desired oakiness has been achieved. I often use the same barrel staves for another 16-gallon (60-L) of red wine but I only use my re-purposed staves once when attempting to generate a barrel-like fermented white wine (usually Chardonnay).
While this process takes some time, I have found it is a great way to impart barrel-like oak flavors into my red and white wines. It allows me create a barrel-like fermented wine anytime and extends the use of an old barrel for aging purposes. You just need to save some of your old barrel staves for another day.
Barrel Leak Repair (sidebar by Michael Tonsmeire)
Knowing how to fix a leak and having the tools on hand to do it can be invaluable when a barrel starts dripping. The first step is to determine the path of the escaping wine (or identify the leaks before you entrust your wine to a new barrel). When you get a new barrel that you have any concerns about, add 5–10% of its volume of warm water and roll it around checking for the appearance of damp spots.
The location of a leak will dictate the techniques needed to stem the flow:
Between Staves
This leak may indicate that the barrel isn’t properly hydrated because wood shrinks as it dries. Move the empty barrel to a location where some spilled water isn’t a major concern and fill it with warm water. If the leak doesn’t stop after 24 hours of swelling, you’ll need to drain the water and tighten the hoops.
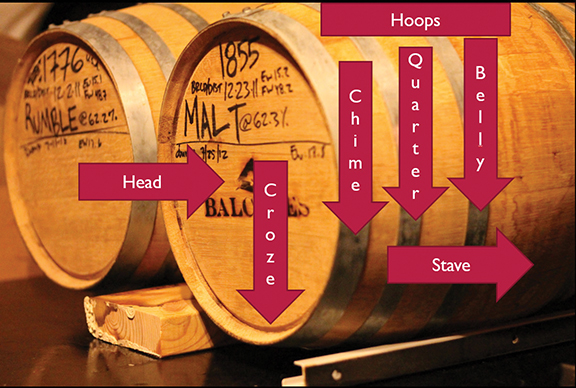
Stand the barrel on one head and remove the hoop nails or staples. Start with the belly hoop, walk around the barrel tapping the head driver with a cooper’s hammer 8–10 times until it is snug. For safety, keep your fingers on the outside. Repeat this on the quarter hoop. Add fresh hoop nails to keep the hoops from sliding towards the head. Flip the barrel onto the other head and repeat the process with the hoops on the other end of the barrel. Test the barrel with water again to ensure the leak has stopped before risking wine.
End Grain
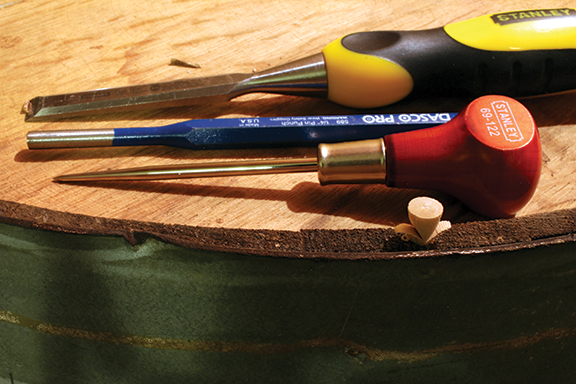
The only place that end grain is exposed is the ends of the staves around the croze. Scrape the wet spot with your scraper to expose fresh wood to pinpoint the leak. Tap the awl (looks like a chisel but with a long thick needle, pictured with a red handle, above) into that spot with the hammer to create a ¼-inch (0.6-cm) deep hole. Firmly tap a spile (a piece of wood that looks like a golf tee) into the hole with the spile pin punch and hammer. Use a hot chisel to clean off the excess spile sticking above the barrel’s surface. Take a high angle, shaving off the sides of the spile leaving a nub in the center extending above the surface. Use a hammer to hit flatten the nub and clean it up with your chisel. Sand the area you scraped with fine sandpaper to close the wood pores.
Edge Grain
Scrape the wet spot with your scraper to see where the liquid is originating. The wine is moving through the capillaries of the wood, you need to cut them off on their way to the leak. Feel the grain of the wood, it will feel rougher in one direction than the other. Keep going past the leak about 1⁄2-inch (1.3-cm) in the direction it feels rougher. Use a 1⁄2-inch (1.3-cm) cold chisel to create 1⁄4-inch (0.6-cm) deep divot parallel to the grain (make sure not to go too much deeper or risk cracking the stave). Then use a 1⁄2-inch (1.3-cm) hot chisel to make the center of the divot a little deeper. Firmly tap a wedge, slightly wider than the chisel, into the hole to plug it. Use a hot chisel to clean off the excess wedge sticking above the stave in the same way as the spile. Sand the area you scraped to close the pores of the wood.