Making Melon Wine

With few exceptions, melons conjure up memories of juicy, succulent sweetness that satisfies the senses on a warm summer day. Any winemaker enjoying a fully ripened culinary melon will naturally envision a chilled wine with similar flavor. But envisioning and achieving a great melon wine are two different things.
Melons are notoriously a challenge for making wine. Cut melons rapidly spoil at room temperature, and the juice sours and spoils early into fermentation; understanding this tendency unlocks the key to success. Refrigeration greatly slows spoilage, but research has shown that refrigerator temperature — 41 °F (5 °C) — is not the best temperature for preserving the aromas and flavors we enjoy. The best temperature window for melons is 50–60 °F (10–16 °C). Once you know this you can reliably make wine from melons.
There is still one more problem with melons when it comes to winemaking, but it is one we can accept once we understand it: Wines made from melons do not share the rich flavors of the melons themselves. Fermentation tends to naturally diminish the richness of both aroma and flavor in fruit, and finished melon wines suggest the richness that was without fully capturing it. It is more of a reminder of the heady aroma and delicious taste of truly ripe melons than the flavors themselves. However, capturing even the suggestions is reason enough to make melon wines.
Melon Taxonomy
Technically, melons are modified berries. While most often thought of as fruit, a handful of melons are treated as culinary vegetables. The four genera that give us melons belong to the family Cucurbitaceae. They originated in Africa and spread through Asia Minor to the rest of the world. Gourds and squashes are of the same family, but originated in the New World. Melons are now cultivated on every continent but Antarctica.
The watermelon (C. lanatus), with over 1,200 varieties, is the only notable edible melon from the genus Citrullus, and is one of few melons without a central seed cavity. No other melon has as many varieties and cultivars as watermelon. All other fruit-like melon varieties and cultivars belong to the species Cucumis melo, which number in the thousands and have central seed cavities. All melons from both genera can be coaxed into wine.
Varieties and cultivars of Cucumis melo are named Cucumis melo var name cv “name.” For example, Cucumis melo var Korean melon cv “golden honey.” Cucumis melo has also been divided into several groups when obvious, although this nomenclature is not universally accepted. The Cantalupensis group includes true cantaloupes and their cultivars, the Reticulatus group includes muskmelons and their cultivars, and the Inodus group includes melons emitting no outward odor by which to judge ripeness. While there are rules for inter-group hybrids, they are too complex for this overview. There are also a few other groups and some melons fail to fall into any of them.
It is not necessary to know the proper (scientific) ordering and naming of melons to make wine, but knowledge is what you make of it. It is useful, for example, to know that the canary melon and Piel de Sapo melon are in the Inodus group before you go shopping. You should pursue this subject independently if interested.
Best Melons for Wine
In considering the best melons for wine, the first step is to eliminate any varieties that have a propensity to spoil very quickly after harvesting. This eliminates some very tasty melons but increases the chances of winemaking success. Also, eliminate any melon varieties that are naturally bland (lack flavor, aroma and/or sweetness). You are going to have to add sugar to the must anyway, but if the melon cannot contribute a respectable amount of its own sugar, the wine will almost certainly lack flavor and possibly aroma.
A list of eligible candidates for making melon wine would be lengthy beyond belief if I included every variety someone said had great aroma and flavor. I have not tasted the thousands of different melons that inhabit this planet, and thus cannot be the arbiter of every melon that might make good wine. It is therefore wise to consult reputable references for some suggestions, which has been done over an extended period. Any attempt to be objective probably will satisfy no one, but here is my list of the best candidates for making wine. These melons are regionally, and sometimes internationally, popular, and considered the best of the many melon varieties for making wine:
• True cantaloupe (mostly grown in Europe, only worthy for winemaking if fully ripe)
• Muskmelon (misnamed cantaloupe in the Americas but known as rockmelon elsewhere)
• Canary melon (only when at the height of ripeness)
• Charantais melon (an exceptional French hybrid)
• Cavaillon melon (another exceptional French hybrid, reputedly ripe when a small crack appears by the stem scar)
• Crane melon (Crenshaw-type melon, extremely sweet with fine flavor when ripe)
• Galia melon (an exceptional hybrid from Israel, now widely grown in the Americas)
• Ogen melon (another exceptional Israeli hybrid, half-parent to the galia melon)
• Honeydew (only exceptional when recently harvested and fully ripe)
• Golden honeydew (very sweet with fine flavor when fully ripe)
• Korean melon “golden honey” (considered the best of the Korean melons)
• Piel de Sapo (extremely popular in Spain, also known as toad skin melon)
• Sprite melon (small Japanese hybrid with unusually complex and very sweet flavor)
• Watermelon (too many to choose from, but ripeness, sweetness and intense flavor are the necessary criteria for selection)
Some wonderful melons were left off the list for reasons previously stated. If you did not see your favorite melon listed here, go ahead and try making some wine with it.
Additional Considerations
Most (but certainly not all) melons signal seed maturity by slipping neatly from the vine. This doesn’t mean the melon is fully ripe, however. It will usually require another few days to a month (depending on type) of just sitting at room temperature to ripen.
The blossom end (opposite the stem end) will often signal ripeness (canary, honeydews, Korean melon “golden honey,” Piel de Sapo) by yielding slightly when pressed and then springing back. Many melons turn yellow or yellowish (canary, Charantais, Cavaillon, true cantaloupe, galia, muskmelons, golden honeydew, Korean melon “golden honey”) or cream (honeydew) or white (sprite melon) when ripe. Most varieties will exude noticeable fragrance when they are ripe (especially muskmelons).
Because melons grow on the ground they can carry a lot of different bacteria on their surface. If the melon is not too large, fill a bucket half full of cold water and stir in 1⁄2 teaspoon of potassium metabisulfite. Cover the bucket with a towel and soak the melon for five minutes, turning frequently. This is best done on a patio or other well-ventilated place to allow fumes to dissipate. Let melons air dry (covered) and they will be safe to cut or crush whole (only thin-skinned varieties) after being chilled.
Larger melons should be placed in a tub outside and thoroughly sprayed with potassium metabisulfite solution (1⁄4 teaspoon to a quart of water) every two minutes for 10 minutes, turning often. Cover with a towel between sprays. Cover and let them air dry.
Challenges
With very few exceptions melons rapidly spoil at room temperature once their exterior is compromised. Some of the most flavorful of all melons begin to display ruinous spoilage within two hours of cutting at 75–80 °F (24–27 °C). Cooling the melons before cutting, crushing, and pressing is an absolute necessity with melon winemaking.
Cooling the melons prior to converting the fruit into juice is essential. At the same time, you must also introduce enough active yeast to produce an almost immediate fermentation and achieve a 10% alcohol by volume as rapidly as possible to preserve the product before spoilage occurs. To do this, you will need a fast-starting yeast capable of tolerating a low 50–60 °F (10–16 °C) window.
The selection of the yeast and the production of an exponentially grown yeast starter solution are very important (read more about making a yeast starter in the sidebar on page 39 of this story). Montrachet is the fastest of the conventional wine yeasts and tolerates temperatures as low as 50 °F (19 °C). It is an obvious choice and has been my chosen yeast for watermelon winemaking for many years.
Quick fermentation generally sacrifices desired varietal character (flavors and aromatics). There are two potential paths to overcome this problem: (1) select another yeast or (2) use Montra-chet to start the fermentation but follow it quickly with a second yeast that will overcome the Montrachet while preserving some of the fruit character. The second path complicates the solution. Selecting an alternative to Montrachet requires that it be superior in some way. Examining factors such as fermentation vigor, low temperature tolerance, alcohol tolerance, nutritional requirements, and preservation of varietal character or some sensory enhancement, only two yeast are obvious contestants to replace Montrachet for melons. These happen to both be from Lalvin: K1-V1116 (European equivalent Gervin Varietal “E”) and QA23 (a European equivalent is unknown).
K1-V1116 satisfies all of the requirements but only captures olfactory essences of the fruit. Capturing flavor is better with QA23, which satisfies all requirements and enhances varietal character, making it the clear winner were it not for one problem — it does not do well in musts with high solids content and crushed and pressed melons of any type will produce juice with small but plentiful suspended solids. Encasing the melon in very fine nylon or other mesh during pressing will minimize that problem. QA23 is readily available for sale online and is the best viable alternative to Montrachet.
Before selecting the alternative yeast, let’s at least look at the second path — using Montrachet to start the fermentation before quickly introducing a second yeast that will overcome the Montrachet while preserving some of the fruit character.
A second yeast starter solution can be initiated approximately four hours after a Montrachet starter is begun. Assuming both starters are husbanded for 24 hours to maximize exponential growth prior to inoculating the must, a second yeast, if properly selected, might be added to the Montrachet fermentation, achieve dominance and carry out the final fermentation in a more leisurely fashion, integrating flavors and aromatics the Montrachet would miss.
The requirements for the second yeast are therefore: (1) achieve domination over the Montrachet, (2) carry out a relatively fast fermentation to push the alcohol, (3) enjoy the same temperature window as Montrachet, and (4) capture subtle flavors and/or aromatics that the Montrachet would miss. The only conventional wine yeast to satisfy these requirements is Lalvin’s K1-V1116.
QA23 simply will not overcome the Montrachet. Since K1-V1116 is not as desirable as QA23, we can now dismiss this path.
From Melon to Must
Before crushing, the flesh from all thick-rind melons should be cut away from the rind, cut into manageable pieces, tied in a fine-mesh straining bag, and crushed in a crusher or by hand. After crushing, press the pulp immediately. Remember — you need to work quickly with melon juice to prevent spoilage.
Watermelon contains 91–93% water, while all other selected melons range from 85–90%. On average, melon juice weighs in at approximately 8.5–8.8 pounds per gallon, of which 8.345 pounds are water. You therefore need a minimum of 9.3 to 9.5 pounds (~4 kg) of watermelon flesh to extract 1 gallon (3.8 L) of juice with a good wine press — more if you are hand pressing. Cantaloupes, muskmelons, honeydews, and other melons require a bit more weight for pressing. Canary melons and Piel de Sapo melons are higher in fiber and usually yield less juice so obtain more weight than cantaloupes.
Before processing all of your fruit, cut and taste a very thin slice (sliver) of flesh from each melon prior to cutting them completely open to assure flavor quality. A melon that is not yet fully ripe can be sealed in plastic and refrigerated three to seven days, depending on the variety, for additional ripening before eating or processing for juice for topping up later. Once your fruit is ready, follow the step-by-step detailed on page 38.
Summation
Melon wines are a challenge to make, but with careful attention to detail they can be made — and made well. Certain melons are very good candidates for winemaking but only when they are fully ripe. Always obtain more melons than you think you need to allow for uneven ripening or deficient flavor.
Melon and yeast selection, proper yeast starter solution development, temperature reduction, and maintenance of the starter solution, melons, juice, and must are all critical to successful melon winemaking. While the process is demanding, it is all achievable. The yeast will make the wine if you do your part. And in the end, you will be amply rewarded with wine that summons up memories of the richness of the original melon. That is worth the effort!
Essential Steps for Making Melon Wine (Sidebar)
1. Obtain more melons than you think you will need. They may not ripen all at once, and any melons with inferior flavor should be eaten or infused in vodka.
2. At first sign of ripening en masse begin a yeast starter solution. When the yeast starter solution is approximately 20 hours old, place it in a refrigerator adjusted to 60 °F (16 °C). If you are unable to comply, place the starter in a regular refrigerator for 20 minutes, then remove for 10 minutes and repeat for four hours. Monitor the temperature of the yeast starter solution, adjusting times inside/outside to slowly obtain and maintain a temperature of 58–60 °F (14–16 °C) while increasing volume according to the directons for making a yeast starter.
3. Depending on the size of the melons, one to four hours in a refrigerator will chill them until their center flesh is the same temperature as your yeast starter solution. If you reach the temperature too early, rotate the melons in and out of refrigerator as with your yeast starter (see step 2). A piercing instant-read thermometer is indispensible for monitoring these temperatures.
4. When the yeast starter solution is 24 hours old, cut, crush and press the melons to produce 3.5 quarts (3.3 L) of juice as quickly as possible. (Excess juice should be fined to clarity and frozen, thawed two days before racking, and used for topping up.) Don’t forget to monitor the yeast starter solution.
5. Move the melon juice to a sanitized primary fermenter and add sufficient sugar to achieve a starting specific gravity of 1.088 to 1.090 (21.1 to 21.6 °B). Add 0.75 teaspoon of yeast nutrient, 2 tablespoons plus 2 teaspoons of acid blend, and 0.25 teaspoon of powdered grape tannin (optionally, tannin can be omitted altogether, or the wine can be lightly oaked in the primary).
6. If a refrigerator adjustable to 60 °F (16 °C) is not available, place the primary fermenter in the coolest location available. Try placing the primary in a tub of cold water and adding ice cubes periodically.
7. When vigorous fermentation subsides, transfer the wine to a secondary fermenter, add 1 finely crushed and dissolved Campden tablet, and attach an airlock. Again, attempt to control the temperature for at least several days.
8. When fermentation stops, measure the specific gravity. If it is at or below 0.998 dissolve and stir in 1⁄2 teaspoon of potassium sorbate.
9. Wait 45 days, rack the wine off of the yeast lees, and top up the fermenter with clarified reserve juice.
10. Wait an additional 45 days and check specific gravity again. The wine should be bone dry and very clear.
a. If the bottom of the secondary is devoid of yeast lees add 1 finely crushed and dissolved Campden tablet or 2 mL 10% potassium metabisulfite (KMBS) solution* per gallon of wine, sweeten to taste with simple syrup** (not reserved melon juice) and bottle.
b. If the wine dropped a fine dusting of yeast lees, rack the wine, add 11 finely crushed and dissolved Campden tablet or 2 mL 10% potassium metabisulfite (KMBS) solution* per gallon of wine, top up and wait an additional 30 days. When the bottom of the secondary is devoid of yeast lees, sweeten to taste with simple syrup** (not reserved melon juice), and bottle.
11. In addition to 750-mL bottles, fill two 375-mL splits. Open one of the splits at three months and taste. If the wine is not acceptable, open the second split at six months. If the wine still unacceptable at six months, wait until your bottled wine is one year old before tasting again. My experience is that melon wines age unevenly from batch to batch but always within one year.
Melon wine is best when it is off-dry or slightly sweet to summon its nature. Do not over-sweeten your melon wine or you will drown the delicate flavors that survive fermentation. Melon wines do not taste as rich as the melons they are made from any more than grape wines taste like the grapes from which they are made. Once transformed, the new wine must mature to express its potential. It could mature early, but if not it should not take longer than 12 months. Once mature, drink it within a year.
* Weigh 10 grams of KMBS, dissolve into about 50 milliliters (mL) of distilled water. When it is completely dissolved, make up to 100 mL total with distilled water.
** The formula for simple syrup is two parts sugar dissolved into one part water. For a pound of finely granulated sugar, it is 21⁄4 cups of sugar dissolved into 11⁄8 cups of water.
Yeast Starter Solution for Melon Wines (Sidebar)
When you use a yeast starter solution you always know your yeast is viable, the quantity of yeast you are adding to the must is several thousand times more than if you just sprinkled a packet of yeast to the must, and you can expect an almost immediate fermentation of your must.
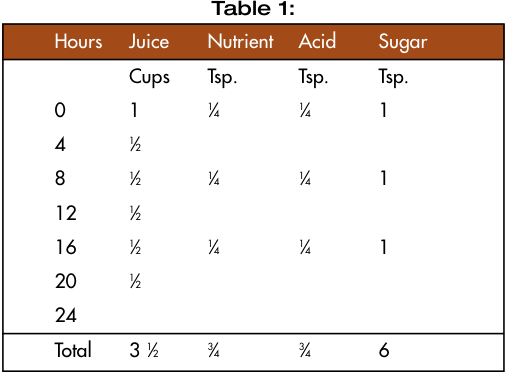
1. At hour 0 in Table 1 below, in a sanitized 1 qt (or 1 L) jar or Erlenmeyer flask, mix 1 cup of room temperature pasteurized white grape juice juice, 1 tsp sugar and 1⁄4 tsp each of yeast nutrient and acid blend.
2. When the solids are completely dissolved, add a full packet (5 g) of your chosen yeast. Cover the container with cheesecloth or a paper towel. You want air to pass through the covering but want to stop airborne mold, bacteria or dust from entering the jar.
3. Set aside at room temperature and add additional ingredients according to the table below.
