
“The One Wall Winery [. . .] will keep your winemaking endeavors efficient and organized.”
If you’re like me, your winemaking space has become a very special place in your home — whether in a cluttered basement, a laundry room, your garage or somewhere else in your abode. There have been many times that you have spent a lot of time caring for your wines, crushing, pressing, racking, measuring, pumping, stirring, fining, filtering, tasting and bottling, and lots more time just watching your airlocks burping. So from that perspective, let’s call that space what it truly is — a winery!
Home wineries run the gamut of configurations and organization. I’ve seen wine spaces where carboys and barrels are sitting all over the floor among other clutter and warehouse-bought food and paper products, bicycles and shop tools. I’ve also seen very neat and tidy totally dedicated wineries in luxury homes, meant to impress the winemaker’s visitors more than really being a functional place to work on their wine — shiny stainless tanks and immaculate barrels stacked ever so perfectly over granite tile floors.
Lots of folks ask me to help them with the layout of their home wineries to be most efficient in the use of their precious square footage and provide them with all the necessary functions required to make fine wine in a minimum amount of space. As a result, and the fact that I’ve reconfigured my own garage winery a number of times, I have developed what I’ve termed the One Wall Winery.
The One Wall Winery is meant to demonstrate how a relatively small space in a basement, garage, shed, or wherever you call winery, will keep your winemaking endeavors efficient and organized. Of course, the way you lay out your winery can be completely different; larger, smaller, and spread among a number of places as your operation demands, but hopefully this will give you some inspiration to get busy and build your winery into an exciting place to work your magic with your wines.

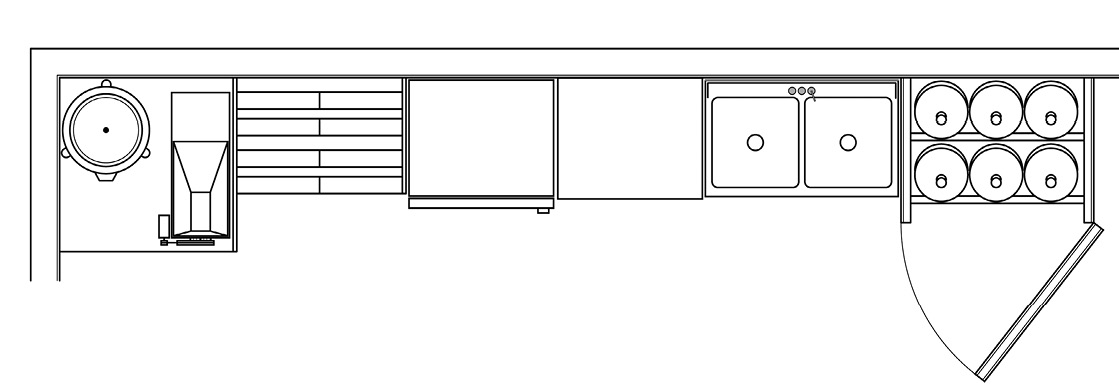
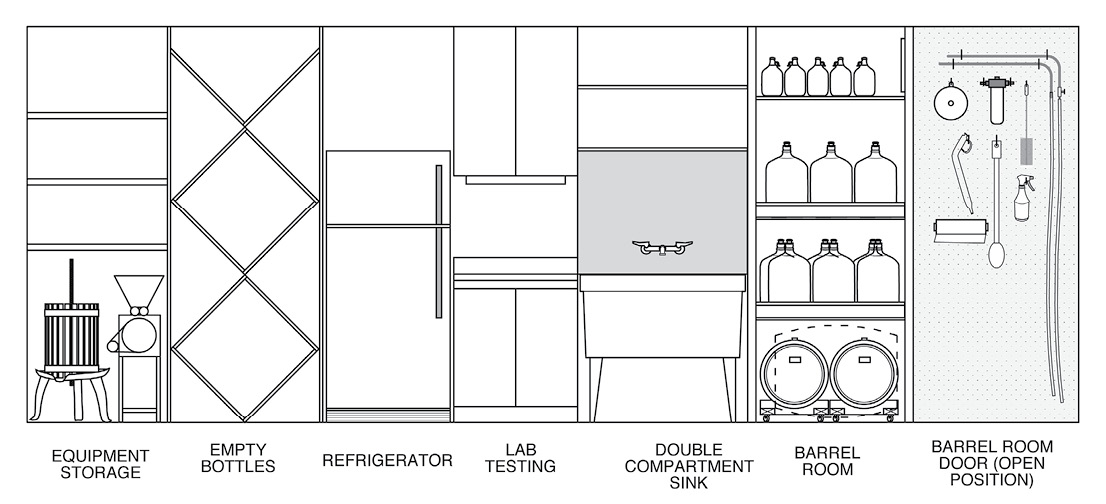
The Winery Sink
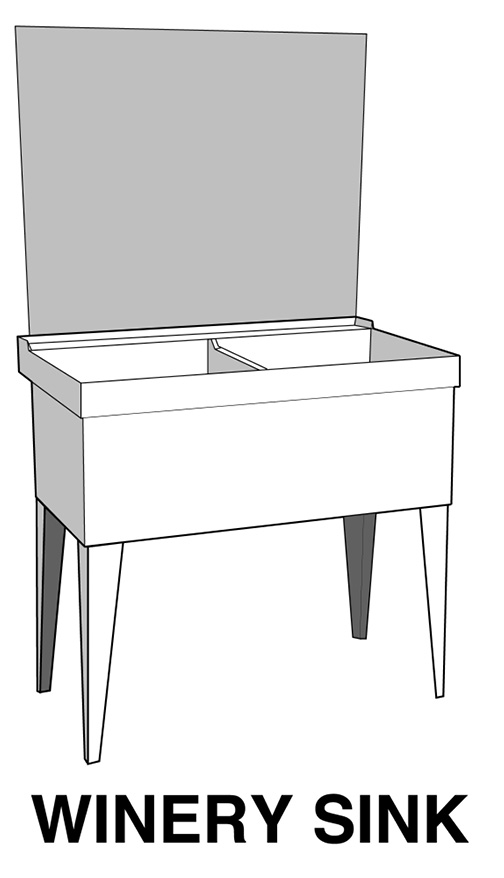
As you consider your new winery, start by figuring out where you can locate a nice deep sink (Figure 1). Can you connect to your plumbing easily or will you need the help of a plumber who can bring the supply and waste lines to the location suited to your existing plumbing and the needs of your winery? I’d seriously consider a double sink, and while a commercial stainless steel sink would be a dream-come-true in the home winery, a much less expensive double, fiberglass, free-standing laundry tub can function perfectly well while being one tenth the cost.
The sink will probably come with three or four holes in the back to allow you to mount the faucet — these are good to use to install pump soap dispensers. Metal caps are also available to snap into the holes to seal them. A wall mounted faucet will provide much more versatility and allow you to set larger containers down into the sink without interference as you’d experience from a sink mounted faucet.
Above your new sink, install a sheet of FRP (fiber reinforced plastic) wall panel to protect the wall from stains, splashes and spray and make for easy cleanup. Using the plastic edge trim is optional. This product can be installed by applying some construction adhesive to the back of the panel and then pressing it in place. Small nails around the sides and bottom will hold it in place until the adhesive sets up.
Wall-Mounted Faucet
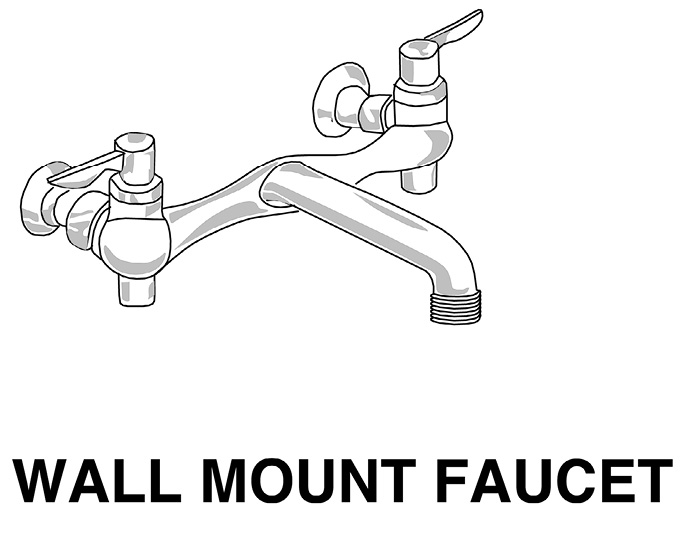
A very utilitarian wall-mounted faucet that is adaptable to connect to a garden hose is a great option for the winery sink (Figure 2). The faucet should be installed about 42 inches (107 cm) above the floor. Ensure that the plumbing lines that extend up to the faucet are solidly mounted to the wall framing to keep the faucet from coming loose from the wall. Quick release garden hose ends attached to the threads of the faucet spout make attaching different lengths of hoses a snap. Attach these hose ends to about a 12-inch (30-cm) length of 5⁄8-inch reinforced PVC flexible tubing. Longer lengths of hose would also allow you to rinse out carboys or other containers that are left on the floor near the sink or even hose off the floor of your winery.
On the end of the hose, a multi-function nozzle will give you a number of options for cleaning your equipment or filling your sink, and again the quick connect fittings will give you a whole range of options for various nozzles or hose ends.

The drains need to have a P-trap installed and the 2-inch (5-cm) drain lines need to be vented to the outside. This entails installing an upturned Tee in the drain line near the sink and extending the vent pipe through the roof. Install a rubber or lead flashing to the vent pipe and integrate it into the roofing to ensure a water tight seal. And if you have the ability to install a floor drain, it will make cleaning up the winery just that much easier. Be sure to follow the guidelines set out in the International Plumbing Code to be sure your plumbing work is safe and secure. (Or, you can hire a plumber to install your sink for you.)
Take advantage of the space above the sink by installing some wire shelving, peg board or other cabinets, and install a wall or ceiling mounted light fixture above. You’ll be spending a lot of time in this area, so make it as practical and utilitarian as possible.
The Wine Lab
In the February/March 2012 issue, we got all our lab equipment organized into a compact, portable toolbox. But the winery will need a space for performing the tests. A base cabinet mounted next to the winery sink, and fitted with a preformed plastic laminate top, will function very well for your wine lab. The labware tool box can fit in the cabinet or, if you prefer, you can use the drawers or shelves inside to protect your labware when not in use.
New cabinets can be pretty pricy for a home winery. A phone call to a few local remodeling contractors asking them for cabinets from their kitchen remodel projects could net you some very nice cabinets for free. I get offers from builders on a regular basis, many times for cabinets that are much nicer than the ones in my kitchen! An advantage to this would also be that you may even score a granite slab that you can use for the top. Whichever way you go, the lab counter should be a minimum of 24 inches (61 cm) wide, but wider will give you room to spread out if necessary.
Putting the lab next to your sink will allow you to dump out samples and reagents easily, and by fashioning a sink-top counter that is one half the width of the sink, you can expand your workspace over the top of the sink as well as having a functioning drainboard that can be removed when both compartments of the sink are needed.
Above the base cabinet of your lab, a 12-inch (30-cm) deep upper cabinet will offer much more storage space for equipment, glasses, additives, cleaners etc. Mount the upper cabinet at least 24 inches (61 cm) above the top of the base cabinet to give you ample space to work below it. Install an under cabinet light to the bottom of the upper cabinet to light up the laboratory work space. You’ll likely need to be reading the volume in various pipettes, burettes and other vessels and this is much more difficult in low light conditions.
Winery Refrigerator
A small refrigerator will add a lot of functionality to your wine lab. Many of the chemicals that we need for our lab work will last much longer if kept stored in a refrigerator, as will yeast and malolactic bacterial cultures. A fridge will also serve you well if you turn the temperature to its coldest setting and use it for cold stabilizing your white wines. And of course, it will keep your beer cold and waiting for you for those long days you are working in your winery!
Bottle Storage
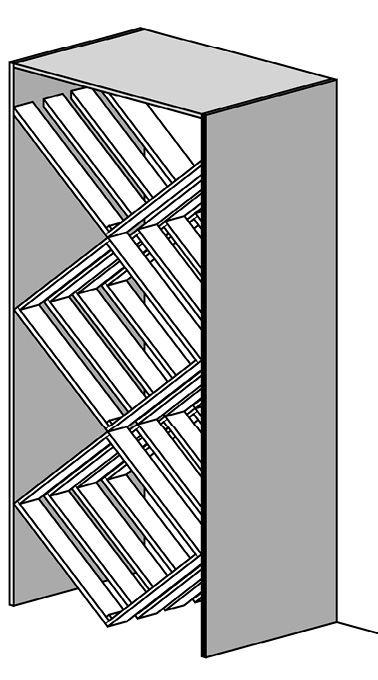
The majority of home winemakers reuse their bottles as well as collect them for reuse. For bulk bottle storage, a double-depth diamond rack will help you keep your bottles stacked and organized for bottling day.
To build a double-depth set of diamond racks, start by ripping a sheet of ¾-inch plywood in half to make two side pieces 24 x 96 inches (61 x 243 cm). If your ceiling space in your winery is less than 96 inches (243 cm), then adjust the height of the side pieces accordingly. Then cut a top piece 36 inches (91 cm) wide and screw between the two side pieces. Below the top piece, between the side pieces and at the back of this box, install a 1 x 4 nailing strip. Stand the unit in place against the wall and secure to the wall studs by screwing through the nailing strip with 3-inch screws.
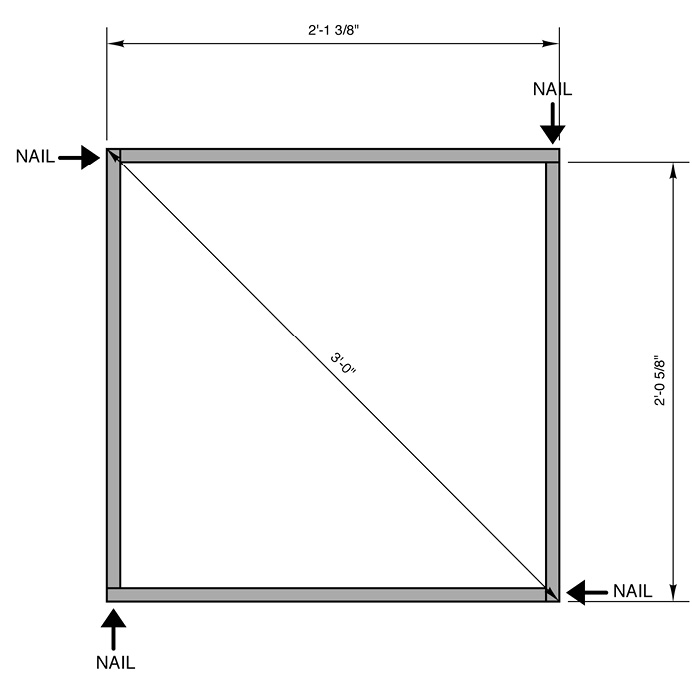
The diamonds are cut from 1 x 4s. Each diamond is constructed independently and there are four diamonds in each tier of the rack, and one V at the top. So start by cutting thirty-six pieces of 1 x 4 at 24-5⁄8” long, and four at 25-3⁄8” long. Cut one end of four of the 24-5⁄8” pieces and the 25-3⁄8” pieces on a 45° angle to fit against the sides of the box. Nail (or screw) the 24-5⁄8” 1 x 4s together “pinwheel” fashion, meaning nail one piece into the end of another, rotate these pieces ninety degrees and nail the next piece into the second piece then the fourth into the end of the third piece followed by the first piece into the end of the fourth piece. (See Figure 3.) Assemble eight of these and then make the V’s for the top by nailing the 25-3⁄8” 1 x 4s into the last four 24-5⁄8” pieces.
Measure the sides of the frame of the racking and on the inside, mark a horizontal line across at 18 inches (46 cm), 4 feet 6 inches (137 cm), and 7 feet 6 inches (228 cm). These marks are the lines for the corners of the diamonds. Set the first 1 x 4 diamond on the floor and on point, 3 inches (7.6 cm) from the back wall of the unit and align the outside corners with the horizontal lines on the sides. Screw the diamond into the side using 1-½” wood screws. Install another diamond two inches from the first diamond, screwing to the sides in a similar manner. The third diamond from the back wall will be installed three inches from the second one and then the outermost diamond will be flush with the front of the unit.
Set the next set of diamonds directly above the first set, and align the top and bottom points of the diamonds. Screw into the sides like the first tier, then screw the top point and bottom points together. Finish the assembly by installing the V’s above the second tier and fastening with the wood screws.
Next cut three pieces of 1x1s at 24 inches (61 cm) long. Set them in the bottom of each diamond and the V and nail them into each diamond and the V to tie them all together in the center. Now you’re ready to stockpile more than 40 cases of wine bottles in six square feet of space (see Figure 4). While we customarily see bottles stored with their necks pointing out towards the room, it’s recommended to point them in toward the wall to prevent them from cascading out onto the floor.
Your Barrel Room
In the June/July 2010 issue, we built a temperature controlled barrel room to efficiently store and age lots of wine in a very small footprint. It capably allows you to work your wines and with the help of a diaphragm or vacuum pump, so you will never need to lift a full container of wine again, saving your back and minimizing breaking a fragile container of your precious elixir.
For the One Wall Winery, we’re showing a smaller version of the one described in the previous issue but this 36-inch (91-cm) wide by 30-inch (76-cm) deep closet is capable of storing nearly 90 gallons (340 L) of wine.
Much of your winemaking equipment will hang nicely from the pegboard on the inside of the door and a very small air conditioning unit will keep the wines stable at a consistent 60 °F (16 °C), throughout the year.
Equipment Storage
Except for crusher/destemmers and presses, much of the special equipment on the market are relatively small and take up small amounts of space. One more open closet about 3 feet (91 cm) wide and about 3 feet (91 cm) deep can accommodate your basket or bladder press with a crusher destemmer slid in next to it (check your equipment dimensions to make sure you’ve made the closet wide enough). Nested together, your fermenters can sit on the floor in front of the press.
On shelves above this equipment, you can store the rest of your equipment in various easy-to-access bins, boxes, or other appropriate containers. Blue masking tape works great to label the containers for clear reference and allow you to remove them when you decide to repurpose the container.
Some items you use may be desgined to be easily disassembled. If this is the case, you can design your equipment storage space to take advantage of this.
Floor Plan
As you’re laying out your winery space, it’s a great idea to visualize every little nook and cranny available for use. (Figure 5 shows a top view of the proposed One Wall Winery; Figure 6 shows the front view.) Think through all the processes you will want to perform and who you might have working in the winery at any given time. If you want to convert a small “powder room” into your winery, and think you can have a couple of helpers in there to bottle your wine, you may have problems. When I first started making wine, I thought about using a 5 x 5 foot (150 x 150 cm) basement laundry closet as my winery. I wisely changed my mind after some sage counseling from some fellow winemakers and set up shop in my garage instead. Now we are able to have bottling parties with seven or eight helpers, and easy access to the wines for friends to come and have barrel tastings.
Like Rome, your own winery space may not be built in a day; but it pays to have an idea of what that space might look like. Hopefully these ideas will give you some inspiration!


After dedicating as much time as we do making a batch of wine, the final step of putting a closure on the bottle can’t be overlooked. There are many options from natural, agglomerated, colmated, and synthetic corks, to screw caps, to name a few. Learn the pros of each option to ensure you find the right closure to fit your next batch of bottles.
The best wine cellars offer home winemakers, wine collectors, or anyone else stockpiling wine a stable, secure, chilly space that exists in complete darkness 99.9% of the time. Get some construction options that a homeowner might consider when designing a wine cellar.

