DIY Netting Applicator

As any reader who has their own home vineyard can probably relate, making the decision to net is one that is not taken lightly. Netting can be expensive, time-consuming, difficult to apply and then remove, and impacts the routine of wine-grape production.
After having moved to an existing vineyard property, several seasons were spent trying to avoid the application of netting. The acre of vines is in a very rural area with high pressure from birds and mammals. From the standpoint of the bird population, this presented a smorgasbord of tasty treats with an overhead power line running the length of the vineyard for hundreds of birds to gather and decide which variety was going to present the tastiest treat. Having tried many alternatives to netting, the decision was finally made to jump in and make that investment. However, to do so there had to be a way to make it simple to apply and remove, allow one person to manage the application and removal, and make it easy to maintain the vines during ripening.
Our Simplified Implementation
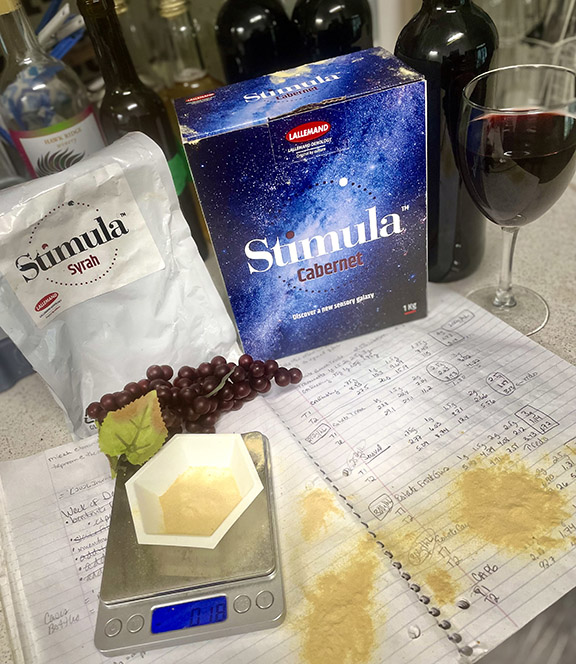
The decision to invest in commercial heavy-duty knitted netting was made to provide multi-season use and the best protection to the vines. This particular netting comes in bundles that measure 17 x 1,250 feet (5 x 380 m). It is not the lighter type of netting that is typically on a roll. One bundle weighs about 80 lbs. (36 kg) and my home vineyard consists of about 3,000 linear feet (915 m) of vines to cover. To facilitate application, the first decision I made was to cut the netting to row length rather than trying to manhandle hundreds of feet of heavy netting at one time. My maximum row length is about 90 feet (27 m). This also enables each varietal block to be netted independently due to the varying times of veraison. Bird pressure begins as soon as veraison starts, so timing of application is critical at this point to avoid berry damage and loss. Canopy management activities are also highly compressed at this point of time before netting is applied.
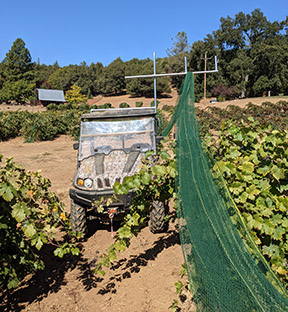
Already having a utility vehicle (UTV) for the property, the netting rig was engineered around its use to facilitate netting application and removal. The rig was originally built using schedule 40 PVC as a proof of concept. This was functional, but the PVC did not hold up well and broke during the first season of use. The subsequent design shown in this article uses structural steel pipe and fittings purchased from the local hardware store. There are only six pieces of pipe and five fittings. The fittings are secured to the pipe with internal Allen screws, which is an improvement over the glued joints of the PVC fittings. An added bonus of these fittings is that the top crossbar can be easily adjusted up or down depending upon the canopy height of head trained or trellised vines. The rig is also easily assembled and dismantled in a matter of minutes for setup or storage. For the most part, the setup allows a single person to apply and remove the netting without assistance.

Head-Trained Vines

The picture below reflects a very simple rig that works for both netting installation and removal for head-trained vines. Netting that was previously cut to the row lengths in that block of vines is stacked in the bed of the UTV. To install on the head-trained vine rows, which vary in height from 4 to 5½ feet (1.2 to 1.6 m), the UTV is parked at the end of each row, where netting is then pulled out of the UTV bed, over the top cross-bar and then walked down the length of the row. The netting never touches the ground and sits on top of the canopy as it is pulled down the length of the row. Red Solo cups were previously set on top of each vine stake to prevent netting from catching on the stake corners. The netting is then positioned to drape over the sides of the vine down to the ground rather than wrapping and clipping around the entire vine.
The “burrito wrap” approach was tried first, but in subsequent years experimentation determined that the weight of the heavy-duty netting and its 17-ft. (5-m) width provides complete coverage that minimizes entry from the birds and mammals without a need to clip the bottom sides together.
For removing the netting on head-trained vines the previous steps are simply reversed.
Trellised Vines
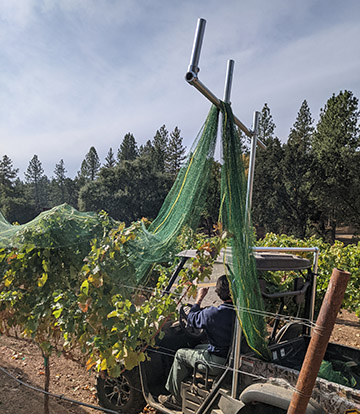
Netting my Sauvignon Blanc, which is on a vertical shoot positioned (VSP) trellis, requires a modified approach from that used for head-trained vines but utilizes the same rig. These vines do require a second person’s help. In this case the height of the canopy, which is about 8 feet (2.4 m), prevents the netting from being manually dragged down the length of the row. To get set up for netting application, one end of the netting is first run from the UTV bed up to the top cross-bar and then is run back through the outer verticals (see image below) that are positioned above the canopy. The outer verticals of the crossbar keep the netting over the canopy. That end of the netting is then tied to the end post. The netting is now ready to be laid out down the length of the canopy. One person drives the UTV down the row while a second person is on the ground positioning the netting.
Once the netting is sitting on top of the canopy, someone walks down each row to extend the netting down the sides of the vines. The bottom edges of the netting are clipped to the drip line wire to prevent birds from getting under the netting. Removal of the netting does not require looping the netting around the main vertical bar/cross-bar (see image to the left), as the netting will go directly into the bed of the UTV. Although laying out the netting can be done with one person, two people make it much easier. Removing the netting is definitely a two-person effort, with one person required to drive the UTV and a second person on the ground to pull the netting into the bed of the UTV.

Construction
As mentioned earlier the materials were obtained from the local hardware store and can also be found online. I used 1¼-inch (3.2-cm) structural steel pipe and fittings, which have proven plenty strong enough. Specific dimensions are not provided as the pipe was cut to fit the dimensions of the UTV roll cage and canopy height. This same setup can be easily modified to fit the dimensions and configuration of whatever vehicle readers might make use of in their vineyard. As a rule of thumb the top crossbar height should be positioned 3 feet (0.9 m) above the canopy to facilitate netting application and removal. Commercial versions of somewhat similar netting applicators on tractor 3-point hitches and small trailers can be found online for reference, so this simple rig could also be applied to those types of vehicles with modifications engineered for mounting. Whatever vehicle solution is used the application needs to accommodate a place to hold the bundled netting.
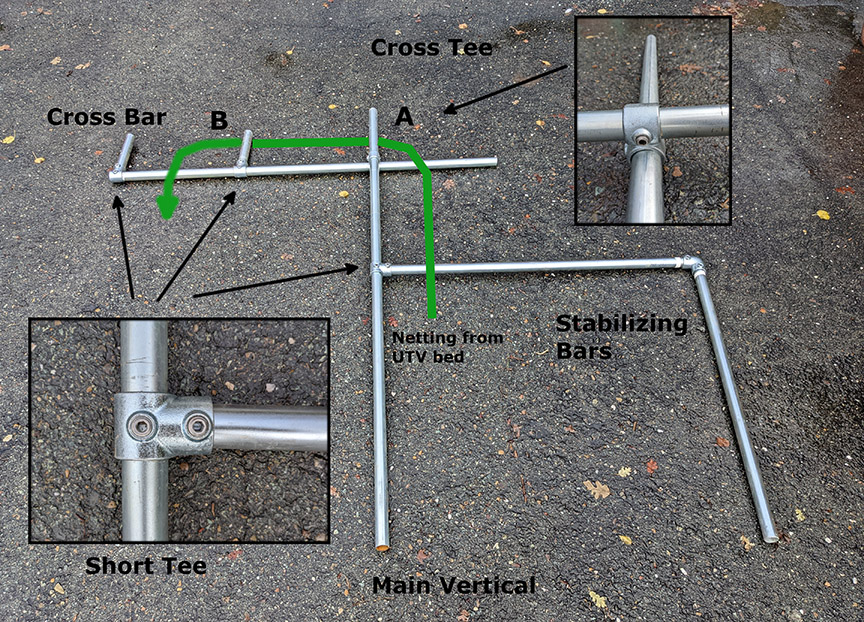
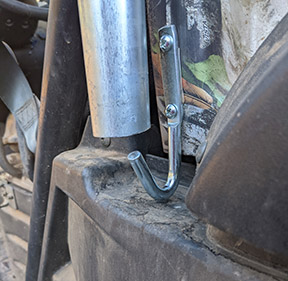
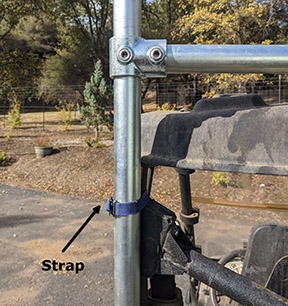
The other important aspect of the rig is mounting it to the UTV. There are just four mounting points or connections. J-hooks were installed on each side of the outer wall of the UTV bed. The rig’s vertical sections sit on the hooks thereby maintaining stability. The other two mounting points make use of straps to secure the main and stabilizing vertical bars to the UTV roll cage.
Vineyard Background
Our vineyard is about an acre in size consisting of Zinfandel, Barbera, Petite Sirah, Grenache, and Sauvignon Blanc. The Sauvignon Blanc is on a VSP trellis, while all other vines are head trained in either goblet or vertical cordon style. Vineyard configuration is 6 feet (1.8 m) between vines and 10 feet (4.5 m) between rows. Maximum row length is about 90 feet (27 m). Each block of a different grape variety has a consistent row length, so the netting was cut to match. Netting is bundled and stored separately for each varietal block so each bundle can be pulled from storage when the specific varietal block is ready to net.
Before the netting rig was engineered and implemented the first couple of years of application and removal was done by dragging each net segment down each row on the ground. This tended to be problematic, as prior leaf pulling, pulling interior canopy laterals, and thinning fruit wound up on the vineyard floor, which then tended to collect in the netting when it was dragged out the length of the row. Vineyard material is not collected and disposed of and instead is just left in the vineyard row for discing and composting.
After harvest the removal and collection of the netting was even more adversely affected by in-row material. Previously the netting was dropped off the canopy on the vineyard floor and dragged to the end of the row to fold and bundle. Everything on the vineyard floor seemed to collect in the netting and a lot of additional time was spent removing the material prior to final storage. The simplified netting rig avoids all of these issues, as the netting never touches the ground.
A final tip I’ll leave readers with regarding bird mitigation is the use of a Falcon FrightKite in addition to netting. This is a kite in the shape of a predator bird that is positioned in the middle of the vineyard and flies atop a 28-foot (8.5-m) telescoping pole. This had the most impact to reducing bird pressures prior to netting the vineyard, so its use continues in addition to netting.
We are extremely happy with our simplified netting rig solution and appreciate the fact that most of the netting application and removal can be done with just a single person and the negative impacts of the netting being on the ground are avoided. In addition, setup and breakdown are extremely easy, and storage of the disassembled rig takes up very little space.