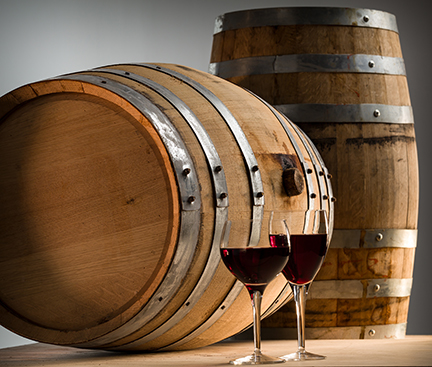
 Oak wine barrels are a valuable addition to any winemaking set-up. Not only does a barrel add complexity, aroma, and tannin, it also allows a gradual, controlled amount of oxygen through the wood staves, which results in reduced astringency and helps stabilize color (among other beneficial phenolic reactions that increase sensory properties of the wine).
When we compare our home winery to that of a professional one, we see that our home operation is a miniature version of the big guys, and the barrels we use are often no different. Using small barrels is perfect for home winemakers seeking the benefits of oak but not making enough to fill a 59-gallon (225-L) behemoth. In addition, their small stature is manageable, meaning you can pick them up and carry them around for cleaning (empty of course) and their footprint is smaller, which is a positive attribute in a home winery setting. Batches made at home are typically in the 5- to 15-gallon (19- to 57-L) range. Barrels at these volumes are very affordable compared to their 59-gallon (225-L) counterparts However, with the benefits of using a smaller barrel come a few challenges we need to overcome in order to take full advantage of what they have to offer. In this article I will attempt to alleviate any concerns you may have of using smaller-sized barrels. I will go over how to prepare for your new arrival, how to break it in, and go over other things we will need to consider to get the most out of this new addition to the winery.
How to Choose a Barrel
Each type of barrel comes in several different sizes to accommodate virtually any volume being produced. Therefore, when thinking about what barrel is right for you, one must consider the different flavors and nuances a barrel provides and worry about the volume of the actual barrel a little later. There are approximately 600 different species of oak but only a few are considered fit for wine barrels.
Of these few, two types are grown in the six main forests of France known for oak: Limousin, Vosges, Nevers, Bertranges, Allier, and Tronçais. It is in these six main forests of which Quercus robur, known as pedunculate or English oak, and Quercus petraea, known as Sessile oak are grown, with the latter being considered superior for its tighter grain and contribution of beneficial aromatics, phenols, tannin, and volatile aldehydes. Hungarian and Eastern European forests also produce Quercus robur and Quercus petraea in the famous Zemplen forest of Hungary, with barrel oak also coming from Romania and Croatia. And last but not least, there is American oak (Quercus alba), which is grown in the eastern United States as well as Missouri, Minnesota, and Wisconsin.
Each type of oak has its own flavor profile and oak flavor transfer rates. French oak tends to add dark chocolate, roasted coffee beans, and exotic, savory spices, with a subtle and slow extraction. Hungarian oak lends vanilla, spice, and caramel-like flavors. Although Quercus robur and Quercus petraea are grown in both France and Hungary, it is the terroir that sets the barrels from each location apart. In my research I have found the trees grown in the Zemplen forests with its volcanic soil grow slower and smaller, which makes for a tighter grain, and a very slow, delicate extraction compared to the oak growing in France. American oak, with its more intense approach to its infusion of flavors into the wine will impart vanilla, aromatic sweetness, roasted coffee, coconut, and dill. Compared to French and Hungarian oak, American has a more intense flavor, and a quicker extraction. When it comes to cost, French is at the high end of the spectrum, American at the low end, and Hungarian oak somewhere between the two. If you want the French essence at a fraction of the cost, I recommend Hungarian oak. If you are working with hybrid grapes, experiment with oak cubes and staves of different types of oak to determine the best fit for your goals.
What Size is Right for You
The oak surface-to-wine volume ratio is a major factor to consider when deciding the length of time a wine may age in a barrel. In smaller barrels, initially, oak will be imparted into the wine faster than that of a 59-gallon (225-L) barrel, which has just the right surface-to-wine ratio for extended aging after first use without the worry of over-oaking, before the slow controlled oxidation has had its chance to influence the wine in a positive way. In our case, it will take a few rotations of wine in and out of the barrel before we can leave the wine in long enough to make use of the beneficial oxidation process. In other words, the barrel will need a breaking-in period to avoid an undesirable level of oak flavor, which would take years of aging before the wine mellows to a desired taste.
American oak, with its looser grain, is the quickest to impart its oak influence into the wine. Whereas French and Hungarian oak (depending on where the wood was grown and what species), will tend to have a tighter grain that will influence the wine with its oak flavor over a longer period of time. However, surface-to-volume ratio should be your primary consideration over grain tightness. Although the grain may be tighter, the barrel is still of a small size and will oak faster than a larger one because of its much greater surface-to-volume ratio. With that in mind, when preparing for the arrival of a new small barrel, you will need to have up to five different batches ready to rotate in and out of it. This is because the first wine may need be racked out in a matter of weeks due to how quickly the wine takes on oak flavoring. After four or five rotations, you can rest easy and allow the wine to age for extended periods without the fear of too much oak character. You can even make a few less expensive wines from kits, juice, or non-premium grapes to go in first so if you accidentally over-oak, you will not be doing so to a batch from grapes that you spent a year caring for in your own vineyard or for which you paid a premium.
With the oak-to-wine ratio in mind, you can determine the correct-sized barrel that fits your production output to avoid storing it empty half of the year. If you purchase your grapes annually, simply get enough fruit to keep the barrel full until next harvest (85–100 lbs. for 5 gallons of finished wine/39–45 kg/19 L), and be sure to have extra wine for topping.
When growing your own grapes, it may be difficult to project yearly output unless you are documenting and looking back at harvest data from previous years to determine if what you are harvesting will be enough. If you feel it may be a light year, juice pails or additional grapes can be purchased to fill the void. Evaluate your yearly volumes and plan accordingly to keep your barrel full and happy. However, if your wine is in danger of being over-oaked, and you do not have a wine to immediately follow, storing the barrel empty until another wine is ready to go is always an option. Simply rinse the barrel several times, drain, allow to dry, and burn a sulfur stick inside the barrel and replace the silicone bung. Be sure to check for the presence of sulfur monthly. Another option is to store barrels with a sulfur-citric acid solution, which keeps the barrel swelled and kept from drying out. This method of storage is recommend for well-broken in barrels as the solution will leach out some of the precious oak flavor from a new barrel. Monitoring and caring for your broken in, but empty, barrel is incredibly important if you plan to continue use of this significant tool in your home winery. Improper storage and lack of intervention can cause contamination of the barrel and spoilage of any wine that eventually goes into it. It is recommended to keep wine in the barrel at all times, if possible. For more on barrel care, see https://winemakermag.com/technique/barrel-care.
In an effort to maintain a fully topped barrel, you will also need extra wine for topping as it evaporates. This evaporation is known as the “angel’s share,” which creates an ullage (head space) in the barrel that needs to be replenished every so often to prevent oxidation and the growth of surface yeasts that could impact the flavor negatively or even ruin the wine permanently. Depending on the humidity of the room, the barrel may require up to 500 mL of wine every two to four weeks to maintain a properly topped-up barrel. Strive to maintain a cellar temperature of 55–60 °F (13–16 °C) and a humidity level of 60–70%. When humidity levels fall below 50% then wine evaporation losses are higher, and levels above 85% are the perfect storm for mold growth. I realize this is home winemaking and conditions are seldom perfect, but do your best to maintain these levels for best results. In the winter when humidity levels are low, use a humidifier that allows the user to set the desired humidity level to keep it consistent. High summer temperatures and humidity levels can be kept in check with an air conditioner and/or dehumidifier.
At cooler temperatures, aging is slowed. At higher temperatures there could be an imbalance in the ratio at which oak compounds are being extracted along with an accelerated rate of microbial spoilage. Be sure to purchase a thermometer and hygrometer so you know what is going on in your barrel storage room at all times. Another thing to consider is for the first two months you will need to monitor the absorption rate of the barrel and top up at least twice a week. As the barrel soaks up a portion of the wine, topping up will be less frequent and can be performed once a month or thereabouts. A good rule of thumb is to have at least 10% more wine than fits in the barrel for topping wine, or you can top up with a similar wine you already have bottled from a previous vintage. Even store-bought wine can be used as long potassium sorbate is not an ingredient (as it would cause off flavors when your wine goes through malolactic fermentation).
Preparing for its Arrival
Before we get our new barrel, we need to have a few things ready. As mentioned earlier, I recommend up to five batches of wine ready to rotate through the barrel as the first couple wines will obtain oak flavoring rather quickly. The barrel will need a cradle to sit in so it is up off of the floor and not rolling around. These can be purchased from the barrel seller, often with wheels attached for easy mobility around the winery for racking operations, or you can make your own (as detailed in the sidebar below). Or the barrel can sit on a workbench or the floor with four wedges cut from 2 x 4 lumber in the front and back on each side to prevent it from rolling and to keep it elevated a bit off the floor.
Typically your barrel will come with a wooden bung. These do not seal well and I urge you to purchase a silicone bung. These achieve an effective seal and are very durable. Be sure the room you are storing the barrel in is close to the recommended temperature and humidity levels
outlined earlier.
Working with a Small Barrel
When I was researching the use of small barrels, I was very concerned about an aging schedule. How long will I leave the wine in the barrel? What if I over-oak my wine? Will the wine even be in the barrel long enough to benefit from the slow ingress of oxygen? While all of these are valid questions, one must realize each wine is different and will require a different aging regimen.
When the first and second wine go in, a good guideline to follow is one WineMaker’s Technical Editor Bob Peak has stated in previous articles: One week per gallon (4 L). This means for a 10-gallon (38-L) barrel, the wine can stay in for approximately 10 weeks. This timeframe is definitely not enough time for any sort of oxygenation effects to take place (at first). But as we rotate more batches of wine through the barrel, each batch can kick its shoes off and stay a little longer than the last, as is the case with another schedule guideline that was recommended to me by a couple professional winemakers: Double the barrel aging time for each batch until the barrel is fully broken in. The first wine may be in the barrel for just 8 to 10 weeks. The next wine could then stay twice that; 16 to 20 weeks, and the next 32 to 40 weeks, and so on. These time frames should assist you in determining how long to leave each wine in and prepare for how much will be required for topping the barrel off to keep it full at all times.
According to Daniel Pambianchi’s Techniques in Home Winemaking, the first one or two wines aged in the barrel will be higher in tannin. The subsequent wines will be of higher quality because the wine can age longer as tannins are transferred from the barrel to the wine at a slower rate. Pambianchi goes on to recommend leaving a portion of the first couple barrel-aged batches un-oaked to be blended later to adjust for the right level of oak flavor. This is wise in case the wine unintentionally gets too much oak flavor. The biggest hurdle to jump over is the break-in period, which is all that is needed in order to allow wines an extended stay in a smaller barrel. This goes for 5-gallon (19-L) barrels up to other home winemaking sizes too. Using a smaller barrel is not difficult, it is just different.
Tasting for your Desired Oak Level
When using a new oak barrel for the first few batches of wine, it is important to smell and taste the wine weekly. As mentioned earlier, once a few wines have taken up residence in the barrel, you can taste it when you top-up (every four weeks) to see how the wine is developing and if the level of oak is to your liking. I prefer to slightly over-oak before I remove the wine from the barrel. Once bottled, the oak flavor will integrate into the wine over time and an oak level you were happy with 6 months ago will no longer have the same impact it once did. Over-oaking the wine slightly ensures that some of that oak essence fades to a sweet spot. Just know this determination of oak is completely up to your palate and what you prefer.
More Tips for Barrels
Once the barrel has gone neutral, meaning the barrel has no oak flavor left to offer, oak cubes can be used. This enables you to use any type of oak while taking advantage of the microoxidation effects of the now-passive barrel. At this point, the concern of over-oaking is past and the oaking level will be determined by the amount of cubes or other oak alternatives you add to the barrel.
Generally, 5- to 9-gallon (19- to 34-L) barrels may be lifted to an elevated work bench for gravity racking. For most of us, 10-gallon (38-L) barrels and up will require a pump to rack the wine out as it will be to heavy to lift for gravity racking. Vacuum pumps work well, as do diaphragm and impeller pumps. If you have a Buon Vino Mini-Jet or Super-Jet, these too can be used for racking operations. Be sure to have a racking plan before you get your barrel.
Topping wine can be conveniently kept in a Cornelius keg under the protection of nitrogen or argon. When it is time to top off the barrel, simply fill it with the plastic cobra tap connected to the keg. I recommend oxygen barrier tubing to prevent oxygen ingress affecting the wine, as is the case with vinyl tubing.
When rinsing or cleaning out your barrel, avoid the use of chlorine in your rinse water by using an in-line carbon water filter. The chlorine can contribute to the production of 2,4, 6-trichloroanisole (TCA, or cork taint) and some molds. You can even use filtered water when mixing sulfite powder and other additives before adding it to the barrel.
If you are getting serious enough in your winemaking that you are getting a barrel, I highly recommend the purchase of a sulfite testing kit. Whether it be an Aeration Oxidation kit, or the Vinmetrica unit, testing sulfite levels as your wine ages in the barrel gives you a huge advantage and allows you to add the exact amount of sulfite needed to protect the wine from oxidation, rather than guessing and adding too much or too little. These sulfite testing kits provide clear instructions and everything you need to get started. You do not even need a degree in chemistry to perform and interpret the test results.
At first, I was afraid to get a barrel, most notably the smaller version, especially with all of the horror stories you can read online of folks over-oaking their wines and barrels being a major pain to maintain and take care of. There are even stories of folks oxidizing their wine because they did not monitor sulfite levels or experienced other issues. However, if you monitor the wine’s progress closely and take care of your equipment, after a brief break-in period, small barrels are easy to work with, affordable, and the benefits far outweigh any potential risks associated with aging wine in them. After a while, maintaining and working with small barrels becomes second nature and any anxiety you had fades away.
Build a Barrel Cradle (sidebar by Rory Schmidt)
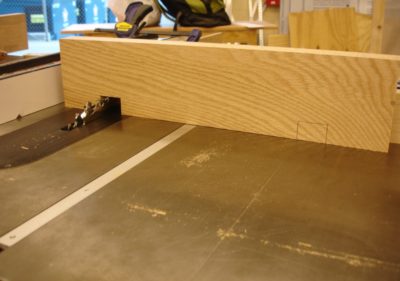
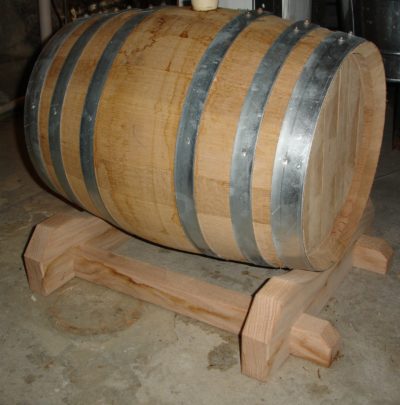
I picked up a 10-gallon (38-L) barrel to use at home. I quickly realized with a round barrel I needed a way to secure it from rolling around once it was filled and lying on its side.
Being a part-time woodworker, I took it upon myself to create a barrel cradle to hold it secure. I decided on a simple lap joint technique (think Lincoln Logs) with shallow V notches to create the cradle. While my cradle is designed for my 10-gallon (38-L) barrel, the measurements can be personalized to fit whatever size barrel you own.
A drawing is the best way to start any woodworking project. It helps you anticipate any potential problem areas. When creating a barrel cradle you need to know the length and the diameter at the ends and middle of the barrel. I first found the overall length of the barrel, followed by the diameter of the ends and middle using tailor’s tape. Using circumference divided by pi, I found the diameter of the middle and ends of the barrel. Knowing the diameter, I could determine how high the ends of the barrel need to sit so that the middle doesn’t rest on the floor.
With my measurements written out, I started construction by cutting the lap joints into matching pieces using a table saw and dado blades. If you don’t have this type of setup there are other options — an oscillating tool with a cutting head, jigsaw, or you could go the hand tool route and use a backsaw and chisel. The key to creating the lap joints is to make sure both pieces are identical. If there is a bit of wiggle in the joint that’s okay, just make sure the cradle as a whole is square.
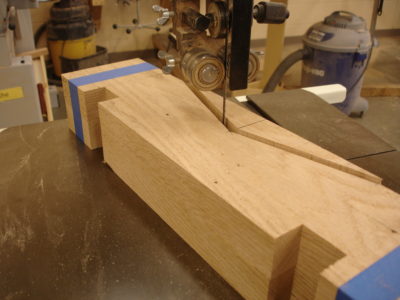
The next step is to cut notches in the end pieces to steady the barrel. The easiest way to cut a shallow V is using a band saw. Taping the two end pieces together is a good idea to ensure the cuts on both ends are identical. If you don’t have a band saw, a jigsaw would work as well.
Once cut, test the pieces by slipping the notches on the ends over the notches on the lap joints to see how they fit and how the barrel sits on your new barrel cradle. When you get it so the pieces sit securely, you can paint, stain or clear varnish your cradle to customize it for your cellar, or add any other decorative touches such as rounding off the corners or other designs.
Further Reading
I urge you to read up on barrel storage, maintenance, and signs of microbial infections to address any potential issues before they get out of hand. Below is recommended reading for barrel care, maintenance, and what could go wrong.
Techniques in Home Winemaking by: Daniel Pambianchi. Chapter 7 Page:189
Oak Barrel Care Guide by: Tristan Johnson https://morewinemaking.com/articles/Oak_barrel_care_guide
Oak Information Paper by: Shea A.J. Comfort https://morewinemaking.com/web_files/intranet.morebeer.com/files/oakinfopaper09.pdf
