A high percentage of my consulting business comes from wine lovers wanting to buy vineyard property. The story is usually the same: about ten years from retirement, successful in business, getting tired of pushing paper in the rat race, they want to get back to an agricultural way of life to recapture a lost piece of their soul. Some believe that the best way to appreciate wine is to grow it themselves. Others may believe that being “in the business” will give them more opportunities to enjoy wine.
All potential vineyard owners have one thing in common, though. None expect the process to be so complicated, expensive and time consuming. The purpose of this article is to make full disclosure. After reading it, you should have a much deeper understanding of the responsibilities, pitfalls and economic impacts of buying land for vineyard establishment. If the caveats dissuade you from planting a vineyard, I will have saved you a lot of money and disappointment. However, if after reading this article, you are still interested in starting a vineyard, you are a true believer and will likely succeed.
Why do I want to grow grapes? This may seem like a simple question, but it’s one that I force upon my new clients, asking them to dig deep and discover the truth that may lie beneath the initial impulse of wanting to grow vines on their property. Let me be clear: The cost and effort to design, plant and maintain a vineyard is clearly prohibitive to most people that want a vineyard for landscaping purposes.
Landscaping in this context means that the vines are planted to:
•Fill in empty space in the yard
•Remind you of France or Italy
•Show your friends and neighbors you have a vineyard
• Increase property value
The key here is to be honest with yourself. There are plenty of fruit trees or other ornamentals that will be just as pretty (but perhaps less romantic) as a vineyard, and will require far less maintenance, inputs and upkeep cost. This warning comes from years of dealing with customers who have let their vineyards degrade to a point where the fruit does not make sound wine, and they feel burdened by the responsibility of vineyard ownership.
The Right Reasons
Without the cost of land, an acre of vineyard can cost up to $20,000 to plant. For the same money you could purchase thousands of bottles of fine wine and fill a cellar for many years of wine drinking. Without commitment, the right help and the right piece of dirt, you may plant a vineyard and never produce a sound bottle of wine. Here’s my list of reasons that you should pursue vineyard land for wine production:
• Your enjoyment of wine has peaked after decades of travel, tasting, note taking, collecting and pursuing knowledge of wine. • You are physically able to do hard physical labor in the vineyard, and believe doing so will feed your soul in a way that your current vocation could not. Alternatively, you have a vineyard staff that can do the work under your close supervision. • You’ve been a home winemaker for a number of vintages, and have found that you just can’t get the quality of fruit that you want. • You believe that your passion and commitment will lead to a sense of accomplishment. You believe you can grow better fruit than other local vineyards. • You have been working hard to have the finances to pursue your dream.
There is a reason that most professional winemakers do not own their own vineyards. The cost and time required for growing quality fruit keeps them from the cellar and from promoting their wines. My advice to clients is this: if you have a source of quality fruit that you can buy at a reasonable cost, you may want to continue purchasing the fruit and let someone else farm winegrapes for you.
Now that I’ve scared most of you away from planting a vineyard, I will attempt to guide the initiated (perhaps insane) viticulturists through the process of assessing sites for vineyard development. I feel confident that you are aware of the financial and labor challenges, so now we will focus on the nuts and bolts of looking for a vineyard site.
Here are some questions you should ask yourself, and answers that attempt to look at all sides of the issue:
Home Winemaking or Commercial Production?
This decision will impact the size of the property you are seeking, and help you define the region where you would like to grow. Most home winemaking vineyards are an acre or less, and most commercial vineyards are 5 acres or more. If you’re not sure which way you want to go, my usual recommendation is to start with an acre. An acre of vines can be farmed by a single devoted individual, and will produce enough crop in its third or fourth year to give you an excellent indication of wine quality from that locale. If you are going commercial make sure you have a potential audience for your wines, or winemakers that have agreed to buy the fruit before you plant. Of course you want to make sure that the land is suitable for premium wine production. Vineyards are too much work to plan and install on a site that will produce mediocre wine.
Time and Money
A vineyard is not an asset. Most banks won’t even add one dollar of value to your property for producing vineyards, even successful commercial operations. Of course, the truth is that a vineyard does add value to a property: both real and imagined, but don’t expect to retire on the money that will be produced by your new winegrape project. Set a budget from disposable income, not from investment accounts. After you set a budget, try not to freak out when the final numbers double. A vineyard tends to be a big money pit for the first three years, and it hurts to watch the money go out constantly without any fruit coming back to you. In general, if you are at all concerned about the cost of finding vineyard land, establishment and maintenance, this is not the hobby for you. At the risk of sounding elitist: if you shudder at the idea of maintaining a Ferrari, a vineyard will likely wreck your finances; both Italian sportscars and vineyards are temperamental and in need of constant professional tinkering in order for them to produce pleasurable results. There are devoted individuals out there that have the time and strong back to do the work themselves. They can minimize costs and grow great fruit. I suspect they are in the minority, though, so expect a great vineyard to cost a great amount of time and money.
Will Grapes Grow and Produce Good Wine?
If you’ve reached this part of the article, you are a brave soul and possess a personality that is not frightened by a challenge. I tried to scare you off but you kept coming back for more! Now we get to the fun stuff. The details of soil and water testing are included a little further down, but for now let me offer the following advice: Let others spend their time and money being pioneers in new regions. Find a place in the world that makes wines you LOVE to drink, where there’s available property that fits your budget and neighbors that can help you with your vineyard. If you love Riesling, you may want to look at the Finger Lakes. Delicious native grapes like Norton do very well in Missouri, where you can find spectacular barbecue to match. Zinfandel lovers may be able to find a plot in the Sierra Foothills of California or even Lodi (a good place to be stuck, for Lodi has one of the best grower outreach programs in the world). Up and coming regions offer good value for land: areas in Paso Robles, Santa Barbara and Monterey are still transitioning from production agriculture to viticulture, and offer an excellent balance of land value and a supportive, friendly industry. The costs associated with vineyard development should lead you to this conclusion: Start a vineyard where great wine is grown and there is an existing viticultural infrastructure with which you can network.
The Key Factors
Get a pro involved early
Ask around to see who’s making the best wine in the area, and then visit that person with gifts of fine wine or take them out to eat. You’ll be surprised how a great bottle of Grand Cru Burgundy or a medium-rare veal chop can affect the mood of any winegrower. If they favor Budweiser and Burger King over Clos de la Roche and duck confit, search for another consultant. Show them you are serious, passionate, knowledgeable and financially solvent and they will usually be willing to talk about your project. Bring soil samples, water samples, etc., tell them your favorite style of wines and ask them how they would proceed to grow that type of wine locally. Become excellent customers of local wineries, attend wine association meetings, volunteer at events, become an important element in the local wine community.
Soil testing
Easy stuff: dig a four foot deep hole with a shovel, or preferably, a backhoe. Taking a central sample on a small backyard property may be enough, but if you see changes in soil structure, color or native vegetation, take additional soil samples from there too. Take samples from 12–24” (~31–62 cm) and 24–36” (62–93 cm) depths, label them individually in big, 1.0-gallon (3.8-L) ziplock bags and UPS or FedEx them off to an agricultural lab. Ask for comprehensive soil analysis for preplant winegrape production, and also ask for preplant amendment recommendations. This will cost you about $130 per sample, and should be done before making an offer on any property (ditto for water testing).
Water testing
If you are planning on using irrigation, take a raw sample of the water source and ask for an irrigation water suitability test (note that the test is for winegrape production). The water can be tested for a myriad of chemicals, nutrients, benefits and potential problems. The following factors should be measured in the test: alkalinity, bicarbonate, boron, calcium, carbonate, chloride, copper, electrical conductivity, fluoride, gypsum requirement, hydroxide, iron, magnesium, manganese, nitrate, pH, potassium, sodium, SAR, sulfate, total dissolved solids, total hardness and zinc. One quart (~1 L) of water is usually required. Use a secure, sterile plastic bottle with a sturdy closure, and make sure to run your well or water source for about 10 minutes or more before taking the sample, to assure that it has flushed all contaminants. Again, I will stress the importance of personally completing soil and water testing before bidding on a potential vineyard property. I suggest not trusting samples provided from real estate companies or consultants. For the money you are about to spend, it’s worth it to do the sampling yourself, or hire a viticulturist you trust to take care of it under your supervision.
Soil and vertebrate pests
Once you get the soil tests back, discuss them with a local grower or call the lab to have anything mysterious explained. Most folks don’t know the importance of cation exchange capacity or boron deficiency, but with the right consultant, it usually comes down to adding something to the soil pre-plant, or using a yearly fertilizer or compost. No soil is perfect, but you may want to pass on a site that has too many red flags on the soil report. Know the details of your soil’s chemistry before bidding on a property. Also, look around at the open land and the neighbors’ open land. Is it pocked with gopher mounds? Are there ground squirrels? Deer and no deer fence? Turkeys? Ostriches? If there are more than five gopher mounds per acre, you may have a potential problem. You can ask for the gophers/squirrels to be professionally exterminated as a condition of purchase. If there are deer in the area, deer fencing (you may be surprised how high a deer will jump for ripe winegrapes) is a must. Deer fencing will also keep other animals out and your dogs in. Dogs are important for a vineyard, as they can put pressure on birds, squirrels, coyotes and gophers. There is perhaps no way to make a dog happier than giving them the job of protecting a vineyard. Each vineyard problem has a specific breed that can help. For my taste, a border collie is an excellent all-around vineyard dog as long as you have enough property to keep the breed busy.
Disease
Know the potential mildew and rot pressures that occur on your potential site, and ask local growers what they spray, what equipment they use, how often they spray, where they buy their materials and what permits are necessary. You may also want to ask local winegrowers about disease issues such as phylloxera, eutypa, Pierce’s disease, nematodes, special insect pests and the likes so you can predict potential problems in the vineyard and act to minimize impact. Finding an area free from Pierce’s disease and phylloxera may be your best bet for a long term vineyard investment.
Aspect
Aspect refers to the lay of the land and how hillsides are oriented to geographical features and the sun. Don’t worry too much about finding that south by southwest facing hillside you learned about in France. Most sites in the U.S. don’t need a special aspect to get adequate ripeness. I do believe that hillside sites tend to grow better wine as a result of drainage and a reduction in vigor. Try to plant on a site that is slightly elevated and sloping, and be careful not to plant at the bottom of a canyon or basin-type area that may collect cold air and frost the vines in spring. I plant my rows in a north-south orientation, and recommend the same to my clients, unless it makes the rows unsafe for tractors or equipment.
Drainage and erosion
The last thing you want after installing a vineyard is for heavy rains to wash away your soil. Winter cover crop is a solution that will also help the soil’s health when the green material is cultivated into the ground. Note which way water and rainfall will drain off of your site, and make sure to protect freshly turned hillside earth from rains by use of a layer of straw, planted grasses, sandbags or subsoil drain systems (sometimes called French drains). Young vineyards that ripped or cultivated the soil preplant are most susceptible to this kind of erosion. Heavy machinery operators that specialize in agricultural grading can be hired to solve these problems for you before planting.
Neighbors and fellow winegrowers
We’ve gone over this, but make sure the property is near existing, quality wine production, and that your neighbors are friendly and willing to share their expertise. Who knows, if you’re nice enough they may even let you borrow their tractor and spray rig!
Fencing, equipment and storage
You need a covered space to keep a tractor, ATV, spray equipment, buckets, gloves and tools. If the property has an existing barn or covered area, make sure it’s big enough to enclose all of your future farming equipment. All chemicals must be kept in a locked chest or closet and don’t forget about bulky items like bird netting, fertilizers, picking bins, and similar sized gear. It’s also nice to have a shaded area with a picnic table for vineyard workers to have lunch.
Follow through and installation
A few final questions arise: do you want to try to install the vineyard yourself or hire a company for a pro install? Do you use the cheapest materials and replace the trellising every 10 years or do you buy the expensive stuff that may last 30? Plan on one full time worker for a 1–2 acre vineyard if you don’t plan to do the work yourself. It takes about 8–9 full time, 48 hour work-week employees 6 months to finish our farming here at Clos Pepe, but we go overboard on fine tuning and human touch. There are always new mechanical devices being invented to remove humans from winegrape farming, but I’m guessing some of that sweaty hand labor is exactly what you dream of after 10 hours of pushing paper at a desk job. I do believe that the human factor, and passion specifically, is evident in a finished wine, and the more of yourself you put into the vineyard, the better the wine will taste.
Planning your Backyard Vineyard
Planting a home vineyard is a serious project that requires study, planning, a willingness to do agricultural labor and perhaps a small streak of insanity that comes with reaching a certain level of wine appreciation.
In planning your vineyard, there are lots of considerations. The purpose of this article is to introduce these issues to you, teach you some concepts, and then turn you loose to do your own research. It’s vital to network with other grape growers in your area to benefit from their mistakes and successes. Local wine growers can point you toward vineyard hardware suppliers, good nursery materials, help you choose your vineyard plot, your grape varieties and root stock. They might even help with the labor if you bring them enough wine. Most viticulturists I’ve interviewed admit that they would have planned and planted differently if they would have taken more time to read, network and plan. Once the vines are in the ground, there’s little you can do to change the basic layout of the field. With that understood, let’s start planning your vineyard.
Select Your Site
In the average backyard vineyard, there is little choice in your site selection. There’s a small piece of dirt that is unused, and that’s where we plant the vines. Do consider what a vine needs to grow sound fruit: good sunlight without excessive shade.
So growing grapes against a solid fence or a wall may be a bad idea. Remember what Galileo said, “Wine is sunlight, held together by water.”
Hillside vs. Flat
Hillsides, especially southwest facing hillsides in the northern hemisphere, have always been the preferred location for growing quality winegrapes. Hillside sites are generally well drained and have less frost issues in spring, as long as the cold air has space to flow down into. Consider the difficulties in farming on a hillside, though. Tractors and equipment take a beating. One has limited choices concerning row direction and row spacing — the slope, exposure and the topography will dictate where you can fit the vineyard. Terracing might be necessary, which can add thousands of dollars per acre to the establishment cost. Our vineyard is mostly hillside, and I deal with erosion and equipment difficulties constantly. There are few sights as inspiring to the wine lover as a hillside vineyard, but putting a vineyard on a slope will nearly double the effort required to maintain it, and will significantly increase the investment needed to establish it. Quality fruit can be grown on flat ground, it just tends to be a little more vigorous and might require some more vine-hedging.
Exposure
It is imperative to know what sections of your property get the most sunshine, wind, and shade throughout the growing season — roughly March to October in the US. Sun exposure on the fruit is key to getting good flavor out of your grapes, so planting a vineyard among shade trees or in the shadow of a canyon is not advisable. An open, sunny, southwest facing slope is perfect. Finding the spot on your property that gets early morning sunlight, and keeps that exposure until late into the afternoon will ensure that the vines get all the sun they need to grow, stay healthy and make sugar in the grapes. Some wind will protect the grapes against mold and mildew. Too much wind will shut the stomata on the leaves and cause the vine to shut down (stop respiring) temporarily.
Prepping the Soil
Follow these five steps to preparing the soil for a vineyard:
1. Evaluate the soil through test pits, soil samples and laboratory soil analysis. Get a USGS soil map and learn what “soil series” you will be planting on. Also learn how that soil series impacts agriculture. Dig a deep hole in the center of your vineyard site and take soil from the top 12” (30 cm), from between 12” and 24” (30–60 cm), and between 24” and 36” (60–90 cm). These are the depths that the vine will establish itself and grow most of its root structure. Collect a few pounds of soil from each depth in large ziplock bags and carefully label each bag by location and depth. Make sure to fill the pit back in so you don’t trap animals or careless children. Send the bags off to a good soil laboratory.
When you get the results back, the aspects of the soil should be described in context of “norms” for winegrape production. If the norms aren’t listed on the evaluation, you can call and yell at the lab, or hit the internet or library to find the normal ranges of nutrients for winegrape production.
You may also want to find out if there are nematodes or phylloxera in your soil. These are vine pests that can cause havoc if you don’t plant a vine rootstock that can resist them. Most soil labs can test a soil for these pests. Ask them about the best way to take a sample, or check their website.
2. Amend the soil with lime, nitrogen, compost, etc., to make it pH balanced and to add necessary nutrients as needed. Teach yourself a thing or two about what nutrients a vine needs, and then check your soil samples to see what needs to be added or amended. Take your soil samples to a respected company that sells amendments, and they will help you determine how many pounds or tons per acre of any given amendment your vineyard may need.
3. If your soil proves to be hard and compacted, and you can move equipment onto your property for the task, rip the soil to a three foot depth to help the vines establish strong, deep root systems. Do this after you have spread your amendments so they will be spread through the soil evenly. After ripping, disk the soil so it is uniform and relatively smooth.
4. Call a local farm supplier and let them know you need to grow some cover crop to keep your new ripped, disked vineyard site from eroding. A good cover crop — grasses, vetch, clover, etc. — will help slow erosion, add nutrients to the soil, attract beneficial insects and, if timed right, may even choke out potential weed growth. In areas with hard winters, growing a winter cover crop might not make sense.
Irrigation
Ask local winegrowers whether or not they use irrigation, or if the rainfall in your area is usually adequate to bring in a healthy crop. The natural habitat of Vitis vinifera gets around 30–50 inches (76–130 cm) of annual rainfall. Personally, I believe that an area that gets 30+ inches (76+ cm) of rain per year is appropriate for dry farming. Irrigation can be the most costly aspect of vineyard development. If you don’t need it, save the money. If it turns out you do need supplemental irrigation for your new vineyard, make sure to install it after ripping and disking, before planting cover crop and put in a system that takes elevation, gravity and water pressure into account. Most backyard vineyards are on flat ground. In this situation, and if the vineyard is less than 100 vines, you can hand water the vines with a hose, giving them enough water to grow every week or so. If you want a more elaborate drip system, this is yet another opportunity to bring a local winegrower a few bottles of wine. Ask how many gallons of water they apply per week in an average growing season, and how they apply it. You may need to set up a subsoil PVC system to get the water to the site, you may need to invest in a pump to keep pressure adequate, and if you are on a hillside you will need pressure compensating drip emitters, around 0.5 to 1.0 gallon (2–4 L) per hour. Without pressure compensating “drippers,” the vines at the bottom of the hill will get lots of water, and the vines at the top will get none due to increased gravity and pressure at the bottom of the system.
Trellising and Vine Spacing
At the risk of sounding like a broken record, you need to visit some local vineyards before deciding on a trellising system. If I learned anything at UC-Davis, it’s that viticulture is site specific. First, we need to understand how to decide on row and vine spacing, then we can come back and discuss trellising options a bit.
There’s no denying it. Vineyard spacing is a hot topic in wine-farming circles. The debate (deciding how much distance to put between individual vines and between vineyard rows) has become a high-interest issue with home viticulturists from the Carolinas to Malibu. There was a time when anything tighter than twelve feet (4 m) between rows and six feet (2 m) between plants was considered a high density planting. Indeed, many of the greatest vineyards in Napa Valley are still planted on this kind of wide spacing. But in the last two decades, and the last ten years specifically, high density plantings (spacing as close as 3 feet X 3 feet (1 m X 1 m) have become widespread. Even though squeezing thousands of vines into a one-acre planting seems a perfect strategy for a backyard vineyardist, there is plenty of evidence that high density vineyards can be extremely problematic on most soil types.
Viticulturists often express vine spacing with two measurements, such as “twelve-by-six” or “eight-by-four.” The first number represents the space between rows and dictates what kind of equipment is appropriate for the vineyard. Twelve-foot (4 m) row spacing will allow almost any kind of tractor, full-sized pickup truck, etc., to traverse the rows. Six to 8 foot (2–2.5 m) row spacing is generally the tightest that allows narrow tractors to work in the vineyard. One might be able to squeeze an ATV down 4 foot (1.2 m) rows, but take the rows to 3 feet (1 m) and get prepared to do all cultural practices by hand.
The second number expressed represents the distance between vine trunks. Together, these numbers will dictate vine density per acre. This will impact both yield per plant and yield per acre, and will also impact how the vines compete with each other for water and nutrients.
Now that you know how to express vine row spacing, the obvious question remains: how does an amateur viticulturist best match a potential home-vineyard site to a specific spacing arrangement? The answer is not necessarily complicated, but does require a good deal of thought, practice and planning. First let’s look at how vine spacing affects vineyard issues and wine quality, and then we’ll help you decide what spacing would be well-suited to your backyard vineyard.
If you remember anything from this article, remember this: Vineyards should be efficient to farm and vine spacing should be based on the anticipated vigor of the vineyard. The amount of work you will have to put into your vineyard is dictated by how well you match vine vigor to a trellising and spacing arrangement that harnesses that vigor into an appropriate “system.”
Let me give you an example. An acquaintance asked me to consult on a vineyard project gone wrong. This was the worst kind of consulting job — one where all the decisions had all been made — in an incorrect fashion. The vineyard owner had gone to Burgundy, France, saw beautiful Pinot Noir vines arranged in meter-by-meter fashion and decided that he wanted the same type of vineyard on a small one-acre slope at his home in the Santa Ynez Valley in California. Don’t let aesthetics drive a planting project, and never base your vineyard design on the vigor and climate of a site 6,000 miles away.
The soil of the Santa Ynez site was highly vigorous, nutrient rich and deep. The vines sprawled out with canes eight feet (~2.5 m) and longer, and the more the owner tried to hedge the vines, the more lateral shoots appeared and clogged up the fruiting zone. Those beautiful 3-foot (1 m) rows became an impenetrable jungle of shoots and foliage — you couldn’t work the vines without a machete, and you might imagine how difficult it was to get sun exposure on the fruit, let alone find the clusters when harvest time arrived. This vineyardist assumed that high-density planting reduces vigor significantly. Competition does exist between vines, but not at a rate that will turn a high-vigor site into an appropriate location for a meter-by-meter system. Bottom line — high density planting is only appropriate on low to medium-low vigor sites where shoots rarely grow more than 4–6 feet (~1–2 m) per season. Sites that are appropriate for low-vigor trellising, such as a system that uses vertical shoot positioning wires to direct all growth up and out of the way of the fruiting zone, is usually appropriate for high density planting. Medium to high vigor vineyard sites are much more efficient to farm with at least 8 feet (2.5 m) between rows (to allow a few feet for shoots sprawling and draping), and six feet (2 m) in between plants, in order to give each vine ample space to spread its foliage and ripen a crop-load.
Next, let’s consider the factors that determine vine row spacing.
Cultivar
Some grape varieties are more vigorous than others. Pinot Noir is generally less vigorous than Syrah or Grenache, so Pinot Noir is generally a better candidate for high density planting, and Rhône varietals are better suited on a wide-spacing arrangement, unless the site is extremely low vigor. Choosing the correct varietal to grow on your property is the most important decision you’ll make in the planning process. Once you have a good idea of two or three options for grape varieties for your backyard — try to choose the vines best suited for the climate and soil in your backyard, and never choose a grape simply by what you like to drink. Start with this question: what varietal is the best wine grown and made within 100 miles (160 km) of your house?
Rootstock
Check with your grapevine nursery to see if they have rootstocks that can influence vigor to a level that will allow you to tweak your vine spacing to a specification that pleases you. Don’t expect miracles with rootstock either. They won’t guarantee low vigor. They have a small, but measurable effect on vine growth. There are high, medium and low vigor rootstocks, and choosing the right combination can save you lots of hedging or fertilizing later on. Careful research and pestering vine-growing neighbors about their spacing and rootstock combinations will likely steer you in the right direction. Rootstock will also help protect your vines against soil-borne pests.
Training-trellising system
As previously noted, low-vigor sites that are appropriate for vertical shoot positioning systems are usually more adaptable for higher density grapevines plantings. Head trained vines require even spacing that allows them to spread their shoots and not be crowded by their vine neighbors. Simple backyard trellising made of posts and wire should always allow as much space between the rows as the height measurement of an average vine in full growth. If you use fancy quadrilateral or split-canopy trellising, the rows have to give the vines ample room to grow and spread shoots to either side of the canopy. It should also be noted here that the closer the in-row vine spacing becomes, the less “wood” or buds should be retained at pruning for producing crop the following year. The main concern for the development of any vineyard should be designing a system that keeps canopy density at an optimal balance so there’s ample sun exposure on the fruit and in the area where buds determine the following year’s crop as a function of sun accumulation.
Fruit Shading
Shaded fruit has more problems with disease, mildew and rot and also accumulates less sugar, has higher pH, higher malic acid, less color and phenolic compounds and shows an increased vegetal/herbaceous character. Keep this in mind as we progress in our study of vine spacing, the main concern in developing vineyard spacing is to keep the fruit zone open to sun and air, eliminating cluster-shading leaves, lateral shoots, and over-cropped clusters that are all jumbled together. Smaller vines with increased sun exposure on clusters are often sought after by high-end winemakers, and the mythology of the high density European vineyards make this scenario even more attractive. Many winemakers admit that smaller vines with a light crop, in balance, produce high quality wine, and high density vineyard design, if used correctly, can increase vine competition and keep vine vigor slightly in check.
Soil depth, water availability and fertility
Deep, fertile soils with high macronutrient (NPK) levels will usually translate into high vigor vines that will require wider spacing. Low nitrogen levels in soil, soils that are rocky, shallow, have clay restrictive layers or are hillside oriented may have less vigor and may be more appropriate for tighter spacing. Remember that as planting density increases, the competition between vines will result in a measurable reduction of vigor. Competition between closely-planted vines is mainly for water. As such, supplemental irrigation is often required in high-density vineyards, especially near the end of the growing season. Remember that you can tweak the vigor of your site by judicious nitrogen applications to increase vigor, or by applying less water in the early season to decrease vigor.
Equipment available
If your tractor is six feet (1.8 m) wide, your rows should be at least 8–10 feet (2.4–3 m) wide. If you have an ATV with a little sprayer on the back, it should be able to fit comfortably down the row without running over errant shoots. If you have no equipment, your options are unlimited and you may want to pack some extra vines in to increase your land-use efficiency. First, determine your potential vigor by either planting a few vines near your house or in a garden, then determine your optimal spacing, then take into consideration what type of equipment you have or wish to purchase to make the farming easier.
Here are a few practical questions to ask yourself: How vigorous are grapevines in your specific soil, climate and area? In a highly vigorous vineyard with more than 10–12 feet (3–4 m) of shoot growth per year, vines should be spaced a minimum of 6–8 feet (2–2.5 m), and have rows as wide as the vines are tall. With 6–10 feet (2–3 m) of shoot growth a year, you should have 4–6 feet (1–2 m) between plants. Medium/low vigor sites, where vine shoots grow 4–6 (1–2 m) feet per year, may be appropriate for high density planting. Spacing between plants can easily be reduced to 3–4 feet (~1 m), and row spacing is more easily based on equipment needs and height of vines in the peak of the growing season. Remember: high density vineyards are generally trained lower, so they can still have a 1:1 ratio of vine height to row spacing for shading considerations.
How much time do you want to spend each week taking care of the vines? The more vines you have to prune, position, trellis, spray and tend, the more time-consuming your viticulture hobby will become. Carefully choose your vine-density to match vigor — but don’t lose sight of the responsibility that accompanies more vines per acre.
There is an interesting relationship between row and vine spacing. As row spacing decreases, so does yield per vine. As you might expect though, smaller row spacing increases tons per acre, so even though each vine is producing slightly less due to competition the yield is actually increased due to the fact that there’s more vines. In the correct climate and soil, high density planting can have a positive influence on vine balance, crop level and wine quality. Home viticulturists should be warned, though. Trying to imitate high-density plantings in your backyard may lead to more problems and poor wine quality. Choose a vine-spacing and trellising design that is suited for your own soil, vigor, varietal, rootstock, trellising and equipment and you will find that your planning will reduce future labor, provide higher quality fruit, and provide endless pleasure in the bottle and in the glass.
Planting Vines
After your trellising and irrigation are set up, you should be ready to plant some grapevines. Planting usually occurs in late spring after the threat of frost has passed. I suggest using dormant grapevines. My rates of success with dormant vines have proven significantly higher than using green-growing vines. If you receive your dormant vines from refrigerated storage, let them acclimate outside in the shade for about a week. Keep the vines moist and in the packing material until the morning of planting. At that time, fill a 5-gallon (19-L) bucket halfway with water, put the vines in root first, and carry the vines 20–40 at a time into the vineyard.
Dig a hole 18 to 20 inches (46–51 cm). Do not compact the soil on the sides of the hole. I know a few viticulturists that sprinkle broken shards of wine bottles in the hole before dropping the plant in, to keep gophers and burrowing pests from eating the roots. Some viticulturists also dip the roots in a solution of mycorrhizae fungus, which will increase the plant’s ability to uptake water and nutrients. Trim the root tips of the dormant vine and drop it in the hole, roots first. Make sure the graft union, which is the calloused bump where the rootstock meets the “scion” wood, is 4 to 6 inches (10–15 cm) above the final soil level. After the soil has been compacted and replaced, you need to dig up some extra, fluffy soil to mound over the exposed part of the vine. Pile the soft soil 1–2” (2.5–5 cm) over the part of the dormant vine sticking out of the ground. When you see substantial growth peeking out of the soil mound, gently remove the mound and allow the vine to grow as usual. Remove all the shoots but the strongest, and gently tie the growing shoot to the training stake with ½” (1.3 cm) green vinyl tie tape. Go through the vineyard every week or two and add green vinyl ties every 4–6” (10–15 cm) of new growth.
Your New Vineyard
If all went as planned, you should now have a thriving vineyard in your back- yard. The shoots are climbing, the green leaves are visible, and in a few years, you will start producing fruit.
Realize that this article is merely an overview of the issues of establishing and maintaining a vineyard. The more you research each element I’ve outlined here, the more successful your vineyard will be. Don’t forget to visit local vineyards and home growers, check the internet, join a few email groups or local clubs and do everything possible to gather information and professional support before ordering your vines. Every hour of preparation that goes into vineyard establishment will save hundreds of hours of hard labor in future seasons. Viticulture has been practiced for thousands of years. Your efforts and study will help preserve the tradition of growing grapes and making fine wine. When you have learned what it takes to grow good fruit in your neighborhood, make sure to share your expertise with other aspiring, local viticulturists. Share your wine and share your enthusiasm.
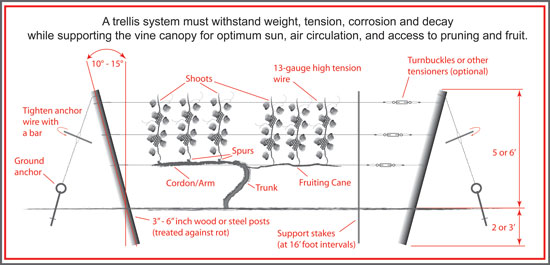
Choosing a Trellis System For Your Vineyard
In the wild, Vitis vinifera sylvestris (the forest vine that makes wine) cannot support itself as it grows. By understanding the needs of a wild vine, it will quickly become apparent why we need to trellis cultivated grape vines. We’ll also understand how the shape of the trellis will impact vine yield, sun exposure, and ultimately, wine quality.
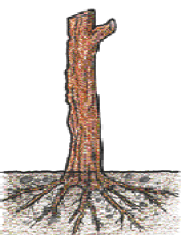
A wild vine cannot support its own weight, especially when young, and relies on existing structures — namely trees — to climb up. Mature fruit is consumed by birds, who then fly away and drop intact seeds to the ground as waste. A small percentage of these “pre-fertilized” seeds find a moist spot to germinate, often in the shade of a tree or bush, and the vine begins to grow — very slowly for the first few years, then more rapidly after the root system has developed and some leaves on the vine reach direct sunlight.
As the vine comes out of dormancy each spring, it produces growing tips flanked by wiry tendrils that search for structures to wrap around and support the lengthening shoots. Tendrils may find the short boughs of a bush or tree trunk to support the vine. These tendrils will become woody and tough as the vine finishes its yearly growth, keeping the vine permanently affixed to the tree or bush it climbs. A vine may snake along the ground for many years searching out a structure to climb. Without the support it needs to climb vertically, it may perish from predation or never produce fruit.
The vine will continue to climb, in a purely vegetative growing cycle, until there are dormant canes in a position where sunlight activates the dormant buds to become fruitful the next year. This fact will become important later when understanding how fruitfulness in the home vineyard is encouraged. Once the vine is mature and is able to grow into a position where it is parasitizing the host tree’s sunlight, it will “switch on” those sun canes into fruit production. The sun provides energy to convert sunlight into sugar and to make the grapes tasty enough to encourage the birds to consume them.
The use of artificial trellising to produce winegrapes outside of a forest setting (viticulture) began in areas close to the Caucasus Mountains starting in the Neolithic period from about 8000-4500 BC. Unlike these first vineyard mavericks, we have a wide array of materials, designs and hardware to choose from — not to mention thousands of years of science, study and anecdote to draw upon to make wise decisions when designing a trellising system.
Choosing a trellis system for your vineyard is one of the most important planning decisions you will make, second only to picking a varietal and rootstock selection.
Trellising Options
Trellis selection and spacing decisions should be based upon the anticipated vigor of the new vineyard. Vigor can be estimated by examining crops on the same piece of ground or planting a vine or two and seeing how much cane growth you get for a year or two before making trellising decisions. You can also submit your soil samples to a lab and request a report that will estimate vine vigor.
Styles of Trellising
Trellising systems can be divided into four types:
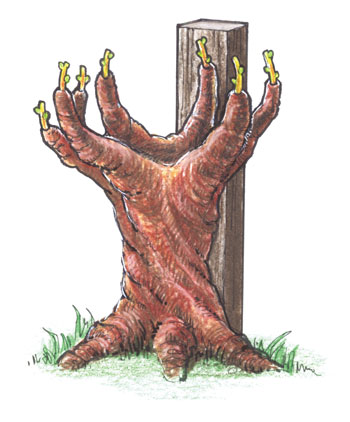
1. Head-Pruned Vines (each vine trained to a stake)
The simplest way of training a vine is head training. This is not really a trellis, but rather a simple way of supporting the vine. Installing the stakes is easy, but head trained vines suffer problems from shading, rot and mildew as the canes end up sprawled out on the ground late in the growing season.
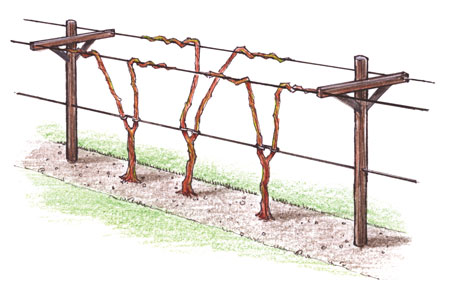
2. Vertical Systems with Shoot Positioning (orients shoot growth up into wires to form a curtain of foliage and a fruit zone that is leaf-pulled for maximum sun and wind exposure)
Vertical systems, like the simple vertical cordon shown here, orient the vine upwards. A vertical shoot position (VSP) trellis system tucks the shoots into a set of wires, keeping the canopy trained into a “curtain” that is accessible to spraying and picking. Properly spaced VSP trellising allows for good sun exposure and airflow.
3. “California Sprawl” Systems (without shoot positioning — vines are supported by trellis; all growth spreads out and down with no manipulation)
A simple stake and wire system, sometimes called a “California sprawl” system, is easy to install and maintain. This type of trellising works well for low or moderate vigor vines, but shading problems can result.
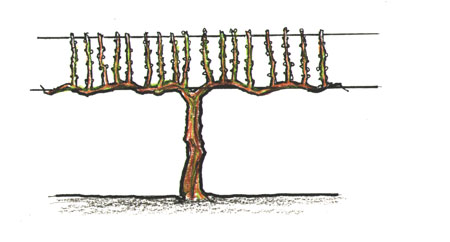
4. Horizontally Divided Systems (with shoot positioning — including Geneva Double Curtain or Lyre systems)
A horizontally divided system, like the Geneva Double Curtain system shown here, establishes two canopies from each vine. These work well for high-vigor vines, but are more difficult to install and maintain than other trellis systems.
To understand these systems, it’s critical to understand shoot positioning and why it’s important. Shoot positioning means tucking the growing shoots into sets of shoot positioning wires above the fruiting zone to make the vine rows appear as vertical curtains of foliage that act as vegetative solar panels for grape sugar production. This keeps the shoots from drooping back over the fruiting zone and helps the fruit get better sun and wind penetration. Remember that canes need sunlight, so the idea here is to maximize sun exposure on the shoots and canes.
Head-Trained Vines
Head training vines is the simplest method of vineyard establishment. Head training is not really a trellising method, and most viticulturists have abandoned the system because of problems with shading, rot, mildew and the difficulties inherent in trying to manipulate a vineyard canopy that is not guided by fruiting wires.
To head train a vine, place a training stake next to a newly planted vine and develop a short trunk system, and encourage growth from a low “head” with two-bud spurs retained at pruning. The vine is pruned like a rosebush, with the buds retained forming a goblet shape, with buds facing outward if possible. Canes will grow up and then down, and will likely end up sprawled on the ground and shading the fruit from the outside.
Simple Stake and Wire
A viable choice for low and moderate vigor sites is a simple one, two or three wire system, with or without crossarms. The vines are trained up the stakes, shoots or cordon arms are retained at pruning, and the only support the system provides is for the fruiting canes or cordon arms (on a wire).
Besides the stakes for support and a simple wire for a cordon or fruiting canes, there is nothing else involved. The shoots grow up, out and droop down, shading the fruit zone and making it difficult to get air, sun and spray exposure on the fruit. Stakes should provide at least 3–4’ (0.91–1.2 m) of support, fruiting wires are traditionally about 3–4’ (0.91–1.2 m) off the ground, and no further hardware is required.
Vertical Shoot Positioning
A vertical shoot positioning (VSP) trellis is the gold standard for modern vineyards, and an excellent choice for those who want their vineyard to have that manicured, landscaped look. Depending on the spacing, VSP trellising can be appropriate for all levels of vigor, although moderate to high vigor sites will need to be hedged during the summer — about 6” (15 cm) above the last shoot positioning wires — to keep the canes from drooping back down into the fruit zone.
VSP is appropriate for both cordon trained (permanent arms along the trellis where spurs are retained for fruit production) or cane-pruned systems (where a single cane is retained on each side of the vine and wrapped around a wire and affixed with a twist-tie for fruit production. The hardware necessary is a little more complex, as you will need a wire at 20” (51 cm) or so for irrigation, 30–36” (76–91 cm) for fruiting, and then I suggest a single wire 12” (30 cm) above the fruiting wire (to assist in weaving the growing canes into the catch wires), and then two sets of double wires, spaced 4” (10 cm) or so apart and separated by a vertical 12” (30 cm) where the growing canes are tucked into during the growing season. The pairs of shoot positioning wires can be attached to a wooden cross-arm, a 4–6” (10–15 cm) pinch clip, or they can be simply nailed onto the endposts and attached to wide pre-fab vine stakes that have notches built in.
A well-maintained VSP trellising system allows for unlimited manipulation of the fruiting zone. Because all growth is directed up into the shoot positioning wires, the viticulturist can easily remove leaves and lateral shoots from the fruiting zone, opening it up to sunlight, wind and to allow for better spray penetration. Make sure you allow for enough space between the rows to give a 1:1 ratio of vine height to between-row spacing.
Horizontally Divided Systems
These systems are generally difficult to install and quite difficult to train the vines into, and are generally recommended for high vigor sites and installers and workers that are trained in its use.
At a high vigor site, each vine is separated into two separate canopies to retain a higher number of viable buds at pruning, and to spread the vigor of the vine out to all of the retained buds. This system also maximizes crop yield and allows sunlight to penetrate between the divided canopies, where a single canopy would become overgrown and dense at the same level of vigor. Think of these systems as a single trunk producing two divided canopies, which are traditionally spaced 3–4’ (0.91–1.2 m) apart to allow for sun penetration between them.
Two of the more traditional divided systems include the Geneva Double Curtain (GDC) or the Lyre (sometimes called U-System).
The GDC system requires a stout 48” (1.2 m) stake, with fruiting wires separated 48” (1.2 m) by a crossarm attached to the stake. Four separate healthy shoots are trained to each of the two separated fruiting wires. One shoot trained both directions along each of the wires, which become the permanent cordon arms where spurs are retained at pruning. Pruning is accomplished by retaining only spurs with bud positions facing out into the vine row.
Tips for Choosing A Trellis
By soil samples or by growing a sample vine, determine anticipated vine vigor.
Low Vigor Sites
Low vigor sites can be planted at a relatively tight spacing as the vines will not compete for sunlight, water or nutrients. Rows can be spaced 6–8’ (1.8–2.4 m) and vines spaced 4–6’ (1.2–1.8 m). VSP, head-trained or sprawl systems would all be appropriate, although VSP is my general recommendation at low-vigor for the ability to manipulate and improve the fruit-zone area of the canopy.
Moderate Vigor Sites
Moderate vigor sites offer many choices for trellising and spacing. Using a low-vigor rootstock may allow for tighter spacing (low-vigor style) and a VSP system. Sprawl or even a divided canopy system may work fine, although the divided systems require more hardware and expert installation and pruning. Vine spacing can move to the 6–8’ (1.8–2.4 m) range, and match the row spacing to the height of your anticipated canopy height (8–12’/2.4–3.7m).
High Vigor Sites
High vigor sites can still take a VSP system, but it will require a lot of summer hedging, lateral-shoot removal in the fruiting zone, and a vigor-reducing rootstock and careful irrigation choices (dryer soil at the beginning of the growing year will help moderate vigor). The GDC and Lyre systems are really designed to match high vigor sites, and are generally recommended for those that are willing to do the research and find expert help. Remember that tight vine spacing is NOT recommended for high vigor sites, as vine competition is rarely strong enough to keep high vigor sites in check and will result in an overly-crowded fruiting zone.
Trellis Installation
In areas where vineyards are common, you can hire professionals to install your trellis system. If you have a small enough vineyard and like to do things for yourself, you can also build your own trellis. (See the article, “Build Your Own Trellis,” in the April/May 2006 issue of WineMaker.) This requires, however, some specialized tools, especially for tensioning the wires. If you choose the right trellis system, one that matches the vigor of your vineyard site, you can get your grapes to harness the power of the sun.
First Year Vineyard Care
Planting a vineyard takes time, effort and planning. But your work is not over once the vines are in the ground. In order to have usable grapes by your third year, you’ll need to carefully manage the growth of your vines.
First Year Goals
The first year of vine growth is meant to establish a strong and vigorous root system and build stores of nutrients to hasten growth in subsequent years. The first year of vine growth is not meant to produce fruit for winemaking. During the first year, all clusters should be removed immediately from the vine to keep the vine from using nutrients to ripen grapes. Also, the first year is not meant to push the vine into making fruit or fruiting wood in the second year, when it might not yet be ready to produce clusters. Some vines may be ready to produce fruit in the second year; others may not. The key here is patience and knowing when a vine has established itself to the point at which it is ready to make fruit for wine. In general, a vine is allowed to establish itself and grow vegetatively — producing no fruit — for the first two years in the ground. After the second full year of growth, the vine is commonly pruned by leaving a few canes on the trellis wires. These canes grow fruit in the third year.
Strong Roots
Our first goal is establishing a vigorous root system. In order to do that, the grape grower needs to water the vines, control weeds and control pests. Our second goal is to build stores of nutrients. To do that, the grape grower needs to apply the right type and amount of fertilizers to the vineyard.
Watering the Vines
As soil types and weather are different from location to location, prescribing a watering plan for all growers is difficult. The key here is providing moisture to the vines’ root system without making the soil overly muddy.
Allow the roots to dry out between water applications. This will promote root growth as the vines sink their root systems deeper into the soil layers in an attempt to find water. Vines that are “trained” to learn that their water only comes from one place (a drip emitter or a hose) will develop a root ball near the surface of the soil and will not develop a deep and wide root system. Deep, infrequent applications of water are, in my estimation, best for the vine. The vines “learn” that growing deeper in the soil profile helps them find water when the top of the soil is drying out.
Here’s a pro tip for assessing a vine’s water status: If the tendril of a vine shoot — there are usually two growing out from near the tip of the shoot — extends further than the shoot’s growing tip, the vine has all the water it needs. When the tendrils shrink back behind the growing tip, the vine is experiencing some form of water-deficit stress. Cut back the water in August or early September to help the vine go dormant (and help the shoot become a mature, wooden “cane”) before the first fall frost.
Weed Control
Weed control is absolutely vital in the vines’ early years. Once the vineyard is well established, and the vines have deep root systems, weed control will not be as critical. But, while the vines are young and their root systems shallow, they will be in direct competition with weeds for sunlight, water and nutrients. As a farmer with a strong bent toward sustainable, organic practices, I do not recommend using contact or residual herbicides in a vineyard.
It is certainly easier to lay a strip of Round-up through your vineyard instead of hoeing it. Your vines will be safer and healthier, however, if you take the time to be a farmer instead of a chemical applicator. Run a mower through the center of your rows, making a nice mulch that will feed the soil, and pay a neighbor kid to hoe the rows around the vines. Also learn that planting a cover crop rich in vetches, clover, legumes or other nitrogen-fixing plants can choke out competing weeds and add vital nutrients to your soil.
Learn which plants in your area are beneficial and which are noxious. Hoe the bad and leave the good, but make sure to clean out a strip of soil around and under the vine so it doesn’t have to compete for sunlight, water, or nutrients where it is planted and establishing itself.
Giving the vine freedom from weeds will help the roots grow faster, and as a consequence will give the root hairs more contact with the soil and the nutrients it contains.
Controlling Pests
Controlling pests, especially ones that snack on roots, is vital for the health of young vines. Fighting gophers is an ongoing battle in many viticultural regions, and — like Bill Murray in the movie “Caddyshack’” — you may well have to join the fight to assure your vineyard survives.
A vineyard is like a neatly ordered smorgasbord for a gopher. They can follow the vine row over a few weeks or months and snack on each vine in turn. All they need to do is chew around the root collar and it’s “game over” for that vine. If you see a dead vine in your vineyard, tug on it a bit. If it comes up easily with a diagonal, slightly-chewed end with no roots on it, you’ve likely been hit by gophers.
Gophers can be trapped quite easily. Or you can build a few owl-boxes in trees around your property. You will be amazed how many rodents these birds take per night. Poisoning is another option, but you need to be careful of secondary kill of household pets or other beneficial animals.
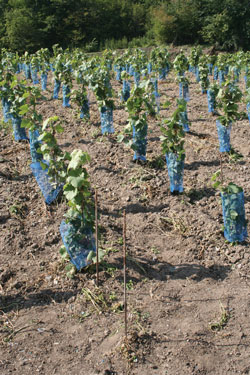
Deer, rabbits and ground squirrels can also nibble young growth in a vineyard. Fences, bait traps, dogs or a hunting permit may help with these problems. It is common to use a cut-off half-gallon paper milk carton around each young vine to keep rabbits and squirrels from nibbling young shoots. Grow tubes also discourage nibbling.
Fertilizer Application
The application of fertilizers is usually necessary in a vine’s first year to help build stores of nutrients, especially nitrogen, in the developing trunk and root system. You have two ways to do this: applying petroleum-based fertilizers or using organic fertilizers. Both will work well to help establish the vine. Using a half-cup of calcium nitrate (15-0-0) per vine a few times during the vine’s first year will definitely make the vine grow faster and remain nice and green. There are also small fertilizer packs that you can toss in the hole under the roots when planting. They are made to last about a year and slowly release nutrients to the vine. Using these petroleum-based fertilizers will have no short-term negative impact on the vines; in fact, they will grow to be very green, vigorous and healthy.
However, I call calcium nitrate “root crack” because I believe a vine can become dependent on non-organic fertilizers, like addictive drugs, and will be less likely to be happy throughout their lives without frequent applications.
Organic sources of nitrogen such as chicken manure, cow manure, fish emulsion, kelp extract, bat guano and others build the soil and increase biological activity in the soil while they provide nutrients. The nutrients that organic fertilizers provide might be more expensive per application, but the benefits they provide the soil and the holistic health of the vineyard as a living system are invaluable. Providing a healthy habitat for your vines to live in will help them grow quickly, stave off disease and provide healthy fruit for making wine in years to come.
Training the Vines
We can now return to your young vineyard, where the soil mounds are removed and two to four little green shoots are emerging from each vine. When the tallest shoot is about 6–10 inches long, it’s time to start training that shoot up the training stake. If you planted each vine close to the training stake, it will not be a difficult task to start training the vine to the stake. Always use the most vertically oriented, vigorous shoot for training. It is also vitally important to leave the other shoots growing on the vine until the most vigorous shoot has been successfully tied to the stake with 1/2” green vinyl tie-tape. This is important because you will break a few shoots during this process, and you always want a back-up shoot in case this happens.
After the most vigorous shoot has been loosely tied to the stake with tie-tape without breakage, then you can go ahead and rub off all other growing shoots and swelling buds on the vine with your thumb. Lash 1/2” tie-tape every four to six inches (10–15 cm) of growing shoot, and make a pass through the vineyard every week or so and add tie tape as necessary. Tie the tape loosely enough to stick your finger in between the shoot and the tape so it doesn’t strangle the poor little vine.
The straighter you tie the growing shoot to the stake, the more uniform and upright the trunks of your mature vines will be. If the growing shoot reaches the fruiting wire at the top of the training stake, snip off the top off the vine to promote growth out of lateral buds on the sides of the shoot. This will help the vine start to make a “head” that will produce your fruiting wood from year to year.
If the vine fails to reach the fruiting wire — or the top of the training stake, or at least 36” of growth — in its first year, I recommend cutting the vine back all the way so it looks like it did when it was first planted (one two-bud spur). Do this to all stunted vines, and to any vines that need more vigor.
Cutting all the wood off a stunted vine allows the vine to grow easier the next year. You will likely get more vigor and health from the vine if you cut it back and give it time. If your vineyard shows low vigor, it is recommended that you cut the entire vineyard back to two-bud spurs and train the future trunks in the second year of vine growth. Watch your young vines (especially the leaves) for signs of powdery mildew. Make sure to apply sulfur, wettable or powder, to keep the vines and vineyard clean of mildew. If mildew becomes established in the first year, it will be more difficult to manage in subsequent vintages. Your hard work in the first year will pay off at your first harvest.
Annual Growing Calendar
In college I had a good friend from New Jersey who was convinced that Californians lacked depth of character because we didn’t have to live through harsh winters. Even though I disagree that you have to shovel snow or ice fish to reach your potential as a human being, I do agree that awareness of the passing seasons coordinates our lives in mysterious ways.
There is a right time of the year for everything, including certain vineyard practices. There is a rhythm to the way the winegrowing season advances and I would like to provide aspiring new vineyardists with a simple viticultural metronome that they can adjust to their own vineyard and climate.
Farming winegrapes is a challenge, and developing a plan for the upcoming year will help your backyard vineyard live up to its potential. We will also define backyard grape growing strategies and offer suggestions concerning the seasonal timing of pruning, watering, fertilization, disease control, pest control, canopy management, weed abatement and harvest.
POST-HARVEST (October through February)
One common misconception of backyard vineyard ownership is that your work stops once the fruit has been harvested. The tendency is to spend every spare minute with the wine in fermenters, carboys and barrels. Spending a little time in the vineyard after harvest will guarantee that the vines are in tip-top shape before their long winter’s nap.
Put the vines to bed in a state of cleanliness. Go back through the vineyard after harvest and remove all the small clusters (second crop) that might have been left behind. Also remove all fruit stems (rachis) that were picked clean by birds and other pests. Powdery mildew and other sporulating diseases need a place to go dormant in the vineyard and errant fruit clusters are some of their favorite haunts. Leaving nothing but hardened canes in the vineyard stops disease cycles.
Grapevines have two major bursts of root growth during the growing season. The first (and most important) is between May and August, but there is also a significant period of root growth after harvest. This is why it’s vital that you give your vines a deep drink of water — up to 10–15 gallons (38–57 L)/vine — after the fruit comes off. If significant rainfall occurs at harvest time (enough water to soak deep into the soil profile) this practice may prove unnecessary.
The dormant vine should be clipped and all second crop clusters and stems must be removed.
After the fruit is removed from the vines, the vine starts to store its leftover nutrients in the trunk and root system to keep the vine alive during the cold and harsh conditions of winter. If your vines show very low vigor, you can toss a few tablespoons of a 15-0-0 fertilizer under each vine to give it some nitrogen to chew on over the winter. Do not fertilize if your vines have adequate vigor during the growing season, as excess nitrogen can impede the vine’s ability to go into dormancy.
If you are in a climate where grasses can grow through the winter, consider growing a cover crop between your rows. For low-vigor sites, plant legumes, clovers and some rye grass for erosion control and to add nutrients when the crop is turned over into the soil in spring. For high vigor sites, planting some fescue grass can soak up some of the excess water and nutrients. Providing competition for high vigor vines can check excess (rank) growth. Allow the fescue grasses to continue growth during the spring, as they will continue competing for water and nutrients as the (high vigor) vines start growing again.
Prune the vines in the dead of winter. Most vineyards are pruned in January and February, although some vineyards can be pruned earlier or a bit later. Note in your journal when your vines drop their last leaves (in the winter) and when the vines experience bud swell and budbreak (in the spring).
Pruning focuses the vines’ energy to produce fruit from specific areas of the vine and keeps the vine from taking over more trellis space than is intended. Fruitfulness is highest on wood that grew the previous year. This means that when you prune, you always want to leave a selected number of canes (cane-pruned) or spurs (spur or cordon-trained) from the previous season’s growth. I suggest retaining between 12 (for low vigor) to 30 (for high vigor) buds per vine during pruning. The rest of the growth is pruned off and, if possible, shredded or burned and put back into the vineyard soil. Canes left whole on the ground can also aid mildew and rot, perpetuating their yearly cycle.
BUDBREAK through BLOOM (March through June)
As the vines begin to wake and burst forth with new green growth, it becomes obvious that we need to get back into the vineyard and begin our early spring labor. Grapevines are meant to grow in areas that have their soil profile fully recharged with rainfall each year. Most soils will be considered “recharged” with 15–20 inches (38–51 cm) of winter rainfall. Applying 10–15 gallons (38–57 L) per plant is appropriate at or just before budbreak to leach salts from the soil and to give the vines the moisture they need to start the new year’s growth. Continue to irrigate in dry conditions. Plan on giving the vines 4–6 gallons (15–23 L) of supplemental water in any given week when rainfall is less than a half inch. Rainfall of an inch or more in any given week should be all the water the vines will need.
Remember to watch for frost! Sustained temperatures under 32 °F (0 °C) will fry your shoot tips and young fruit clusters. Overhead sprinklers, or simply spending some time with a hose spraying down the vines by hand for an hour or so, should coat the delicate tissues with water, which will freeze overnight and insulate the tender tissues like an Eskimo in an igloo.
You should then fertilize in March and again in late May. If your vines need an extra boost of vigor, give them some nitrogen fertilizer or a fertilizer with a bit of potassium and phosphorous. You may want to give them a small amount of zinc before bloom, as it can improve fruit set if applied judiciously. Vines that grow in balance without added nutrients do not need to be fertilized.
Always remember to spray! You should be applying sulfur to your vines every 7–14 days depending on mildew pressure, starting when the shoots are a few inches long. Do not apply sprays during flowering, as it can impede the process of pollination. Mildew loves moist weather and temperatures between 65–75 °F (18–24 °C). You should reapply after measurable rainfall, as the sulfur will wash off and the rain can spread the bursting spores of mildew. Make sure to stop spraying sulfur after the fruit softens, as it can stay on the clusters and cause hydrogen sulfide stink in your wine.
Remember that mildew cannot grow on fruit once it hits about 16–18 °Brix. For most home vineyards, a backpack-style sprayer will work fine, while larger vineyards may require a gasoline-powered sprayer that is towed behind an ATV. The key is to run a tank cleaner through your sprayer regularly and to clean the screens and nozzles after each application.
Hoe out the weeds from under your vines. Keep the vine row clean from weeds and grasses. Also, remove noxious weeds from between the rows while they are small and before they go to seed. Careful hoeing will allow you to decide what grows in your vineyard. You also want to “sucker” your vines, which means removing all growing shoots below the head of the vine (and out of the trunk or the dirt). The earlier you “sucker,” the easier it will be. This helps direct the vine’s nutrients to correctly positioned and fruitful shoots.
Begin managing the canopy of your grapevines. The key to a balanced canopy that produces top-notch wine is to have an uncrowded fruit zone with enough sun and wind penetration to keep the fruit from being attacked by mildew or rot. It should also provide enough shade that the fruit does not burn. Go through the vines every week or two and remove shoots that are not supporting fruit. Each fruitful shoot should have its own space and should not be crowded by adjacent shoots.
In general, clusters should not be touching each other. You may also notice that lateral shoots may spring from main shoots. These “laterals” cause crowding and can be removed as well. If you are using shoot-positioning wires, you can start tucking the growing shoots between the wires to direct the growth upward. Directing the growth vertically will help position the fruit above the cordons and canes so that you can remove leaves and have all the fruit at the same height. This is important for sun exposure and uniformity of ripening.
BERRY-SOFTENING (Early ripening through harvest)
Think of this period of vine growth and fruit maturity as the fourth quarter of a big game. You’ve trained, practiced, put in the work and now you need to finish strong to win. Do whatever is necessary to keep the fruit clean and the critters at bay. Don’t allow your vines to shut down too quickly.
Mature, evolved fruit is more flavorful and balanced than grapes that dehydrate to get sweet. As the vines continue to grow, you may need to go through them each week to remove new lateral shoots, pluck a few more leaves to keep the canopy open and healthy. You may need to hedge the top of the vines if they are flopping down and shading the fruit. If the vines still have actively growing shoot tips after the fruit has softened, cut back watering to slow down vegetative growth and promote ripening. If you need a little more ripeness at the end of the season, you can turn the water off to give the fruit a bump of sugar — however, as previously stated, it’s better to have healthy leaves making sugar than to have the fruit ripen as the result of dehydration.
Keep the critters away! Ants, bees, wasps, yellow jackets and other insects can exploit weak spots in the grape skins and make a mess of your clusters. Compromised grape skins can start a rot problem, so you need to be vigilant early in the season in controlling insect populations. Once the insects are eating the fruit it’s too late for any control strategy. Search out and destroy wasp and yellow jacket hives near the vineyard before the fruit is sweet. You should also put out baits for ants to keep populations down before the heat of summer.
Bird netting is a good way to keep your fruit from “flying away.” Erect a fence or rescue a few greyhounds to keep the deer and other mammal pests off your fruit.
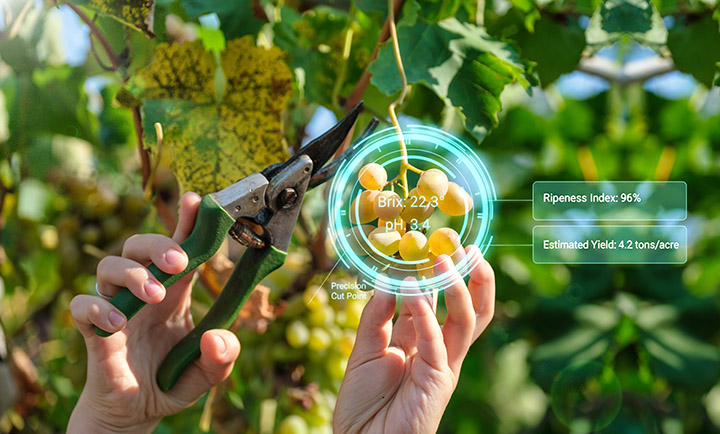
Be aware of the weather, but don’t freak out. Be wise when deciding when to pick your fruit. Remember that delicious fruit makes delicious wine, so use your own sense of taste (along with Brix and pH testing) to decide on a picking date. A pH meter won’t be drinking your wine, so learn to trust your own palate. If a huge storm is coming and your fruit is tasting really good, you may want to pick before the big rains hit. A little rain won’t destroy your crop but it may lower the sugar content and push harvest back a week or so. You need to weigh your decision to pick carefully and try to be as patient as possible. A wise vineyardist feels the right day to pick. Trust your instincts and your palate and keep a grape-growing journal!
It is not unusual for vineyardists to make the same mistakes every year as a result of forgetting the challenges they faced the previous vintage. If you jot down a few notes each season, you have a better chance of tweaking your practices and improving your wine quality with each year.
Invite an expert over for dinner and good wine. Having another vineyard owner walk through your backyard vines may result in some fresh suggestions and improvements.
Taking the time and effort to grow your own wine grapes requires perseverance and character. There is something extraordinary about creating wine from water, elbow-grease and a piece of earth. In a world that seems so rushed and prepackaged, there is a slow, honest authenticity about continuing the tradition of home winegrowing. It reminds me of that old aphorism, “tickle the earth with a hoe, and she laughs with a harvest.”
SUMMARY
As the articles in this section indicate, establishing a vineyard can be a costly and time-consuming endeavor. For the committed home winemaker, however, the extra effort may bring a whole new level of enjoyment to the hobby. Any effort you make to research your options and learn what has worked locally before you start installing your vineyard will pay large dividends in the long run. In the next section, we’ll discuss choosing a rootstock for your vines, how to plant dormant grapevines and how to manage the early part of your growing season, especially around budbreak.