On April 17 learn early to mid-season grape growing techniques for your small-scale vineyard with “Backyard Vines” Columnist Wes Hagen. Register now to ensure a smooth start for your vineyard this spring!
There was a time when grapevine vineyards were planted with only 18” (46-cm) cuttings from existing grapevines. A few buds went under the ground and few buds were left above the ground. Vines would root on their own and a vineyard was basically free to plant if you knew someone you could secure some cuttings from. Since the discussion of choosing a rootstock can quickly become bogged down in very specific (and often boring) discussions of soil types, vigor and site specificity, let’s at least jazz up the subject slightly with a fun historic journey back to the prehistory and the early scientific study of the grapevine.
Two hundred million years ago there was only one continent and grapevines as we know them didn’t exist yet. While a single land mass dominated the face of the earth, the grapevine was evolving and changing slowly. When the continents separated (by 150 million years ago they were already taking the distinct shapes we recognize today), the grapevines began to adapt to the rapidly changing environments where they found themselves. To make a geologically long story short: grapevines generally evolved into three classifications: American vine varieties, Asian varieties and the European/Middle Eastern/North African family of vines that most of us use today for our wine production.
Charles Darwin spent many years studying the grapevine in his laboratory in Kent, England, and wrote that the vine was one of the most perfect examples of evolution in all of nature. In “The Movement and Habits of Climbing Plants” (1865), Darwin writes, “It is, also, an interesting fact that intermediate states between organs fitted for widely different functions, may be observed on the same individual plant of . . . the common vine; and these cases illustrate in a striking manner the principle of the gradual evolution of species.” More specifically, a grapevine can produce a cluster or a tendril from the same node — which means a vine can assess its environment at any time during the early growing season and produce either fruit for reproduction, or a tendril to help the vine climb to a higher, sunnier spot where reproduction would likely be more successful.
Grapevines get love in religious circles, too. The Bible says that when God flooded the earth, the one dude he chose to save was a viticulturist. When Noah waded off the ark, the first thing he did was to plant a vineyard. (I won’t ask the obvious questions, such as why he rescued and released a pair of gophers, the European starling, the glassy-winged sharpshooter and other vineyard pests.)
Starting in the late Paleolithic and throughout the Neolithic period, mankind began to dabble in collecting wild grapes and making wine. This process became more agricultural by the 4th Millennia BCE, when it’s clear that Europeans living between the Black and Caspian Seas were domesticating grapevines in their villages and planting their first vineyards. Clearly the history of mankind growing grapes specifically for wine goes back at least 6,000 years and maybe as long ago as 10,000 years. We know that some of the first fired pottery shards that have been carbon dated to 6500 BCE show that wine was carried in these sealed pots — and if wine was being transported more than 8,000 years ago, it’s easy to imagine that it was being made and experimented with for many generations previous.
Planting a home vineyard in this age was easy. It was all done with clippings off the last year’s vintage. Slips of dormant grapevine wood were kept moist in the fall and winter and planted in the ground before spring warmed up. When the moist soil warmed, the dormant wood pushed roots out of the buds below the ground, and shoots on the buds in the sun. Voila! A new vineyard was just that easy.
At this point we can fast forward past thousands of years of grape growing and the proliferation of vineyards throughout the ancient world. In fact, we can keep our camera lens focused on Charles Darwin, who continues to be the protagonist of our long and involved story of how rootstocks were invented and used. England is both the culprit and the hero of this part of the story. British botanists were busy collecting American plants — cataloging and giving them all proper Latin names, when an insect escaped their laboratories and wreaked havoc on British vineyards and then hopped the Channel to decimate the vineyards of Europe.
The bug, of course, was phylloxera — a root louse that has existed alongside American grapevines for millennia. But when the insect had unrestricted access to the unprotected vineyards of Europe, the results were devastating. Within a few decades up to 90% of all European vineyards were destroyed by the single bug. The French did all they could to fight the scourge. But with only their provincial understanding of viticulture, and without Darwin to help them, they tried solving the problem with methods that seem ludicrous to our modern, scientific minds: they buried a toad at the base of each vine “to draw the poison out.” It didn’t work. In the fifteen years between 1874 and 1889, wine production in France dropped by almost 70%. Hey, I would have buried toads too if I thought it would have helped.
So, how does Darwin come back into the story? Without the new idea that animals and plants adapt to their native environments and protect themselves from native pests, it is unlikely that any scientist would have been able to suggest the use of grafted American rootstocks for the rescue of European vineyards. Scientists primed by Darwin’s revolutionary work, such as Charles Riley and others, understood that American grapevines would have developed resistances to phylloxera over the millions of years they had been living in balance with the nasty American bug.
And amazingly, vines that had been separated by hundreds of millions of years of geographic isolation were fused by grafting so that a European variety such as Cabernet Sauvignon could grow fruit on the grafted rootstock of an American vine variety. Only a few American varieties showed great promise in protecting grapes in phylloxera-ravaged areas. Vitis berlandieri, V. riparia and V. rupestris were the strongest three candidates, and most of our modern rootstocks are hybridized from these great native grapevine varieties. All three of these varieties can be found in Texas riverbeds, but V. riparia also can be found as far north as Quebec, and it is cold hardy to minus 40 °F (4 °C).
So evolutionary theory saved the European grapevine, and soon French, Spanish and Italian vineyards were replanted using American rootstock and began to produce a good crop once again. European vineyards are planted with US-based rootstocks to this day, as a better solution has yet to be offered or proved. Such a fundamental shift in the way mankind viewed the natural world, the view espoused in Darwin’s “On the Origin of Species,” cannot be ignored in the history of winegrape production, and moving forward into the arena of suggesting rootstocks for your vineyard, let’s all take a moment to reflect and toast the man who changed the world and saved European wine, albeit indirectly: Charles Robert Darwin.
Finding a rootstock that works in your backyard vineyard is a fairly simple procedure. I’ve simplified the process down a little bit to make sure that we won’t waste time talking about rootstocks that are not available to you. Here’s a list of the process for finding rootstocks:
• Find a grapevine nursery that has the best selection of grapevines and rootstocks that grow well in your part of the country. • Note which rootstocks are available from that nursery. • Find those rootstocks on the chart at http://www.californiagrapevine.com/images/Chart%202.pdf. • Match up the “Best Soil and Climate Conditions” column with the conditions in your geographic location. • Ask the professionals at the nursery if your decision sounds like a good one. ..
Here’s a quick breakdown of what each column describes and why it matters:
ROOTSTOCK: This is the given name of the rootstock, and will be the name you will use to order it. The rootstock is usually expressed as a descriptive term (ie: Harmony) or a series of numbers and letters (ie: 5C). When describing a vineyard block, the cultivar (grape) and rootstock are commonly described as a single combination separated by a forward slash, such as Pinot Noir 115/5C. That would denote Pinot Noir (the varietal), 115 (the cultivar or “clone” of Pinot Noir), and the rootstock in that block, or on that vine: 5C
PARENTAGE: The (usually) American grapevines that were hybridized or adapted into the rootstock in question. Note that the prefix “Vitis” has been left off each variety of roostock, so for instance, 101-14 rootstock is actually a hybrid of V. berlandieri x V. riparia.
PHYLLOXERA RESISTANCE: This is important to understand only if there is no phylloxera in your home area. If there is no threat of the dreaded vine aphid, you don’t need a strong resistance to it. Also realize phylloxera doesn’t do well in sand or highly sandy soils, so if you’re growing on sand, and have no problems with nematodes, you may be lucky enough to grow grapevines on their own, girly, tender, Euro roots!
VIGOR: While the vigor of a rootstock will have an impact on the growth cycle of the vineyard, it won’t likely be a game changer. Use it as a tool to moderate vigor. On rich soils, you may want to use a lower vigor rootstock that matches your other needs (1 to three x’s in the column), while in a sandier or shallow soil, choose a rootstock that will give you heightened vigor (4x’s +). Having an efficient rootstock in a poor soil will help save you lots of fertilizer and compost to get the vineyard in balance, but again, don’t think the rootstock will change a low-vigor site to a high vigor site by itself.
COMPARATIVE MATURITY RATES: As with vigor, only expect about a 10% influence (maximum) between early and late maturity ratings. Expect an influence, but not a massive change in performance.
ADAPTATION TO DROUGHT and “WET FEET”: Choose at least “fair” designation for drought if you plan to irrigate ion-dry, arid areas. “Wet feet” adaptation is more important in areas of high rainfall where the soil may stay wet for a good part of the growing season. Realize that if you plant a rootstock with poor or fair resistance to drought, that the vine can shut down more quickly in the summer if it suffers from water stress. In other words, apply extra water in periods of heat to keep the vine from shutting down early.
NEMATODE RESISTANCE: You may need to talk to a university or a soil specialist (or a local grape grower) to see if you have to worry about nematodes in your area. Nematodes lay their vicious little eggs in your vine roots, and when they hatch the larvae feed on the young, tender roots. American rootstock adapts by sending out new, bifurcated, roots while Euro vines have no resistance and the impacted root zone will not recover. For areas with higher nematode populations, choose a more resistant stock.
ROOTING QUALITY: Deeper, richer soils require less rooting quality, while shallow, hard soils may require at least a fair to good designation to get the vines to spread out and penetrate tough soil.
FIELD BUDDING QUALITY: This only applies if you are buying 100% rootstock vines to plant and then graft in future vintages. This is usually done in rare situations where someone wants to start the rootstock in the vineyard to get it developed/mature, but the scion material most desired won’t be available for a year or more. Buying grafted vines (with both rootstock and scions already joined and healed) is recommended.
BEST SOIL AND CLIMATE CONDITIONS: Pay special attention to this column, as making an accurate match will save you a lot of headaches down the line. Some viticulturists would argue that a list like this is only hypothetical. Our true understanding of rootstocks and where they belong is more anecdotal than scientific. I’m excited to have at least a starting point for matching stock to the soil/climate, and use the knowledge here, even if partially anecdotal, for best (or at least improved) results.
OTHER UNIQUE QUALITIES: You don’t likely need to go through these descriptors/recommendations until you’ve narrowed down your choices to a few rootstocks. Then check to see if this last column can tip the scales. For example, maybe you have a bit of lime in your soil or you know that crown gall can be a problem in your state.
A chart of popular rootstocks, should provide enough information to make a scientific and viticulturally sound decision on choosing a rootstock for your backyard. With the right rootstock, the vines will be matched to the soil and resistant to predation by insect pests that would destroy your roots.
Planting Dormant Grapevines
Establishing a vineyard is an exciting and rewarding adventure. Like all of life’s challenges, your success or failure will be dictated by the amount of research, planning, effort and perseverance you exhibit throughout the process. If you’ve read the articles in the first section, you know one thing is certain — there’s a lot to do before putting vines into the ground. Your vineyard “system” needs to be in perfect working condition before vines can be planted. You need to install the trellising and install and test the irrigation equipment. The soil needs to be tested. In addition, vineyard pests need to be held in check. Installing a vineyard is not something you do on a whim some weekend.
Before planting a vineyard, it is advisable to talk to a local horticulturist or nurseryman about how grapevines will grow in your specific locale. Ply the local experts with kindness and wine, and ask every question you can come up with. You may also need to ply some friends with beer to get them to help out over the growing season. As my favorite wine-country truism goes, “It takes a lot of beer to make wine.”
Ordering Dormant Vines
I suggest that you plant dormant grapevines because they establish themselves — start growing and adapting — in the piece of ground where they are going to live permanently. Green-growing grapevines were raised in a sheltered environment and often die in the field from exposure or shock. While many wilted green-growing vines will sprout secondary buds and do fine in the long run, my experience has shown me that dormant vines are clearly the smart choice for planting material.
Purchase dormant vines early to make sure the nursery has the exact materials you are looking for. Ordering early assures you don’t have to settle for “leftovers.” I recommend you order dormant grapevines up to one year before planting. A good grapevine nursery wants to know what their customers need in advance. This knowledge aids them in deciding what scion material — sometimes called clone material — to graft onto rootstock to prepare orders. Vines that are going to be planted in an area with known soil pests, such as nematodes or phylloxera, are commonly planted on hardy, disease-resistant rootstocks. These rootstocks are bred from native vines, which are resistant to American soil pests. (See the previous article in this section for advice on chossing a rootstock.)
Call a good nursery at least a few months before spring and let them know how many vines you will need. Be sure to specify that you want to purchase dormant grapevines. Make sure the type (cultivar) of vines you order —Norton, Chardonnay, Merlot or whatever variety you choose — are appropriate for your climate and vineyard.
Order ten percent more vines than you think you will need. The extras will come in handy in case you need a few extra or miscounted. It’s easy to plant them, according to the directions below — but at two-foot by two-foot spacing, in an out-of-the-way corner of your vineyard. The following year you can dig them up, trim the roots and growth, and use them to replace the vines that didn’t take in the “official” vineyard.
Call the nursery every few months and give them updates on when you’d like the dormant vines taken out of cold storage and delivered. The best time for delivery is usually in the spring after the possibility of hard frosts has passed. Dormant vines are usually dug up deep in dormancy (during the winter), trimmed, and then bundled into 20–25 vine bunches, tied together and bagged. The bags of grapevines are filled with moist wood chips and put in a large wooden crate that is also filled with moist wood chips.
Plant Requirements
Plant after the worst threat of frost is over and the ground begins to warm. In California, this is usually around March or April, but will obviously be later for cooler parts of the continent. Deciding when to plant is tricky. The earlier you plant, the more growth you will get in the first year, but there will also be a greater chance of frost damage. You can plant grapevines all the way through late spring to early summer, so don’t rush it. You can even plant in June or July, but you won’t get as much growth your first year. A vineyard is a long-term investment, so there’s no reason to put the vines in the ground until you and the soil are absolutely ready.
Dormant grapevines are vines that have been grafted to rootstock, or grown on their own roots, at least a year previously. The grapevines were put in the soil and allowed to callous and grow for a season. They were then taken out of the ground, trimmed, placed in moist wood shavings, and put in cold storage in bundles for delivery to vineyards.
The cold temperatures in storage — usually about 35–40° F (1.6–4.4° C ) — give the vines their “chilling requirement” as well as keeping them from growing before they are planted. For a vine to have successful budbreak and to be fruitful, it needs 250 hours per winter below 45 °F (7.2 °C), although many regions get over 800 hours of chilling.
Receiving Dormant Vines
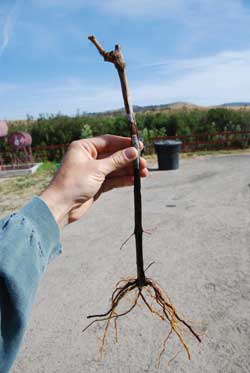
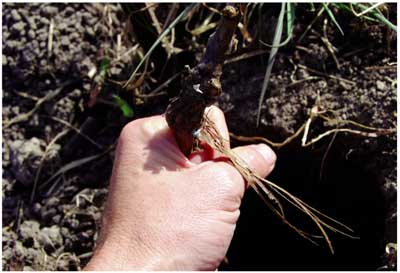
Most dormant grapevines are already two to four years old, and are fairly hearty, with trunks almost as thick as a man’s finger. When your vines arrive, I suggest you cut a few up in front of the driver or salesman to show you are serious. Make sure the center of the vine still shows green tissue. The vines should bend and not snap like a dry stick. Ensure there are uniform, bulging calluses at the graft union. Hold the bulging top of the vine — where the last year’s growth has been trimmed to a single “spur” — and bend it gently back and forth to make sure it is still green and elastic. Dormant vines that break at the graft union — where rootstock meets the clone wood or scion wood — are of poor quality and will provide more headaches than pleasure.
When you sign the invoice saying you have received the vines in good condition, make sure you feel comfortable that your vines are of acceptable quality. Many times vines sold to home vineyards are the ends of odd lots that nurseries are trying to get rid of.
Cut a randomly selected vine in half with a sharp knife, and then bend the halves to check that they are green and somewhat elastic. If you see dark, gooey spots inside the vine’s tissue, chase the delivery driver off your property, wielding the diseased wood like a knife, shouting threats of litigation.
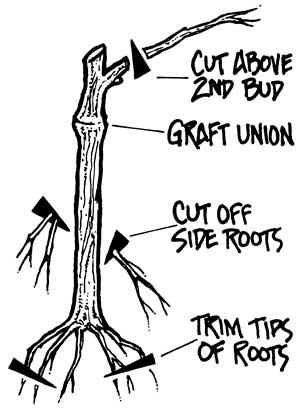
The “head,” or top, of the vine should have been trimmed at the nursery to a two-bud spur. If this trimming not been done, just count the small, bumpy buds on the spur and cut through the third bud to concentrate the vine’s growth.
A grapevine must be prepared before it is put in the ground. The roots must be trimmed and the “head” clipped.
Planting Dormant Grapevines
Now that you’ve guaranteed you have good dormant planting materials, you should be ready to prepare the vines for planting. The vines should be warmed to the ambient temperature of the vineyard site over five to ten days before planting. However, you want the vines to remain moist so they don’t dry out needlessly.
Most vines come in bagged bundles of twenty or so. You can either open the bags or poke holes in them. Keep them in a shaded area, still enclosed in moist sawdust and shavings, while they acclimate. If the sawdust dries out during this process, just hose down the bags until moist again.
Take the vines out of the bags and sawdust the night before planting. Soak the roots in 5-gallon (19-L) buckets of water. The tops of the vines can stick out of the water, or you can soak them in larger bins so that the entire vine gets soaked. Take the vines into the field in these same buckets — you can use the water in the buckets to give the planted vines a first drink.
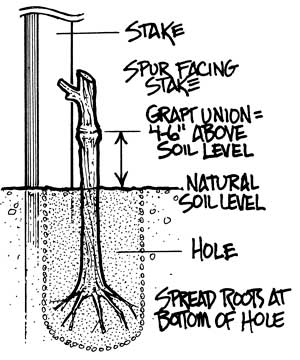
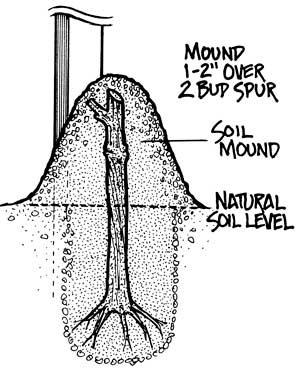
The vine should be placed in the ground so that the graft union is four to six inches above the soil line.
Don’t make the mistake of taking too many vines into a sunny field to plant. You do not want the vines to be out of water, soil or moist sawdust for more than an hour before they are planted to avoid dehydration.
Each vine should be removed from the water bucket as it’s planted. Trim the root tips with sharp pruning shears so that the root ends will be vital and fresh when put in contact with soil. I usually take the entire root bundle in my hand, stretch the roots out like I was giving them a haircut, and then trim the last few inches of all the roots with a quick snipping motion, taking care to cut off broken or crushed roots as well.
Efficiency is key to the planting of dormant vines. I recommend having a strong helper digging holes with a post-hole digger or a narrow-bladed planting shovel, and another helper following behind to plant the vines. The hole should be about 6 inches (15 cm) across and at least 18–20 inches (46–51 cm) deep. Do not just stick a shovel in the ground, yank it back and forth to open a crevice and toss a vine in. Do everything you can to assure the walls of your hole are loose and not compacted further than the soil would be naturally.
I also recommend planting while the soil is still moist to make digging easy. Turn on your irrigation system until the soil is moist, but not muddy, or wait until after a light spring rain to plant. I like to pour about 0.5 gallon (~2 L) of water into the hole before planting and refilling to make sure the soil beneath the newly-planted vine is moist. Although it’s not standard practice, it’s something that we do here at the vineyard and it seems to increase the chances of a vine establishing itself.
Drop the vine in the hole and then spread the roots out so roots are facing the sides of the hole, as well as facing down into the subsoil. Packing the dirt back into the hole, around the vine, is an art form in itself. We cut the handle off a standard garden hoe so that it’s only about 18 inches (46 cm) long and use the butt end to compact the soil as we fill it back in. We use the hoe end to pull dirt into the planting crevice. Pack well, but don’t damage the roots.
It is also important to make sure that the graft union is at least 4 to 6 inches (10 to 15 cm) above the finished soil level, as the vine will settle a bit in the dirt. If you are planting on rootstock, the graft union is the bulge a few inches under the “spur” where new growth will sprout on the top of the vine. If you bury the graft union, roots will sprout underground from above the rootstock, and the vines will prefer them to the stock. You will soon have vines growing from their own roots rather than from the rootstock, which defeats the purpose of rootstock.
If you have training stakes in the vineyard, plant the vine so that it is no further than a few inches from the stake, with the “spur” turned inward so that it almost touches the vertical stake. This will make it easy to tie growing shoots to the stake.
Review and Mounding
Make sure you keep the vines moist and cool prior to planting. Trim the roots, make a deep hole and position the vine with your hand to a correct depth that keeps the graft union above the ground. I tell my planters I want the union four finger-widths above the finished soil level. Then sweep the soil back into the hole, packing it firmly in with the butt end of a sawed-off hoe. Don’t leave air gaps in the soil. This would be an appropriate time to water the vine to help the soil settle and soak the root area.
Once you have compacted the soil back to the natural soil level, you’re still not quite done. You need to make a soft soil mound over the part of the vine that protrudes from the ground. Use soft, broken soil — not hard clumps — and cover the vine so that the whole vine has one to two inches of soil covering it. This keeps the growth buds moist and protected from the sun as the vine acclimates. It will also discourage rabbits and other pests from nibbling off new growth as it emerges. Loosen the top of the mound if it dries and begins to clump. Within a few weeks, you will see green growth poking out from the soil mounds. At this point, carefully loosen the soil mounds on a cool, cloudy day and remove them so the natural soil level is restored.
When the vine is first planted, a mound of soil should be made over it. The soil protects the vine as it acclimates.
Now What?
Planting a vineyard is hard work, but here’s some good news — once a vine is planted and established, it’s pretty hard to kill.
If you get decent rainfall and have a mild winter, your vines should grow healthy and produce fruit for making wine. Rainfall in the range of 20–30 inches (51–76 cm) per year seems about optimal and, for best results, winter temperatures should not hover constantly below 14 °F (-10 °C). If you get eighty-five percent of the vines to take and grow, consider your home vineyard planting a success.
Once the vines are in the ground, you have about three years until you have usable wine grapes. During those years, the vines will need to be cared for and tended to. Elsewhere in this issue, I’ll tell you in detail how to care for your vineyard during its first few years. For now I’ll just supply a quick overview of these critical years.
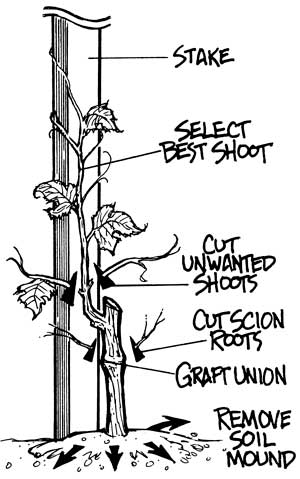
Once the vines sprout, you’ll have to start thinking about vine training. Initially, stakes are used to support the growing vines. You should start staking when the longest vines reach about six inches in length. The shorter vines in that bunch should be removed, leaving only the longest vine to grow upward. At this point, some vineyards use grow tubes, which are slender plastic tubes that surround the vine, to thwart pests.
During the first year, a single shoot grows up the stake towards the trellis wires. Other shoots are clipped.
If the vine’s growth seems stunted, you probably have less nitrogen in the soil than the vine would prefer for full, vigorous growth. High nitrogen levels are not good for established vines that are producing fruit, but young vines can benefit from the application of some nitrogen-rich fertilizer.
If you’re lucky, the vine will reach the top of the stake by the end of the first year. In the second year, your vines should start growing on the trellis and by year three you should have grapes. And once you have grapes . . . well, you know what comes next.
Spring Budbreak
Budbreak is an exciting time in the backyard vineyard. For months now, you’ve had to explain to the neighbors and holiday visitors that your vines aren’t dead, they’re just taking a nap and getting ready to produce the next vintage. When budbreak occurs, your neighbors will finally be convinced that your vines are indeed vibrant and healthy.
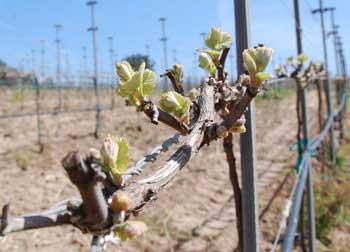
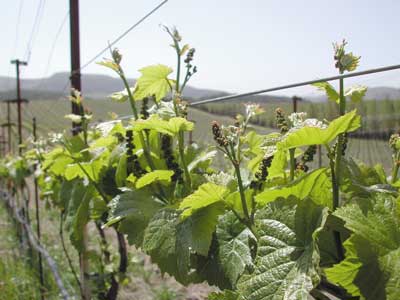
In my vineyard in Santa Barbara County, California, budbreak occurs in mid-March. When your backyard vines will begin to grow again is a function of the weather and the warmth of your soil. When it starts to happen, the first thing you’ll notice is that the buds — they almost look like soft thorns on the dormant canes and point away from the head of the vine — begin to swell, or push, and they get fuzzy and elongated.
According to my UC-Davis textbook, “Budbreak occurs at the stage of development when green tissue becomes visible at the tip of the bud.” (University of California, Grape Pest Management, Second Edition, 1992.)
I have noticed in my California vineyard that often the emerging tissue is a lovely red color and, as soon as the vine begins to photosynthesize, the tissue then becomes milky green.
Taking the proper steps during and shortly after budbreak will make your next growing season a lot easier. I’ve broken down a number of issues you’ll have to deal with at the beginning of the winegrape growing season, explained their importance and tried to give as many helpful tips as possible.
Start Spraying
The first topic I’d like to discuss in the context of budbreak is mildew and fungal diseases. Remember that spores of powdery and downy mildew often “overwinter” between the dormant cane and the bud shield and in bark crevices. It is vital to hit the vines with an application of fungicide, whether it be sulfur, horticultural oil, copper, synthetics or a mix. Do this right away. Being vigilant with a spraying schedule will keep massive outbreaks from hurting your crop — if you can knock down the spores before the tiny grape clusters emerge, you will save yourself a lot of grief later.
Some viticulturists like to wait until there is two inches of shoot growth to begin spraying fungicides. But the sooner you can knock down those active spores, the better. With an arsenal of sulfur, a surfactant mixed in for added efficacy and perhaps a spray of two percent horticultural oil as the buds are emerging, the backyard viticulturist should be able to wage a good war on fungal disease. Copper can be extremely helpful, too, if you are in an area that has problems with downy mildew.
Remember that wettable-sulfur application (which is an approved organic practice) only kills germinating spores of powdery mildew. In other words, it slows its progress but does not affect existing infections, and many scientists think it’s actually the vapors (SO2) produced by applying sulfur that stop mildew from growing.
Sulfur is most effective at temperatures above 60 °F (15 °C) and less than 90 °F (32 °C). Early in the season, it’s important to make sure, as I mentioned above, to include a surfactant in the wettable sulfur mix to make it more effective. Only use this wettable mixture from 2 inches (5 cm) of shoot growth to bloom — using it after bloom may leave unwanted amounts of sulfur on your grapes and in your finished wine. Most vineyard consultants would suggest the method of powder-sulfur dusting after bloom and before berry-softening, when no more sulfur should be applied.
High application rates of sulfur coupled with temperatures above 96 °F (35 °C) can cause foliar burn, so if you’re expecting a heat wave, keep your applications below five pounds-per-acre, or one pound of wettable sulfur (I use Thiolux) in 20 gallons (76 L) of water.
For those who like to stay on a regular schedule for vineyard practices, applying sulfur to the young shoots once a week should be more than enough, even if it rains on them a little bit. If you get hit by a deluge, I recommend doing a touch-up application after the storm. Heavy rain will wash sulfur off and spread fungal spores from shoot to shoot, cane to cane and plant to plant.
Clear Out the Critters
If the soil is warm enough to push shoots from the dormant vine, chances are the gophers and other mammalian root-munchers are also waking up. Left unchecked, gophers will treat your vineyard like a smorgasbord. They’ll make tunnels that run right along the root system, and may well kill a vine by gnawing through the main taproot. When I see a vine in my vineyard that looks stunted or virused, I dig up around the roots and look for gopher damage. Ninety percent of the time gophers are to blame.
Although I am a sustainable farmer with lots of cute, fuzzy pets, I show no mercy to gophers. I trap them. You may well have trouble with deer, too, so keep an eye out for large herbivores roaming the vineyard looking for snacks. According to some farmers I’ve talked with, loud noises and mountain lion scent are effective deterrents.
Jack Frost Nipping Your Merlot
Sustained temperatures below 26 °F (-3.3 °C) can cause irreparable frost damage to young shoots, growing tips and fruit clusters.
At Clos Pepe we had to spend almost a thousand dollars per acre to set up sprinkler systems to protect our vineyard from frost, but the backyard viticulturist should be able to make due with a few hoses and a tripod-sprinkler. Keep your eye on the weather report, and when the temperature dips near 25 °F (-3.8 °C ), turn those sprinklers on before the freeze to coat the young clusters with water. The water will freeze, making a little “cluster-sicle,” and the ice will insulate the grapes.
Crystallization of water into ice releases energy as heat and keeps the young shoots and berries from being damaged, so be sure to keep those sprinklers running as long as the temperatures are in the 20’s. It’s not just the ice that keeps the young berries safe, it’s the process of the water turning into ice.
In California, if your vineyard is on top of a hill or on a slope, you might not need to frost protect, because of cold air’s tendency to move downhill and settle in low-lying areas. Keeping weeds and grasses mowed will help as well. The smoother and cleaner your vineyard floor, the harder it will be for frost to develop on the trellis and the vine.
Feed the Need
Budbreak is a perfect time to give the vines a little nitrogen and zinc if they need it. Nitrogen keeps a vine vigorous and green. If your vines were stunted and a little yellow last year, give them a little hit of nitrogen at budbreak. Ask your local nursery person to suggest a product and application rate. For an organic source, try a handful of chicken manure or bat guano. You can also use a scoop of organic compost under each vine every year to keep the soil full of microbiological activity and diversity.
If the vine is healthy and vigorous, do not supplement the plant with additional nitrogen. Too much vigor will cause excessive fruit shading and might ripen the fruit too quickly, and might also hinder the vine’s ability to go dormant later in the season.
After the shoots have elongated and the leaves are becoming fully expanded, you can give the vines zinc if they need it. Steve Matthiasson, of the Lodi-Woodbridge Winegrape Commission, recommends applying zinc two weeks before bloom to increase berry set.
Zinc deficiency is easy to see in the grape clusters or on a leaf. A grapevine leaf looks a little like a “spade” symbol on a playing card. If the nice round “bulges” on either side of the “petiole” or leaf stem are not clearly apparent (the leaf loses its spade shape and becomes more like a circle), you probably have some zinc deficiency.
Poor berry set can also be a sign of zinc deficiency, especially “hens and chicks” (grapes that are of differing size and shape). Ask your nursery for a zinc product and use as directed.
Water, But Not Too Much
Unless you live in an area with very sandy soils, or in a locale that receives less than 15 inches (38 cm) of rainfall during the winter, your vines will have plenty of water to use at the beginning of the growing season. Don’t give a vine more water than it can use. Vines need their roots to dry out many times during the season. A vine’s root system can get “wet feet” if left soaking for too long. This will cause the roots to decompose and lose efficiency, or even kill the vine.
It has also been shown in studies of Oakville Cabernet by the University of California at Davis that early season water-deficit irrigation (not watering the vines early in the season) can keep vigorous vines from growing too much vegetatively. This helps keep sun flecks on the fruit, promotes a healthy, open canopy and creates wines that rate higher in blind tastings than vines that received a lot of early season water.
A Long Row to Hoe
The last task for the new growing season is to hoe, mow or cultivate the weeds from within the vine row. Weeds and grasses growing close to the vines will compete for water and nutrients. I don’t recommend using Roundup® or any other defoliant in your vineyard because it will negatively impact the diverse life within the first few inches of the soil. It will kill beneficial soil fungi as well as earthworms. Although 99 percent of California vineyards still use defoliants, I don’t think they would if they could see how it is sterilizing their soil. Some organic viticulturists go so far as to imply that contact herbicides can open up niche space for the phylloxera vine pest, which is something that no one wants to do.
The special time of budbreak marks the beginning of a brand-new vintage and reminds me that I can fine-tune my vineyard cultural practices to get a balanced vine and delicious wine. The more work you put in at the beginning of the growing season, the easier it will be for you to relax and enjoy the craft of viticulture as the season progresses.
Problems that do not get addressed now will be harder to correct for as the growing season continues.
Special thanks to Steve Matthiasson of the Lodi-Woodbridge Winegrape Commission, who reviewed this section. He helped me understand more about the relationship between viticulturist and vineyard. All backyard vineyardists can benefit from reading the materials offered by Lodi-Woodbridge.
Early Spring Vineyard Management
Budbreak represents the end of the winter’s “vacation” and the beginning of a vitally important managerial period in the vineyard.
Between budbreak and bloom, winegrowers are offered the chance to get a head start on the growing season to make decisions and finish vineyard practices that will dictate the relative ease or difficulty in finishing a year’s vine farming. The purpose of this article is to define and detail the practices that can be accomplished in the first few months of a vine’s growth cycle, explain why they are important to final wine quality, and how to assess your early season efforts in the vineyard.
The biggest change in my own vineyard management practices in the 10+ seasons that I’ve grown grapes has been how to handle the vineyard between budbreak and bloom. We have brought our 6-person crew into the vineyard much earlier in the past few years, and have found that the early work we finish is much more economical than coming back and trying to “fix” the canopy after it has filled the trellis. In this spirit, I hope to share some of our early-season tricks in vineyard management and describe how getting into the vineyard early can save you lots of hassles at the middle and end of the growing season.
In the early season, here is what we need to accomplish:
• Make sure the vines have adequate water and nutrition • Keep mildew and early season shoot blight from effecting the vines’ health and vigor • Protect the vines from frost • Control weeds • Set a firm foundation for canopy management through shoot removal and suckering (removal of unnecessary and basal shoots)
Now let’s discuss how to accomplish these goals out in your vineyard:
Water and Nutrition
As the vines wake up from dormancy and start to grow, they are wholly dependent on the water and nutrition that is available at root-level. It is vitally important that the soil be moist to saturated. The vine will decide at budbreak just how vigorous to grow, based mostly on nitrogen availability and water status.
Water is a tool that can impact vigor both ways. If your vineyard grows too vigorously and rank, it would be better not to apply water in the early spring. This may retard overly vigorous growth and may help you produce better balance in the backyard vineyard. Inversely, if your vineyard is low-vigor or stunted, heavy applications of water (and some supplemental nitrogen) can help foster a more vigorous growing cycle. In most areas of the U.S., winter rains and snows will saturate the soil profile so no supplemental irrigation will be needed for the first few months after budbreak. Vines like to have their roots dry out between watering, so by using a soil probe, an irrometer or a shovel, be aware of the water status of your soil 3–5 feet (1–1.5 m) down. Once the soil has dried out at 3 feet (1 m), it’s a good time to start offering the vines some additional irrigation.
As far as nutrients and fertilizer go, the beginning of the season is an excellent time to give the vines some NPK “breakfast” as they wake up, but only if your vineyard needs a little push in vigor. NPK stands for nitrogen, phosphorous, potassium. The hyphenated numbers on the label of fertilizers represents these components. If a label reads 15-15-15, the product provides 15% of each of the three macronutrients by weight of the product. Never fertilize a vineyard if the leaves are green and healthy and the vines are growing with adequate vigor. Fertilization should be restricted only to vineyards that are struggling to produce uniform canes with moderate vigor. If your vineyard naturally produces a cluster of fruit for every 12–15 leaves, you are naturally balanced without fertilization and don’t need to add anything. If the vineyard is overly vigorous, you may want to reduce any supplemental irrigation, making sure the soil dries in late spring and early summer, which will send a message to the vines; don’t get too big and bushy!
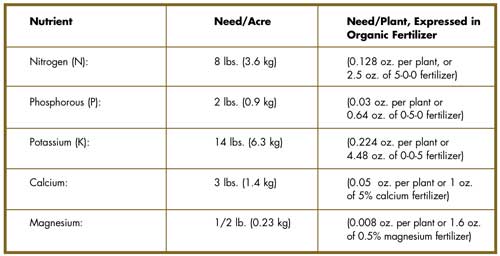
From a previous article, here is a generalized list of what a vine loses each year in nutrients when you produce and harvest a crop of grapes (see Table 1 below).
Table 1: Average Nutrients Removed Per Acre (rounded off in lbs.) in a Producing Vineyard per Year (at 2.5 tons/acre, or about 5 lb. fruit per plant @ 1000 plants/acre)
Many backyard soils in the United States provide these nutrients naturally to the vines, year after year. This chart does not imply that all vineyards need to have these nutrients added. If your vines produce vigorous, green growth and good fruit year after year without adding fertilizer, there is no need to add further amendments or nutrients. Stunted, low-yielding or yellowed vines will benefit from nutrient additions early in the growing season, at flowering, and after harvest. Using natural fertilizers can benefit the existing nutrients in the soil.
Make a Spray Schedule
I’ve said it before and it bears repeating: the number one error in home viticulture is poor spray scheduling and coverage. Sulfur (preferably a wettable product such as Thiolux) needs to be applied to the vines starting at budbreak, and in areas where mildew pressure is high, it needs to be re-applied every week until bloom. In areas where mildew pressure is not as high, spray at 6-inch (15-cm) shoot length, 12-inches (30 cm), 18 inches (45 cm) then every 10–14 days. Adding copper to the mix will add a bit more protection and I use a sulfur and copper mix for the first three or four sprays here at the vineyard.
Powdery mildew is the enemy here, as well as botrytis. Mildew and rot issues are likely the number one culprit in lost crop and poor wine quality in home vineyards. If you have a serious early-season botrytis shoot blight problem — brown rotting spots at the base of tender shoots or the tips of the tendrils, or shoot tips are turning black and dying — you may need to check with your local nursery about options for botrytis control.
Another serious issue I’ve seen in a number of my home-vineyard consultations is underpowered and inadequate spray equipment for mature canopy. If you are stuck using a backpack sprayer and continually have problems with mildew even when you stick to your spray schedule, the problem may well be spray penetration. To be effective, you need to get full coverage on the vine, including the interior of the canopy when the vines have filled in the trellis later in the season. If you have an ATV or a Gator-style ranch vehicle, you may want to look into a tow-behind sprayer that hooks up to the ATV/Gator battery for power. There are also gas-powered units that do not require an exterior power source. But, if you are stuck with a backpack sprayer, you may want to make sure that the pressure is adequate when applying, and you may need to spend more time covering each vine and spraying from both sides of the vine row. Inserting the spray gun into the canopy is another way to get better coverage deep inside the vine’s growth. Make sure to wear proper clothing and safety equipment during sprays to keep yourself healthy.
The first month or two after budbreak is absolutely critical for mildew control. When the bud shields crack open to allow budbreak, the spores hungrily attack the new delicate shoots. In vineyards that had mildew issues the previous year, massive amounts of dormant mildew spores will be ready to attack the vines as the weather warms. Mildew, much like many aspects of the grapevine, activates in two year cycles. A heavy mildew infection in a vineyard may increase mildew pressure in subsequent years, and will worsen until effective control is managed.
Frost
Sustained temperatures below 32 °F (0 °C) can cause damage to the green, growing parts of the vine, especially young shoots and fruit clusters. Maintaining a bare vineyard floor will help keep the cold air from “sticking” in your vineyard (it should move downhill like flowing water). Pay special attention to areas of your home vineyard that are located on low ground. When deciding on a location for your home vineyard, it is advisable in frost-prone climates to put the vineyard on a hillside where the cold air can flow away. Dormant vines are generally very tolerant (and even fond of) cold winter weather. However, when the vines start growing again, frost can cause all green growth to burn and die. If this happens, don’t remove the burned/frosted material. The vine will likely recover and start growing again, and even produce a new (usually lighter) crop of fruit.
There’s a few things you can do to help a vineyard through a potentially damaging frost episode:
• Watch the weather carefully and on potential frost nights, set your alarm for midnight to check the temperatures in the vineyard.
• If temperatures drop under 32 °F (0 °C), turn on your drip system (it may produce enough warmth to keep the vineyard from frosting, or even better, turn on an overhead sprinkler system. Sprinklers will coat the young fruit and shoot tips with water, the water will freeze, and the ice will insulate the tissue like an igloo. Many copper spray products also include ice-nucleating bacteria, which will hasten the process of the ice forming around the plant.
• Keep your vineyard rows and in-between rows clean from weed and cover crop growth. Bare, firm, moist soil is warmer and provides better frost control compared to a vineyard floor rank with plant growth.
Control Weeds
There are only a few ways to control weeds in the vine row:
• Hand removal/hoeing (best exercise and best for the vineyard and the environment.)
• Contact herbicides (do not use at a time when green vine tissue may be contacted, as products like Round-Up can cause permanent vine injury. Use pre-budbreak herbicides according to label.)
• Residual herbicides (pre-emergence, apply before winter rains.)
• Mechanical Cultivation (tractor or ATV-mounted devices such as Weed badger, Pellenc or Kimco.)
Weed removal and a clean vine row is absolutely vital to a young vineyard, but a bit less vital as the vineyard matures and the vines stop competing at the same level as weeds for water and nutrients. Weeds will absorb a good deal of the irrigation and rain water if allowed, and can also rob the topsoil of nutrients that may eventually work down to vine-root level. My usual recommendation: keep the vine row weed-free for the first 3–5 years of a vineyard’s life, and then keep the weeds in check, and never let them interfere with the growing canopy of the vine. The less vigorous the vineyard, the more important it is to keep weeds in check. It is also advisable to weed while the weeds are young, easily destroyed and before they go to seed.
Early Canopy Management
I’ve saved two of the most crucial cultural practices for early season vineyard management until last. Shoot removal will space out the growing shoots and canes on the fruiting wire, will produce a uniform crop, a uniform niche space for each cluster, will increase the effectiveness of sprays and leaf removal and will balance the fruit to leaf ratio. Suckering will focus all of the vine’s energy to grow in the proper space.
Shoot removal: This is a fairly expert operation, but with a little training, within a few hours, your post-budbreak vineyard will be dialed in and you will be saving lots of future work. The best time to engage in shoot thinning and removal is when the vines have an average shoot length of about 6 inches (15 cm). Some shoots will be just emerging, but already you should be able to discern which shoots are healthy and growing fast, and which may be stunted and will never catch up. The idea is to retain a certain number of healthy shoots per side of the canopy.
• Low vigor vines: retain 16–20 shoots/vine or 8–9 shoots per side
• Medium vigor vines: retain 20–25 shoots/vine or 10–12 per side
• High vigor vines: retain up to 30 shoots/vine or 15 per side.
Retain the healthiest shoots and remove the stunted shoots, or shoots without crop.
The most important element of this practice is to space each shoot out at least 3–4 inches (8–10 cm), so that each shoot has its own space. You can use the width of a slender hand as a guide. There should be about a hand’s space between each shoot.
Remove any “double shoots.” If a single bud is supporting a double shoot (two separate shoots with two growing tips coming from the same bud position) pinch off the extra shoot. Retain the longer of the two shoots if it is in a good position. Also, remove all shoots that are pointing down. They will be difficult to position up into the catch wires.
Excess shoot growth from the head of the vine should also be removed, but make sure to retain a few good shoots for next year’s fruiting wood if you are using a cane-pruned system. In spur-trained, cordon systems, remove every shoot and sucker that is not coming out of a spur position retained at pruning, no exceptions. You can also thin spurs that have more shoots than necessary. In other words if you have a two-bud spur, that spur should only have two shoots.
When done carefully, shoot thinning will help each vine produce canes and shoots of uniform length and vigor, which will help produce a crop of uniform ripeness. Each shoot will have its own space in the canopy which will reduce crowding and mildew/rot/insect pressure and open the fruit up to more wind and sun exposure.
Suckering: This is easy stuff. If the vine trunk has anything growing out of it, grab it and pull it sharply down. If you see any red buds on the trunk (future shoots), rub them off with a gloved thumb. Suckering has a single focus and a single goal: Remove any green growth from the vine that does not originate from budwood that was retained during pruning for fruit production. That means any growth not on the retained fruiting units is removed for the purpose of focusing the vine’s growth and nutrients on ripening the crop.
Budbreak signals a new year, a blank slate in which we will write the story of another vintage, another wine. The practices that take place between budbreak and bloom are meant to balance the vineyard and make the vine’s job easy — to produce enough sugar to ripen a crop and to keep that crop pristine for wine production. Starting the growing year off diligently and professionally will set the tone in the vineyard for the entire vintage. Build a solid foundation for your entire year in the vineyard, and you’ll have more time for drinking as the season progresses — and better wine to drink in the future.
Popular Varieties
If you are thinking about planting a home vineyard, there are many grape varieties to choose from. You will likely know the types of wine you enjoy, but you need to pick a grape variety that will grow well in your location. Here are some of the most well-known grape varieties and where they thrive:
Cabernet Sauvignon is one of the most popular red wine grapes. It is planted in a wide variety of places, but does best in warm climates. It rose to popularity in Bordeaux, France, but also produces great wine in California’s Napa Valley, Australia’s Coonawarra region and in the Maipo Valley of Chile. Under warm conditions, fruit can reach 27 °Brix or beyond at harvest.
Pinot Noir is a red grape that is not as deeply pigmented as Cabernet Sauvignon. It is generally grown in cooler grape-growing regions. Pinot Noir came to prominence in the Burgundy region of France. In the US, it has found success in California, oregon and Washington. Pinot Noir is best harvested around 24 °Brix.
Zinfandel thrives in warm grape-growing climates and is closely associated with California, where about 10% of all vineyard acreage in planted with Zinfandel. The grape’s tendency to unevenly ripen can cause headaches in the winery. Zinfandel can put on sugar in a hurry, and it is best to get it in under 26 °Brix. This red grape is also used to make White Zinfandel blush or “pink” wines.
Syrah is a grape frequently found in the balanced red wine blends from France’s Rhône Valley. In Australia (where it is called Shiraz), it is made into big, jammy “fruit bombs.” Syrah/Shiraz can do well in many grape-growing climates from relatively cool to quite warm locales. Harvest sugar levels get higher in warmer growing regions and can range from 23–28 °Brix, depending.
Despite the bad press from the movie “Sideways,” Merlot continues to be a be a popular red grape. One of the key varieties of Bordeaux wines, it is the most-widely planted variety in that region. It also finds success almost everywhere Cabernet Sauvignon — it’s frequent blending partner — is grown. Typical harvest numbers are 24–27 °Brix.
Sangiovese is an Italian red variety that makes well-balanced, refreshingly acid wine. It is almost never made into a “blockbuster” wine, as Cab, Zinfandel or Shiraz frequently are. It thrives in moderate grape-growing climates and harvest numbers are usually around 25 °Brix. Acidity is typically higher than in most reds, often coming in at 6–8 g/L.
Chardonnay is the most popular white wine in the world. Chardonnay grapes grow well in a variety of soil types. And, because it ripens early, it can grow in regions with a short growing season. It is planted all over the world with notable regions including the Burgundy and Champagne regions in France, coastal regions of California and New Zealand.
The character of Sauvignon Blanc, the second most popular white wine grape, varies depending on where it is grown. In cooler climates, it makes a light wine with a crisp acidity. In warmer climates, it makes a produces more rounded, melon-like flavors. Unlike Chardonnay, which is frequently oaked, Sauvignon Blanc is almost made “clean.” The grape comes from Bordeaux, but is planted widely, including in California and New Zealand, where it thrives in vineyards near the coast.
Riesling is an aromatic white wine grape from the Rhine area of Germany. It is the most widely-planted grape in Germany, and also thrives in cooler grape-growing regions around the world, including New York’s Finger Lakes and Canada.
Spring & Summer Vines
Spring has sprung and the vines on your property are charging into this year’s vintage. The new growing season gives us the chance to improve our vineyard practices, balance our vines and nurture the crop. As buds break, shoots climb and tendrils curl, my inbox begins to fill with questions from the WineMaker readership. The purpose of this article is to provide winegrape growers with a framework of information by which they can better understand the needs of the vineyard from early spring throughout summer, before it’s time to harvest your ripe grapes.
Question: I hear about grapevines going through different phases of growth such as bloom, budbreak, fruit set, verasion (berry softening) and shatter. In what order do these phases occur, and how do I know if there is a problem with any of them?
Answer: Understanding the cycle of vine growth will help your awareness of what a vine needs and how you can help the vine with cultural practices (i.e. human interaction). (Realize this is a list of growth phases of a mature vine that has grown a trunk and does not include the cycles of harvest or dormancy.)
Budbreak (Spring):
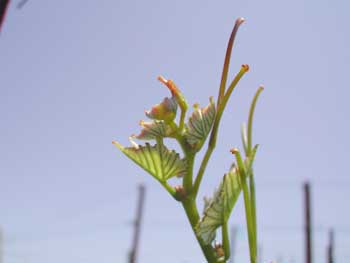
Budbreak is defined as the emergence of green tissue from the fruiting wood of the grapevine and signals the beginning of the growing year. Before budbreak occurs, you will notice that the thorn-like dormant buds on the grapevines will start to swell and develop a cotton-like appearance. Bud swell will continue until the buds begin to fold open as small leaves and a growing tip appears. Depending on weather, soil moisture and sunlight, the vines may begin growing slowly or rapidly. As soon as you can see a significant green color along the fruiting wood, budbreak has finished and the next phase begins. Problems that might arise during budbreak include uneven budbreak throughout the vineyard, a few vines not waking up from dormancy and vines waking up too early in the spring, becoming vulnerable to frost. With good winter rainfall, irrigation probably won’t be necessary. In drought conditions, apply 5 gallons per vine per week. (More for sandy soils, less for clay soils).
Early Shoot Growth and Fruit Emergence (Spring):
Your vines have emerged from dormancy, and now the vines have a visible bounty of short green shoots. When the vines have an average shoot growth of a few inches (3–4”/7.6–10 cm), give them a good sulfur application. If you live in an area with strong mildew and rot pressure and the potential for hard frost in the early growing season, you may want to apply some copper as well.
You may notice that the young shoots are supporting small fruit structures. Make sure those little clusters get a good spray of sulfur too, for we want to keep them clean and mildew-free. Reapply sulfur every 7–14 days. Mildew grows most rapidly in warm, wet weather from between 70–80 °F (21–27 °C). Your vines may also be sprouting suckers. Suckers are green growing shoots that emerge from the trunk and base of the vine and draw resources that are meant for shoots that are bearing fruit. Knock the suckers off your vines with a decisive blow from a gloved finger.
You may also want to look for “water buds” which are swelling buds on the trunk and base of the vine that will develop into suckers. Knocking those off in the same “suckering pass” will save you another trip through the vineyard.
Spring is also the correct time to replace dead vines in your vineyard with dormant vines of the same type. Plant the vines according to your nursery instructions making sure to mound some soft dirt over the scion wood so that it doesn’t dry out. Remove the soil mound after the shoots begin to emerge from the soft soil. One problem that may arise during early shoot growth is frost damage, which copper sprays can protect, but if the weather gets into the high 20’s (Fahrenheit or in the negative single digits in Celsius), damage will occur. Turning on the sprinklers will help before frost occurs, so watch your thermometers and local weather.
Mildew damage and botrytis on the shoot tips is also a problem. If shoot tips and fruit begin to brown and die, make sure to spray sulfur and copper on the new shoots every week or two to take care of mildew and rot. Early sprays help to control mildew later in the season.
Insect damage can cause some trouble in the vineyard as well. If something is eating those tasty new shoots, throw some sticky tape in your vineyard, catch the species that’s munching the vines and ask a local nursery how to control the critters.
Some vineyards can suffer from a lack of water. If you had more than 20 inches (51 cm) of rain over the winter, watering is most likely unnecessary at this point. In drought conditions, 3–7 gallons (11–26 L) per plant is appropriate in most vineyards.
Flowering, Fruit Set and Shatter (Late Spring):
After a few months of shoot growth, the small fruit clusters will shed their caps and tiny, white flowers will emerge to pollinate the grapes. This is a critical period for the vines. Warm weather and a lack of rain or extreme temperatures will help the fruit pollinate and “set” into viable grapes. There’s a few things you can do to help your vines have a successful flowering period. Do not spray your vines while the caps are falling and while the flowers are visible. Spraying the flowers will hamper their ability to fertilize the grapes. (Think how unpleasant it would be if you were sprayed with sulfur while attempting to fertilize your mate.) Make sure the vines have enough water. Water-stressed vines may abandon some fruit. Applying a tiny bit of zinc fertilizer before bloom and fruit set may also help the vines “set” more fruit. Studies show that zinc can increase yield about 10% when applied pre-bloom.
Shatter is what happens in a year when flowering and fruit set is poor. After flowering, you can tap each cluster lightly with your finger, and you may see that some of the tiny pre-grapes might have shriveled , browned and eventually fallen off the cluster. These unfertilized grapes have “shattered.” A few shattered grapes are normal on each cluster, but if more than 25% of your grapes do not pollinate, you have had a poor set and yield will be adversely affected. There are several potential problems during this period, one being mildew and rot damage. Be careful to apply one last spray of sulfur or copper before bloom to keep the shoots clean during flowering. Shatter itself can become a problem due to weather or poorly timed spraying if more than a quarter of your potential crop does not fertilize, shrivels and drops off the clusters. Slow and uneven growth where vines have either been poorly watered, fertilized, or growth is uneven due to pest pressure or vine disease can also be a problem during this period. Other problems include rank growth (when too much water or fertilizer has been applied, or rootstock is too vigorous for your site) and shaded fruit, which can be prevented by removing enough leaves in the fruiting zone to expose the fruit to sun flecking and wind (after bloom when the fruit set is complete). An open canopy will keep the fruit healthy and maximize your sulfur applications.
Discover how many leaves can be removed without burning or raisining the fruit. The more leaf removal the better — unless you expose the fruit so much that it can burn of course. If rains persist (1–2 inches/2.5–5 cm per month), irrigation might not be necessary. If the soil has dried up, apply 3–7 gallons (11–6 L) to each vine per week.
Fruit Growth and Berry Softening (Summer):
By the time summer rolls along, your vines should have a developed canopy of shoots and leaves. You have done your best to open up the canopy by tucking shoots into trellis wires to direct all vine growth upwards (vertically). Doing this keeps all the fruit at the same height on the trellis and you can remove a few more leaves and fruitless shoots in order to open up the canopy (and fruit zone) to air flow and sun flecking. Once your vines complete berry softening, mildew is less likely to grow on the clusters and sulfur spraying stops. If you see further evidence of mildew or rot, talk to your local nursery about non-sulfur fungicide sprays that will not negatively impact wine quality.
Berry softening will occur at this point, which means your fruit is rapidly accumulating sugar and losing acidity. Red grape varieties start to turn from a green color to blackish purple. White grape varieties turn slightly golden and translucent. Birds will also notice this change and begin to flock around your vineyard. Deer, squirrels, raccoons, ostrich and other pests may arrive for a free meal as well. Use bird netting over your vines to help with your birds, and keep a dog out in the back yard to scare away larger mammal pests.
You may want to dust off your lab equipment at this point and start testing the fruit for sugar and pH when the entire vineyard has gone through berry softening. Powdery mildew cannot grow on grapes once the sugar gets up around 16–18 °Brix.
Uneven berry softening can be problematic if vines are of varying age and vigor. After 90% of the vineyard has changed color, it may be wise to cut off the remaining green crop and make the fruit more uniform in ripeness. Shriveling and unripe grapes could be the result of water stress or disease.
If mold or mildew problems persist, visit a nursery and find a non-sulfur fungicide, as ripening grapes can pick up sulfur through their skins and leave it in the wine. Remember to check your shoots’ growing tips for water stress often. If the curly-looking tendrils extend beyond the growing tip, the water status is good.
If the tendrils pull back behind the growing tips, your vines are water stressed. Another visual cue for water stress is droopy leaves. If the angle of the leaf to its stem is less than 90 degrees, you may need to apply additional water. Water use should be curtailed beyond this point of the season to stop vegetal growth and promote fruit ripening. Cut water down to two-thirds of what you’ve been applying. A few gallons (~8 L) per plant, per week, is all they need if the summer is dry.
Understanding the seasonal rhythm of the vineyard is necessary for growing good winegrapes. Knowing what to expect in the vineyard, season by season, will allow you to observe the vines carefully and apply the needed materials and labor for keeping your vines healthy, clean and balanced.