Vineyard Maintenance
Pruning Your Backyard Vineyard
Pruning grape vines during dormancy is a vital practice for keeping your vines in balance. Grape growers discovered thousands of years ago that cutting off up to 90 percent of the previous year’s growth from a dormant vine will limit the crop and vegetative growth of the vine in the following season, increasing the quality of the wine made from the vineyard. Simply put, pruning promotes balanced vines for making good wine. The last thing we want as home winegrowers is to have a sprawling, unkempt monster vineyard in our backyard that hides fruit from sun and wind. Balanced vines depend on competent pruning, and it is my intention to offer the WineMaker readership the basic foundations and theories that govern this age-old vineyard practice.
Viticulturists stress that all successes or failures in any given growing season depend first and foremost on the success of pruning. Pruning is the foundation that supports (or ruins) the entire year’s grape crop and wine. Why is pruning so vital for producing good winegrapes? What pruning options are available for backyard vineyardists? How much wood should you cut off the vine, and how much wood should remain for next year’s growth? What are “spur pruning” and “cane pruning” and which is better for your vineyard? This article will familiarize the reader with the basic cultural practices of grapevine pruning.
Before we get down to the nuts and bolts of grapevine pruning, I have to offer a bit of practical advice to the backyard vine-warrior. I remember studying pruning at UC-Davis. We sat in a classroom and discussed “canes” and “two-bud spurs.” I listened carefully and took good notes. I copied diagrams that showed where cuts should be made and how the vines should look before and after pruning. Easy stuff, I thought! But when we were taken out into the student vineyard, and the professor threw some “loppers” in my hands, I stalled. There is a profound difference between viticulture book learning and having what I call kinesthetic vineyard sense. You can study books all day, but still not know how much pressure will snap a dormant cane as you attempt to wrap it on a wire. Without knowing the level of expected vigor in your vineyard, it might be difficult to know how much wood to leave, and how much wood to cut off.
Confidence builds in the doing and this confidence will increase each year. Don’t expect to be a perfect pruner by reading a single article.

In fact, the best advice I can give is to volunteer to prune at a commercial vineyard. Work a half a day. Get some blisters and some “feel” for the task. Ask questions, pay attention and get dirty. Pruning is a lot like oil painting. You can study the Masters and visit museums, but it won’t help you paint a masterpiece. For that you need to pick up a brush and a palette.
Why Prune?
To understand why we prune, we must first understand that everything we do to a vine needs to be done not only for this year’s growth, but also for the following years. Everything in viticulture happens in two-year cycles. For example, the fruitfulness of this year’s crop was determined in spring of last year by the amount of sunlight that touched the “buds” on the shoots that grew into (hardened) canes. The amount of grapes a vine will produce is dictated by the previous year’s pruning as well as weather conditions in the previous spring. Those shoots that grew last year are going to be used this year to produce fruit, either as spurs or canes.
Because of this two-year cycle, we want to make sure the vine gets lots of sunshine on its growing shoots. The more sun that hits those shoots and buds, the more fruitful our vines will be the following year. Cutting off most of the previous year’s growth allows us to keep the vine from crowding itself and becoming a shade factory. We want an open, balanced vine that absorbs enough sun to renew fruitfulness for the following vintage and ripen a crop for the current vintage.
Pruning Goals
Before we get into the specifics of pruning theory, let’s take a moment to review the goals of grapevine pruning for wine production.
1. Give each growing shoot adequate space to allow sunlight to bathe the leaves and the developing buds. Growing shoots should not be crowded. Some viticulturists like to see a hand’s width between each shoot. The key here is that the vine is not so cluttered with growing shoots that it keeps sunlight and wind from reaching the interior of the canopy.

2. Encourage air circulation inside the canopy and around the fruit. Humidity is the enemy here because it increases the incidence of mold, mildew and other diseases. Air flow is also important, as nested clusters and dense foliage will harbor insects and birds. If your kids can make a fort under your vines, that’s a good sign that you didn’t prune and trellis your vine well enough.
3. Pruning also allows the application of sprays (such as sulfur, copper and foliar fertilizer) to be much more efficient. Spraying an open canopy, where each growing shoot has a defined space in which to grow, allows penetration of those chemicals, requires less material to be sprayed, and often makes the application more effective and long-lasting.
4. Successful pruning leaves buds on the vine that will create canes and spurs for this year’s fruit production, and (just as important) will provide buds intended to create replacement shoots for next year’s pruning. Don’t forget: When you prune, you’re not only pruning for this year’s fruit production, but also for subsequent years. This is more of an issue for cane-pruned systems but this concept should always be considered.
I am certain you noticed the basic theory — prevent crowding and shading of the canopy, which in turn prevents sunlight, air and chemical applications from reaching the fruit and interior canopy. This leads us to a simple conclusion: The aim of pruning is to spread out the dormant buds in a way that will allow the future shoots to grow in their own defined space. If you keep this in mind while you prune, there will be little chance of making a serious mistake.
Pruning Terms
Now that we understand the bare-bones philosophy behind pruning, here are a few technical terms to know:
Shoot: A shoot is the current season’s green growth on a vine. Each “bud” left on a dormant vine grows a shoot when the vine comes out of dormancy. Shoots become a “canopy” when more than half of the shoot becomes “woody.” When completely tan and hardened, a shoot is called a cane.
Cane: As explained above, a cane is a mature shoot that has become hardened and tan. When pruning, we are cutting only the canes. Most pruning takes place between January and February in California, but can be attempted any time after the vine is completely dormant (no leaves, no growth). In general, make a few test cuts on a dormant cane. If the wound does not weep out watery fluid, you are ready to prune.
It is also important to finish pruning before the vine starts waking up, marked by swelling buds and emergence of green tissue (budbreak). A cane is also considered a “fruiting unit,” if you retain it during pruning. If you use the “cane pruning” system, you will choose the best few canes to retain, cut the rest off, and wrap those canes (one each direction) around a wire on your trellising system. These wrapped canes will then begin to sprout fruit-laden shoots from the buds in spring. These fruitful shoots will climb the trellis, produce leaves and a canopy to ripen the hanging clusters.
Spur: A spur is a “fruiting unit” just like a cane. By “fruiting unit” we mean a part of a cane grown last year that will be pruned, retained, sprout new shoots and grow fruit this year. A spur is basically a one-year-old cane (last year’s growth) that has been cut back severely, usually so there are only one to two buds retained after pruning. A spur could be described as a cane cut back to a stub of a few inches in length, either on the head of the vine (in a cane-pruning system, to provide a place where new fruiting canes will grow for future vintages) or on a permanent cordon arm where a number of evenly spaced “spurs” will be retained at pruning to provide buds for this year’s fruit production. Make sure you know what a spur looks like before proceeding, because you will need to cut canes back to spurs in both the cane and spur systems of grapevine pruning.
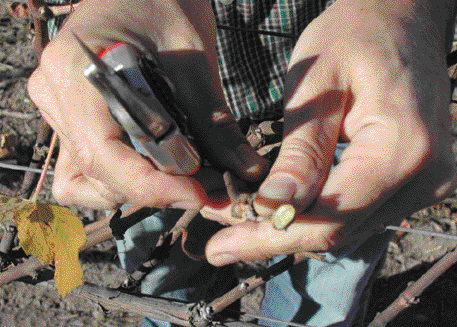
Bud: During dormancy, buds are a rounded thorn-like protrusion that appear at every “node” of the cane. A bud is actually considered an organ of the vine, and basically contains an undeveloped shoot tucked in under protective, overlapping “scales.” The scales help keep next year’s potential growth protected from winter frosts and hungry animals and pests. These scales become cotton-like and swollen in the weeks prior to budbreak. Interestingly, a bud can be dissected during winter and checked for fruitfulness. (Remember, the bud’s fruitfulness was determined the year before!) Dissecting a number of dormant buds (primary buds) and viewing them under a microscope can help a viticulturist count how many grape clusters will be supported in each bud, and can actually be counted in order to approximate vineyard yield even before the vines have begun their year’s growth. Buds (or the nodes that contain the buds) also have built-in backup systems. Each “node” of a cane usually contains an amazing four buds — a primary bud for the current season’s growth, a lateral bud that can sprout that same year if conditions are correct, and a secondary and tertiary bud which usually stay dormant until the next year, when they burst forth, but usually aren’t as fruitful as the primary bud. If one bud’s shoot gets frosted, eaten or yanked off, it usually can grow another from the lateral bud or the secondary/tertiary buds if absolutely necessary. For our purposes, though, assume you will see only one shoot growing from each bud or node that you leave on the vine after pruning.
Head: The “head” of the vine is the top part of the vine’s trunk, including the area that produces the cordon “arms” (in a spur-pruned system) or (in a cane-pruned system) the area where canes are retained as fruiting units, and spurs are left for producing the next year’s canes. Simply put, the head is the top part of the vine’s trunk where everything that goes out on a wire and produces canopy and fruit is attached.
Permanent Cordon: Some vineyards choose to use a system of pruning in which a cane is laid down on the fruiting wire and is kept there permanently, year after year, and allowed to grow into a permanent, woody “arm” that supports spurs (fruiting units) up and down its length. In the simplest “cordon” systems, one arm extends from each side of the head (two arms in all), and the growth from the previous year is clipped off the top of the permanent arms (like giving the vine a buzz haircut) so all that remains are one to two buds (a 2” to 4” stub) on each spur that grows on the permanent cordon arm. It is easy to see the difference between a spur-pruned (cordon) system and a cane-pruned system if the vineyard is mature. If you see thick, woody arms extending from each side of the vine that are permanently attached to the trellis, that is a spur-pruned system, and after the vine is pruned you will see small spurs sticking up from the arm vertically every few inches along its length. A cane-pruned system will not have permanent cordon arms, but instead will have a new, one-year-old pencil-width cane laid down on the fruiting wire each year. To review: thick arms coming off the vine equals spur-pruned cordon system; new canes wrapped on the wires equals a cane-pruned system.
Pruning Your Vineyard
Let’s get down to business and see if we can’t find a pruning system that is appropriate to your home vineyard. We’ll start by looking at the two most popular pruning styles, define them, describe them, go through a short “how-to” session, and then try to develop criteria so it’s easy to decide which system to try in your backyard.
Cane Pruning
Cane pruning is a system that uses one-year-old canes (last year’s growth and only last year’s growth) as fruiting units for the current growing season. This means that the canes that produced fruit last year are always cut off the vine and new canes are chosen to be wound around the fruiting wires and tied down (at the end of the cane) with twist ties so they don’t slip from the weight of the growing shoots.
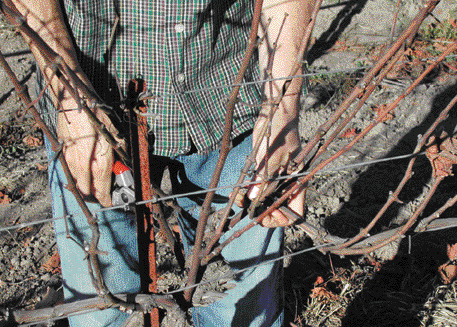
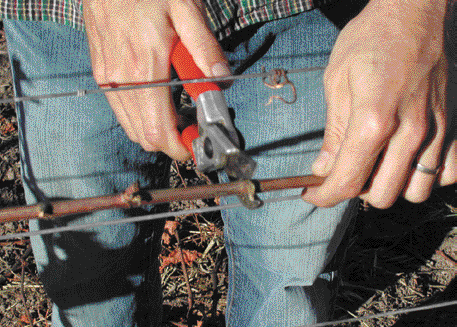
How to do it: The young vine (a single green shoot) is trained up the stake with loose bands of green vinyl tie-tape the first year and usually “topped” after reaching about 30” in height or the height of the fruiting wire, which means the growing tip of the young vine is cut off to promote growth from the buds lower on the future vine trunk. All the buds on the lower part of the shoot or trunk are removed. (Leave at least the top three buds on the shoot to produce lateral shoots that will become the head of the future vine.) As the vine matures and new canes grow from the developing “head” of the vine, two healthy canes are chosen each year as fruiting units, all the other canes are pruned off, and the retained canes are wound snugly around the fruiting wires and affixed with 5” paper-and-wire “twist ties” to keep the canes attached throughout the year. Remember to cut through the last bud on the cane, which will make a “bulge” at the cut node. This bulge will keep the cane from slipping off the wire where it’s affixed with a twist-tie. When I am cane pruning a vine, I look at the whole vine’s growth before I decide where to start cutting. I usually use a vine lopper (large pruning shears) to first cut off last year’s fruiting units right at the head, which will also remove most of the canes that produced fruit in the previous vintage.
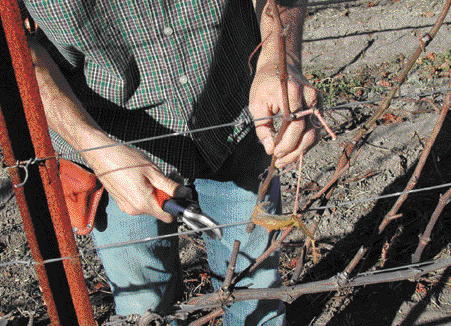
After extricating the wood from the trellis, take a look at the canes that remain. You should have three to five canes coming from the spurs you left on the head last year. These are your choices for fruiting units this year, but you only need two canes, one for each side of the fruiting wire. This is vital. Use your imagination and try to decide which of the canes was positioned to receive the best sunlight exposure during last year’s season. You also want to choose a cane that is as thick as a pencil, but not thicker than twice a pencil’s width. If the cane gets small and brittle near the end, make sure to cut it back so it has at least a pencil’s width and there’s green color in the tissue inside. “Bull canes,” or extra-thick, even oval-shaped canes, are less fruitful than pencil-width or slightly thicker canes.
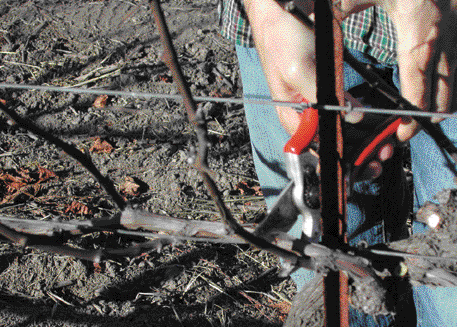
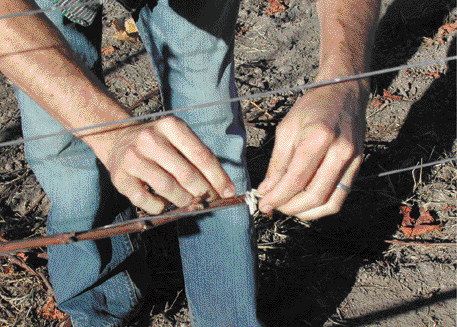
After you have chosen the best two canes for the job and tied them to the fruiting wires — I take into account how easy it will be to bend the cane onto the wire without breaking it — cut the other canes off the vine, but leave two small (two-bud) spurs on the head of the vine to produce next year’s fruiting canes. Again, it is advisable to wrap and twist-tie the end of the canes to your fruiting wire before cutting off the other “extra” canes on the head. This way if you break a cane, you still have a backup or two to use. Wrap the canes fairly tightly around the wire and make sure your twist-tie is secure enough to keep the whole cane (and the future substantial weight of an entire growing canopy) secure for an entire growing season. Poor wrapping and tying will make the entire cane (often full of shoots and fruit) flop to the ground. The number of “buds” that will be retained on the fruiting canes will determine your crop level.
Generally, the more buds you leave, the more fruit you will get. Some vineyards even wrap two canes each way on the wires to produce more fruit, but this seriously increases canopy density, and may not be advisable.
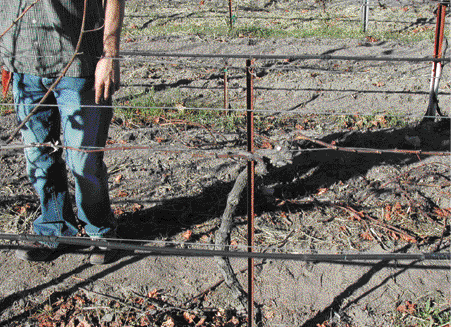
In general, use as much cane as is necessary to fill the fruiting wire that stretches between the vines. For example, at 6’ (1.8 m) spacing between vines, each fruiting cane should be 3’ (0.91 m) long, so it comes near to touching the 3’ (0.91 m) fruiting cane coming off the adjacent vine.
Pros: Fresh canes (new one-year-old wood as fruiting units each year) are believed to grow higher-quality fruit in some varietals than a permanent cordon arm and spurs. Most of the Grand Cru Burgundian vineyards (Pinot Noir and Chardonnay) adamantly follow a philosophy that cane pruning makes superior wine, but during my last visit I saw a famous Grand Cru vineyard that is spur pruned with one arm.
Cane pruning also has the benefit of removing most old wood each year, which lessens the chance of developing disease or burrowing insects in the cordon arms. It is also a preferable system for low-vigor vines that might not be able to support the higher number of retained buds in a spur system.
Cons: There is no doubt that cane pruning requires a higher level of expertise than spur-pruning. Spur pruning is like giving a haircut. Cane pruning is like performing surgery.
To successfully cane prune a vine, the pruner must carefully consider which canes stay and which canes are removed. Cane pruning is certainly more involved and time-consuming. Another consideration is that the vine may have an imbalance of clusters at the end of the canes and at the head of the vine, and a hole where there is little fruit in the middle of each cane. Spur-pruned vineyards may spread out the canopy more evenly than cane-pruned vines, as the spurs are evenly spread out and seem to have a more uniform growth pattern.
Spur Pruning (Cordon):
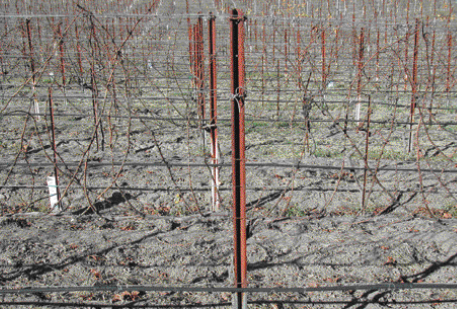
The initial process of developing a spur-pruned vineyard is exactly like a cane-pruned vineyard. Both require a trellising system with a stake in which the vine can be trained up (the first green shoot lashed loosely to the stake with half-inch green vinyl tie-tape as it climbs), and at least one wire (usually between 30”and 40”/0.76 and 1.0 m above the vineyard floor) that will support the permanent cordon arms.
Train the vine up the stake the first year and top it at the wire, after it has grown 6–9” (15–23 cm) past the wire. Let the vine push some lateral shoots near the “head” the second year (the vine may want to push lateral shoots the first year with high-vigor soils or varietals, which is fine) and use the best two canes during the second pruning.
Wrap and attach them to the wires as if you were using a cane-pruned system. The difference is in the third pruning: Instead of removing the canes and replacing them with new ones, just cut all last year’s growth on the arms back to two-bud spurs. Space these spurs out at least five to six inches (13–15 cm) to make sure you don’t crowd the future shoots. Clean the head of the vine of all growth — leave no buds or spurs on the head. You need no “renewal zone” on the head (like in the cane system) to produce canes for subsequent years, because all renewal happens on the cordon arms. That’s it! You’re done! The arms stay there and grow woody and thick, and you continue to cut back the previous year’s growth to two-bud spurs each year during pruning.

Pros: Ease of pruning. Training pruners is quite easy, and the skill can be learned and mastered in little time. Big tree-like vines with permanent cordon arms look cool in your vineyard. More vigorous varieties, such as Syrah, Cabernet, Sauvignon Blanc like to be spur pruned. You can leave more buds on the plant, and it can produce a little more fruit and vigor than cane-pruned vines. Spur pruning is recommended for most home vineyards, and is perfectly suited for vines that are trellised on fences or walls.
Cons: In cool sites, spur-pruned fruiting wood tends to be less fruitful than fresh canes. More permanent wood (cordon arms) may mean more habitat for burrowing insects and vine pests to make a permanent home.
Other Pruning Styles:
Without getting too technical, we should mention two more pruning styles that are popular, but not used as often as the systems described above. I will give simple definitions, but not pruning instructions. You should be able to find more information about these pruning styles through the Internet or any viticulture text.
Head pruning
Popular in California Zinfandel vineyards of the early and mid 20th Century (and still in practice in some vineyards today in the Rhône, Greece, and other parts of Europe), head pruning requires no trellis. The vine uses a short, stout trunk as its own support system (a single stake is sometimes used as well). The pruning of mature head-trained vines encourages the shoots to grow up and flop out, so the fruiting area is in the shape of a hollow basket inside the “hollow” of the grapevine’s center. This allows some sunlight to enter the vine from the top and fleck the fruit. I’m not a big fan of this type of pruning in my neck of the woods, although it does make world-class wines in the Rhône, where the vines are small and stunted enough not to have too much canopy or crop load.
Head pruning does have the advantage of low start-up costs for those on a budget, and has been used successfully in many backyard vineyards with limited or oddly shaped landscaping areas. The benefit of having minimal or no trellising may offset the lack of control the grower has in manipulating the canopy as it grows, as is possible with more elaborate trellising systems.
To train a young vine to a head-pruned system, start the same way as spur- and cane-pruned vines. I recommend starting with a smaller training stake (“pencil-rod” or even treated bamboo will work, as the stake will become unnecessary when the vine’s trunk is of ample diameter to support itself), and as the vine grows, choose the sturdiest single shoot and train it up the stake with loose bands of green vinyl tie-tape.
Top the vine, choose three to four lateral shoots that grow near the top of the vine and prune those back to spurs during winter pruning. In the next season’s pruning, split the spur positions so they have two spurs coming out instead of one, and as the vine matures, try to space the spurs so they are distributed evenly in a circular fashion around the head of the vine. (This is often described as pruning to make a hollow “bowl” in the center of the vine, which will be where the fruit is cradled, and sunlight can reach the clusters).
Minimal Pruning
Minimal pruning is gaining a foothold in areas of Australia and the Central Valley of California where most vineyard labor is mechanized. I do not recommend it for backyard vineyards.
The idea is that the vine will regulate its own growth when left to its own devices. Some minimal pruning is done with tractor-mounted devices with saws, and the cost per acre to accomplish this task is, as the name suggests, minimal. The vines will have more fruit than conventionally pruned vines, but studies have shown that the “architecture” of the vine will become somewhat standard after many years. Minimal pruning is the worst choice for a backyard vineyard, but it illustrates that a vine will respond to whatever system of pruning you use.
And in Conclusion…
Grapevines require pruning during dormancy to produce high-quality grapes. Prune your vines after leaf fall and before budswell. Choose a pruning system that matches the vigor of your vineyard and the varieties you grow. Seek out pruning experts in your hometown and ask if you can assist in pruning (make mistakes in someone else’s vineyard!).
Low-vigor sites and varieties (Pinot Noir, Chardonnay and even Cabernet in cool areas) may do better with a cane-pruned system in which new canes are selected, wound and affixed to the trellis wire each year. Cane-pruning requires expertise, and it is suggested you spend some time in the field with skilled pruners before attempting it.
Medium to high-vigor vineyards (in warmer areas) and varietals such as Sauvignon Blanc (warm climate) Merlot, Grenache and Syrah are usually suited to a spur-pruned system, which offers ease of pruning and a classical vineyard look.
A cane-pruned vine uses new canes each year, while a spur-trained vine uses permanent “arms” with spurs jutting out of the top every few inches, in a regular pattern. Experts disagree which system produces consistently better fruit, and I might argue that matching the system to your site will result in the best solution.
Other systems, such as head-trained or minimally-pruned vines, show us that there are always alternatives to the more popular systems of pruning, and that grapevines — regardless of how they are pruned — will thrive and produce good fruit as long as each shoot has room to grow, soak up the sun, and have fresh air circulating around them.
Of vineyards practices that you must do every year, pruning has the most influence on your grapevines. Pruning determines not only how this year’s vintage will do, but also the next year’s. After a few years of practical experience, vineyard pruning will become second nature.
Weeding the Vine Rows
Even though the subjects of weed removal and watering the vineyard may not seem thrilling subject matter on the surface, you may be surprised to find out just how important they are to maintaining a successful, producing vineyard. While weed removal is fairly straight forward (get the weeds out to reduce competition, either by tools or herbicide), watering is one of those subjects where consultants rarely give precise answers. I hope to give specific watering suggestions for the “average vineyard,” and teach you how to assess watering needs using seasonal rainfall, a few simple tools, and a basic understanding of how many gallons per week the vines may need in dry soil conditions. And, as strange as it may seem to put weeding and watering together in a single article, we will soon see that there is a relationship between the two.
Part I: Why Weed?
This question bears contemplation, because both hand hoeing and or herbicide applications are serious matters. There are times in the growing year where it is vitally important to keep weed pressure down, and there are times when it may not be so important.
Vineyard managers agree that a 2 to 5-foot (0.6 to 1.5-meter) strip of clean earth under the vine row makes for a tidy vineyard that thrives. This can be accomplished a number of ways.
Hoeing: Why go to the gym when you can get your exercise in the backyard? Or isn’t there a spoiled 16 year-old in the neighborhood that needs some $5/hour hoeing experience to build his or her character? Most backyard vineyards can be hoed out in an afternoon or two, and the benefits to the vineyard are definitely worth the effort.
Besides getting you off the couch, hoeing will break the soil up, increase irrigation penetration and mix organic matter into the soil where the vines are growing. One of my favorite old-world sayings is: “Tickle the Earth with a hoe and she will laugh with a harvest.”
Mechanical removal
A weed-whacker or a small gas-powered tiller will work, but only to a point. The weed-whacker can and will damage the trunk of the vines and could easily cut through a young vine. The gas-powered tilling machines are basically useless, I’ve found, as they are very light and do not generally dig into the soil deep enough to make a difference. I find that hoeing is less work than trying to wrangle a hand-held tiller in the vine row. Tractor-mounted machines that remove weeds from the vine row are generally too large and expensive for home use. Using the lawnmower between rows works very well, and you can even try to clean up around the vines with it, but removing the weed at root-level is the only way to stop the cycle of regrowth.
Flaming
Flaming your weeds may be a good solution for home vineyards. Agricultural weed-burners (aka flamethrowers) are legal in most areas, but NEVER use them in dry months. They are meant to be used on green, live weeds, and generally have no effect on mature vines when used properly. Obviously, flaming weeds needs to be done according to local laws and the manufacturer’s instructions. Make sure not to leave the flaming unit where kids might find it and invent daring games. (“Billy, stop chasing your sister with daddy’s flamethrower!”).
Herbicide
Several herbicides can do an excellent job when used correctly. But if it is applied to a growing vine, it will do the same thing to a vine as it does to a weed. Knocking down weeds during dormancy is how most herbicides should be used. I suggest not using contact herbicide while the grapevine has leaves.
Livestock
Sheep and goats do an excellent job of eating winter weeds, but just like herbicide, they are best used in dormancy, as vine leaves are very, very tasty. Keeping a clean vineyard during the vine’s early years will help them grow strong and healthy. Keeping a clean vineyard floor in a mature vineyard will keep pests away, reduce mildew or rot and makes for a backyard vineyard that’s a joy to look at.
Part II: How to Water a Vineyard
Irrigation is a modern blessing for vineyards. One reason why European wines vary so much from vintage to vintage is that many of the most vaunted wine regions in the world do not allow mature vineyards to be irrigated. In this way, the vines are wholly dependent on the soil profile being fully charged by winter rains and then they also need supplemental rainfall in the growing season for the vines to bring in a ripe crop.
Irrigation is probably the most important tool we have for manipulating the vine’s vigor and cycle so that it creates the style of wine that we desire. In some regions, like most of California, wine production would be impossible without supplemental irrigation. Other regions, such as the Willamette Valley of Oregon, generally receive enough rainfall throughout the year to produce superior winegrapes without supplemental irrigation. If you live in an area that gets around 20 inches (~50 cm) or more of winter rainfall, and an additional 10–20 inches (~25–50 cm) from April to October, your vines may not need a watering system at all. Clean rainwater is superior to irrigation (ground) water, so if you can grow a vineyard without irrigation, you can plan on cutting your installation bill by about 50%.
After ten years of managing my family’s vineyard in the Santa Rita Hills of Santa Barbara County, California, I couldn’t imagine farming winegrapes without using irrigation as a tool. The question then becomes: How is irrigation a tool in the vineyard and what should I know about watering?
Deficit irrigation
There are times when having little or no water in the soil can increase wine quality. Drying the soil out as the crop finishes flowering and set has proven to minimize berry size, which can increase a wine’s color and concentration (less juice and more skin in the fermenter). Soil dryness before veraison (or berry softening), will tell the vine to stop its vegetative growth cycle (focusing nutrients on shoots and leaves) and focus on ripening the crop. In a vineyard with excessive growth (vigor), allowing the soil to dry out early in the spring, as the vine comes out of dormancy, will keep the vine from producing rank growth. And, of course, turning the water off the last few days (and weeks) before harvest will likely hasten ripening. Be careful with turning the water off too early, though. A vine without green leaves will not evolve the true ripeness of the fruit, it will only dehydrate.
Leaching salts
Unless your irrigation water has salinity issues, it is important to flush the vines’ roots with deep irrigations, especially during drought periods. Heavy winter rains are needed yearly to flush all the accumulating salts away from the roots, where they can attach and stifle a vine’s growth.
Testing
Before applying water to your young vines, have your water tested at an agricultural laboratory to make sure it’s suitable for irrigation.
Limit
Never apply more water than can be totally absorbed by the soil within 48 hours.
Timing
In dry areas where vines are dependent on irrigation, use 3-5 gallons (11-19 L) per plant per week as a starting point. March through May, 2-3 gallons (8-11 L) should be plenty — or none if you received good winter rains. June through August may need 3-7 gallons (11–27 L) per week. Reduce the irrigation as harvest nears, but keep the vines viable, with leaves healthy enough to mature a crop. Dump 10-20 gallons (38–76 L) on each plant immediately after harvesting the vines. Vines go through a rapid period of root growth after harvest.
Real-time moisture
You can measure real-time soil moisture by digging a hole with a shovel, using an irrometer or a soil probe from a farm supply store, or watching the relationship between the growing tips of the vines and the tendrils (curly growths that grab onto the trellis wires) next to the growing tip. A vine that has tendrils that stick out farther than the growing tip is generally considered to have ample water. As the tendrils pull back even with the growing tip, the vine is beginning to undergo some water stress.
Sprinklers
Overhead sprinklers that soak the vines are generally not a wise system for vineyard watering. They increase mildew pressure, rot pressure and less of the water makes it to the vines’ roots. Much of the water can evaporate or cause extra weed growth in the middle of the vine row.
Note: Weeds use irrigation too. If you have drip emitters, you will notice that weed growth will increase.
Insects, Viral, & Fungal Diseases
In this article, we’ll take a look at vineyard diseases. It is not intended to teach everyone all there is to know about spotting a disease, diagnosing it, and solving the problem. Instead, I hope this will serve as a short primer, describing a few diseases that show up in vineyards. Also, this article should get you some of the necessary tools for spotting a problem, and finding a professional to confirm your suspicion. This professional should ultimately help you find a permanent solution. The best way to become familiar with these diseases is to actually see them in the field (or on the vine). Make it a point to observe a professional viticulturist in the process of diagnosing the problem, and participating in the course of treatment. Volunteering to help a local viticulturist walk his or her fields is a very insightful experience.
Without the benefit of a personal “vineyard disease tour,” I hope to supplement the readership’s knowledge with a description of some diseases and their basic effects on vines. The photographs throughout the next few pages should help you visualize the common symptoms. Again, I’d like to make it clear that treating a potential vineyard disease after reading a descriptive article on the subject is not a recommended practice.
Paying a university-trained vineyardist to assess your vines will almost always save you time, labor, and money, even if your vineyard is believed to be disease- and pest-free.
This is certainly not a complete list of diseases. A more complete list, with photographs, that no viticulturist should be without, can be found in the UC Davis “bible.” This is “Grape Pest Management,” a textbook compiled by the University of California at Davis in 1992. To locate a copy at the UC-Davis bookstore online, go to www.ucdbookstore.ucdavis.edu (email: textbooks@ucdavis.edu) or call customer service at (530) 752-2707.
Insect-Borne Diseases
Insect-borne diseases are actually fairly easy to understand. Pierce’s disease, for instance, is caused by a bug infiltrating a vineyard and spreading disease from vine to vine during feeding. A leafhopper, snail, or wasp can contaminate a plant while feeding directly on the vine’s fruit or leaf tissue. In the case of the mealybug, the insect can destroy the sanitation of the fruit by depositing residue or excrement.
There are two common options for treatment that viticulturists regularly use. The first is the best solution to any problem — prevention. Keep the pests out of your vineyard to begin with using traps, barriers such as a mesh fence, or chemical control agents (such as insecticides, oils or soaps).
The second option is based on organic and biodynamic methods. This treatment is a bit more involved, and arguably more risky. Planting cover-crops and allowing for a great deal of biological diversity in your backyard vineyard will attract a number of hungry insects. Those insects, it is believed, will be in a constant battle of eat-or-be-eaten with other insects, and (if the theory holds true) will keep any single insect species from “taking over” a vineyard. My suggestion is that you focus your attention on creating insect diversity in the vineyard, and if that doesn’t work, spray the hell out of those buggers. Remember that spraying will also destroy beneficial insects, which I like to avoid unless dire circumstances prevail. But, when things get dire, I suggest doing what is necessary (and what technology allows) — destroy the pests and make some wine.
Pierce’s Disease
Pierce’s disease is named after N.B Pierce, who studied the bacterial disease in grapevines as it decimated much of the California grape industry in the first half of the Twentieth Century. The good news is that the insects that carry Xylella fastidiosa (and the bacterium itself) cannot survive the cold winters of the Midwest and northern states. The disease, therefore, is only prevalent in areas with mild winters, along the southern portion of the country from Florida to California. Pierce’s disease, or “PD,” is the greatest threat to vinifera (grapes of European variety) in the southern regions of America.
The disease is most commonly spread by small insects known as sharpshooters. The new “superbug” that threatens California viticulture is the glassy-winged sharpshooter (GWSS), which can fly three times as high as the more common blue-green sharpshooter. In general, the blue-green sharpshooter cannot fly over six feet, but the GWSS can fly as high as twenty feet.
All sharpshooters spread PD the same way. There are “host” plants that can keep the PD bacteria alive. These include blackberry, willow, coyote bush, elderberry and others. A sharpshooter feeds on these “host” plants, gets the PD bacteria into its mouthparts, and then injects those infected mouthparts into the grapevine’s tender tissues to feed (suck xylem fluid). The populations of sharpshooters grow quickly with the unlimited food source of a vineyard, and hop from vine to vine, spreading the bacterium. Often, as the rest of the landscape browns in summer, irrigated vineyards stay green. This makes them an obvious target for sharpshooters, who survive by consuming massive quantities of plant fluid. Sharpshooters like to live in wet areas near rivers and in ornamental landscapes (those that are irrigated). It is common to see the symptoms of PD infecting the edges of a vineyard that abuts a riparian habitat (a river).
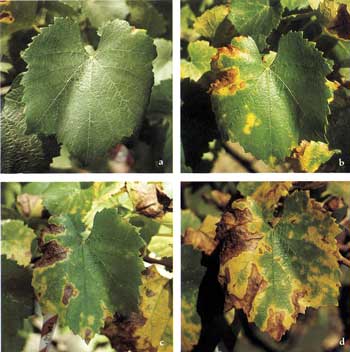
The PD bacteria clog the flow of liquids within the grapevine, and can eventually kill it. The progression of the disease is fairly slow, often taking a few years to render the vine useless. Leaves take on a scorched, dry appearance and will appear uneven and stunted in sections. Late in the season, you may see leaf blades falling off the petioles. (The leaf stems remain on the vines without the leaf.)
The easiest symptom to recognize may be the uneven ripening of the wood — islands of brown hardened cane wood surrounded by green unripened wood. Like most bacteria, PD prefers warm climates, and the progression of the disease will be hastened by warm weather. Sharpshooters will also breed faster in warm weather, increasing populations and the speed in which they can transmit the disease. Besides some experimental injections of antibiotics with surgical screws, there presently is no cure for Pierce’s disease. Replanting in an area that is infested with sharpshooters and host plants may not be wise either. Unless you are comfortable with replanting every five years, it is generally suggested that Vitis vinifera vineyards are not viable in areas with large populations of PD-bearing insects.
Temecula, California has done an admirable job as an industry to stay alive in the midst of a serious sharpshooter infestation. Viticulturists there use a combination of strong spray programs and plant citrus fruits, the favored host of the GWSS, at the perimeter of their vines to attract the insects. In the mornings, when the populations of these insects is at its highest, vineyardists spray the citrus trees.
In general though, fighting Pierce’s disease (if it is prevalent in your locale) in a Vitis vinifera vineyard is a fight you are likely to lose. It should be stressed that there are hybrid varieties of grapevines that are resistant to Pierce’s disease. If you live in a PD hot spot, check with a knowledgeable grapevine nursery and discuss your options for growing a resistant type of hybrid grapevine for wine production.
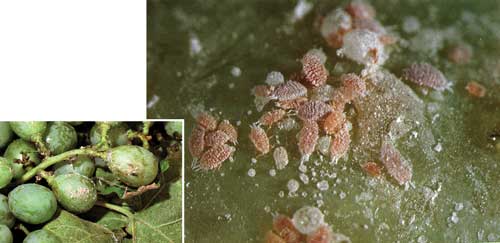
Vine Mealybug
The vine mealybug produces a “honeydew” excretion and leaves a cottony egg mass on grapes and vine trunks or cordons, making them less attractive for winemaking. The signs that could suggest a mealybug infection are many and include: an increase in ant activity, a visual confirmation of mealybugs on the vines, white spots of honeydew, cottony “ovisacs,” or the characteristic black, sooty mold that will begin to grow on the honeydew. If you are seeing honeydew from vine mealybugs on more than 2% of your fruit, you should consider some kind of control program to reduce populations early in the growing season. California is seeing an increase in the population of these pests in recent years, and has been pouring money into research. However, because the mealybug seems to be an isolated problem, I won’t go into too much detail here.
Mealybugs can be controlled with chemical sprays such as “Applaud” which use a nicotine-like compound. There is also a newly available pheremone that is being used to cause mating disruption. When sprayed, the males can’t find the females, because the hormone smell is everywhere in the vineyard.
As noted earlier, vineyards containing mealybugs can see marked increases of ants, including fire ants. These ants protect mealybugs from their natural enemies in exchange for honeydew. The best way for home gardeners or commercial growers to reduce mealybug numbers is to rid the area of ants. This can be done with baits, so the vines do not have to be sprayed. In a home vineyard, one bait station per vine (if mealybugs are present) would probably do the trick. Commercially, the recommendation is a scoop of bait per vine.
There are plenty of other insects and pests that will eat grapevine leaves and cause vine damage. Leafhoppers, mites, snails, ants, bees, wasps and other species can cause damage to leaves and ripening fruit. If your vines are being eaten by insects, do your best to control the populations early in the season. Once the vines are inundated by insect pests, control will be more difficult. You may want to use some sticky traps in the spring to monitor the insect species in your backyard vineyard.
Leafhoppers and mites will, in most parts of the U.S. where grapes are grown, be your biggest enemy as far as insects are concerned. Low populations (a number that does not result in your vines being eaten alive) will not threaten your vines or crop.
If you see threatening numbers of leafhoppers or notice mite damage on your vines, try spraying a common insecticidal soap or oil to the vines. As always with insecticides, make sure to wait a week to 10 days after a sulfur application to make sure you do not disrupt the efficacy of your mildew-control program.
Fungal Diseases
Fungal diseases are commonly spread through the wounds made on the vines during the process of pruning. If you are concerned about fungal diseases, or live in an area where rain is common at pruning time, you may want to ask your local viticulturist where you can procure some “pruning paint” to sanitize the wounds. This will minimize the risk of fungi entering the vines through the wounds.
Powdery Mildew
With no control, powdery mildew is the one fungal disease you can expect to appear on your vines. The mildew appears as powdery white or grey mildew on the bottom of leaves or on the clusters. Often a mildew infection will start where two clusters are touching, or on clusters deep within a vigorous portion of the canopy.
Temperature and humidity play a major role in mildew development. The fungus grows best in conditions of high humidity between 70–86 °F (21–30 °C). Temperatures above 95 °F (35 °C) will kill mildew colonies, and if the temperatures in your vineyard exceed 95 °F (35 °C) for more than 12 hours, expect that the mildew has been destroyed. For control, start applying fungicide (usually sulfur) on a regular schedule, and watch the bottoms of the leaves carefully for signs of mildew infection. Reapply after rains. side of young, soft leaf and shoot tissue.
Bunch Rot
Bunch rot, unlike powdery mildew infections, is more common at the end of the season. This is when the grapes are ripening, the weather is warm and conditions are correct for the Botrytis cinerea, Penicillium or Aspergillus to begin growing on soft fruit. Bunch rot usually appears initially as a discoloration of the grapes, and is most obvious on white varieties. Established bunch rot will start to give a fuzzy grey or blue appearance as the fungus begins to permeate the grape skin. Optimal temperature for Botrytis fungal growth is 72° F (22 °C). If you have problems with bunch rot, using control in the early part of the season will help greatly later on. There are also grape varieties that are somewhat resistant to bunch rot. When it comes to grapevine diseases, powdery mildew and bunch rot are like the flu and the common cold: plan on dealing with them on a yearly basis. But, they also fairly easy to control with if your canopy is open and you keep a regular spraying schedule.
Eutypa Dieback
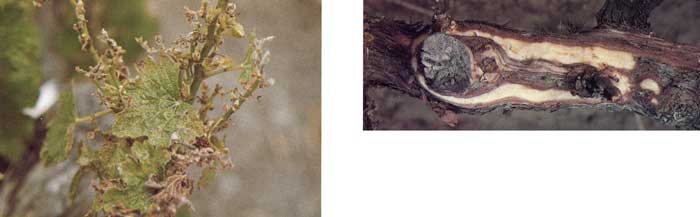
Eutypa is a canker-type fungal disease that spreads through fresh pruning wounds. Rain is usually the culprit — spreading the spores of the fungus by splashing them from vine to vine, where they enter the vine through the pruning cuts. Symptoms usually appear as cankers (which look like darkened, dead wood that surrounds an old pruning wound) on the spur nearest the initial infection, and moves through the vine until an entire cordon arm or trunk is infected. The canker also spreads within the vine’s woody tissues. If you cut through an infected vine’s trunk or cordon arm, you will notice that only a small strip of live vine is present inside.
There are a few cultural practices that will reduce the chance of your vines becoming infected with Eutypa. Try not to prune when rainfall is expected. This is easier said than done, as pruning is often done in the winter, when rain is common. If possible, make pruning cuts in dry weather, and paint the wounds with pruning wound compound, such as “benomyl paint.” Of course, most home vineyardists won’t have access to benomyl paint, so it is suggested that you treat pruning wounds with a quick spray of Lysol or a paste of laundry detergent, being careful not to touch the dormant buds with these materials. If you notice that your vines are developing the characteristic “deadwood” Eutypa cankers around old pruning wounds, it’s time to break out the saw and do some vine surgery. The key is to remove only the affected wood, and to stop where you hit healthy tissue (that is not dark and “dead looking”). If the vine has been infected to the point where there is no healthy wood left above the head, you can cut the vine back to a short trunk, and train a sucker from near the bottom of the vine as the new trunk.
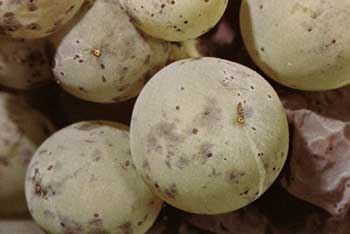
Black Measles
The characteristic “measle” spots that develop on mature fruit of the infected vines give this disease its name. It is believed that black measles is a fungal disease that enters a vine through pruning wounds, so the same type of precautions used for Eutypa should be helpful in preventing black measles.
When infected, the maturing grapes on a vine will show a characteristic dark spotting, each spot surrounded by a brownish or purplish ring. The leaves of a vine infected with black measles also take on a very noticeable scorched pattern, which is usually most evident in July and August. Treatment is difficult and fairly dangerous. Reports indicate that treating pruning wounds with sodium arsenite can provide control in an already infected plant, but it is a dangerous chemical and may also leave residue that can affect wine quality and safety. It is strongly suggested that this chemical be avoided. If your vines become infected with black measles, remove the affected vines and replant.
Viral Diseases
One amazing aspect of the grapevine is the ease with which a vine can be propagated. There aren’t many plants that you can cut during dormancy, shove a cutting in the soil, and have a decent chance of it growing into a new vine. The problem with grapevine cultivation is that it is so easy, and that the genetic “code” of the mother vine is replicated exactly in the new plant propagated. That means that any virus contained within the “mother plant” will also be in the propagated plant. Many grapevine nurseries are not as careful as they should be in locating “certified” or “clean” wood for creating new grapevines. A virus in grapevines is generally a nursery issue. (Note: Fanleaf degeneration should be considered an exception to this rule, because nematodes spread the disease between infected and unaffected vines alike.) If you buy “certified” grapevine materials from a well-respected nursery, you should have little or no troubles from virus during the life of your vineyard. I cannot stress how important it is to buy clean material. The cost of clean materials is inconsequential next to the cost of having to rip out and replant a virused vineyard. I will also mention in passing that there are those viticulturists and winemakers that believe a “little virus” in the vineyard (whatever that means) may slow vigor and result in a smaller crop with more varietal intensity. There are plenty of ways to slow vigor and thin the crop to a balanced level without having to rely on a virus. If a virused vineyard is still attractive to you after reading this article, I have failed in my duty as your vineyard tutor.
Remember that a virus cannot be removed from grapevines by any means. A cutting that is infected will produce a vine that is infected. There’s nothing you can do besides yanking the vine out and starting again with clean, certified nursery stock. Diseases caused by viruses that are not described here include rupsestis stem pitting and corky bark. As is the case with preventing all grapevine viruses, the key is to use clean (certified) materials when planting your vineyard.
Leafroll
This is a viral disease that will result in reduced yield. The reduction in yield is not striking in the first few years that the virus causes the disease, but usually progresses until the vineyard is no longer producing a viable amount of grapes for wine. Some vineyards with leafroll are not replanted, and if the disease is not too severe, yields are reduced, but vines continue to produce fruit. Symptoms are usually visible on the leaves, and are more pronounced as water stress becomes apparent in late summer. Leaves that show rolled shape and become yellow or red are exhibiting the symptoms of leafroll virus, especially if there is green banding next to the veins of the leaf. Like most viral grapevine diseases, there is no known cure for leafroll. Once again, make sure to replant with certified stock.
Fanleaf Degeneration
We should discuss fanleaf degeneration because it is not purely a nursery issue, and is spread by the dagger nematode, which is a species of roundworm that feeds and breeds in the roots of grapevines. Once a vineyard site has been infested with dagger nematodes, it will be a very difficult and expensive challenge to keep the pests out.
The nematode spreads the disease by munching on infected roots, prior to feeding on (and infecting) the “clean” roots. The key here is to recognize that the bug cannot spread a virus that doesn’t exist. With this in mind, it is clear that planting clean, certified rootstock will almost ensure that your vineyard will be free of this disease.
In very few instances, nematodes are able to spread fanleaf from one infected vineyard to a clean one, but this is certainly an exception, and a rare one at that. Once a vineyard site has been infected with both the nematode and the virus, it is almost impossible to ever replant without the good probability of subsequent infection. Allowing the ground to go fallow for 10 years has proven effective.
Symptoms of fanleaf virus include a disfiguring of the leaves. The “sinus” of the leaf becomes more “open” (where the leaf blade meets the petiole, there is usually a “v” shape, which is missing if infected), and the “teeth” on the leaf blade become sharper and more elongated. In severe infections, the areas next to the veins on the leaf blade will become brightly banded with a creamy yellow color. You may also notice an increasing number of small “shot” berries on clusters, but by itself, this is not a clear indication of fanleaf, as most “shot berries” are caused by zinc deficiency or uneven fruit set.
Conclusion
Careful decision-making and monitoring is absolutely vital to keeping your grapevines healthy. Start by choosing a nursery with an excellent reputation for providing customers with certified virus-free grapevines. Plant on land that has not been host to nematodes and diseases. Be careful with your practices and your pruning. Help the vine help itself with an appropriate trellis, balanced nutrition and canopy management that promotes a fruiting zone that is open to wind and some sun flecking. Treat your pruning wounds with a compound that will limit the spread of fungal pathogens, especially if pruning must be done in wet weather. Learn the warning signs of mildew, rot, fungal, insect and viral diseases and act quickly if you see a problem develop.
Ten Signs of a Healthy Vineyard
This list has been ordered by my own view of importance. I started with twenty five aspects of vineyard management, whittled the list down to ten, and then ranked them personally: #1 being most important.
10. Organized vineyard floor
If your vineyard is in a frost-prone area take it down to bare soil. You should also keep the vine row absolutely clean in young vineyards, say 1–3 years old. At this age the weeds and grasses will compete for nutrients with the young vine. This becomes less of a problem when the vineyard is mature and has deeper roots. A little weed growth in the vine row doesn’t bother me at all in a producing vineyard at least 3–5 years old. The top few feet of soil mean little to the vines, and as long as no weeds are intruding into the growing parts of the vine, you should be OK.
9. Petiole angles
A petiole is a leaf stem on a grapevine — what attaches the leaf blade to the shoot. Vines that have plenty of water available to them generally have a nearly 90 degree angle because the pressure of the fluids within the petiole creates firmness or turgidity. When water status starts to become deficient (the vine is drying out), turgidity is lost, the leaf blade begins to droop and the angle shrinks.
8. Diversity in the vineyard habitat
The easiest way to explain vineyard diversity is this: if there are enough bugs and critters busy eating each other, they have no time to threaten your vines. Hawk/falcon perches, low-impact sprays that do not kill beneficial insect populations, and foregoing herbicide to promote soil microbial health are all examples.
7. Leaf to cluster ratio
Count every leaf and every cluster on each vine. Make an average (we use 100 vines, but that may be overkill), and find your average ratio of leaves to clusters. Your target is 12–15 leaves for every cluster, and the closer each vine gets to the same ratio, the more uniform your ripening will be.
6. Informed pruning
Pruning is not a skill you can master by reading about it. There’s really only one way to learn: volunteer for a day at a local vineyard and learn on their vines instead of your own (not my vines, though!). Choose a facility that produces your favorite local wines and has a crew chief that has expertise and is willing to mentor.
5. Efficient canopy management
10% sun flecking is the absolute minimum amount of sun your fruit needs. If your canopy is so dense that less than 10% of the sunlight hits the fruit, you can expect vegetative flavors in your wine (olive, bell pepper, asparagus, etc.). The general rule is to continue experimenting to see how much leaf plucking you can utilize without compromising the fruit.
4. Balance
Here are a few key factors for determining whether your home vineyard is in balance: 12–15 leaves per cluster, (see #7). Shoot tips are even with tendrils at or shortly before fruit softens and colors up. Budbreak is even throughout the vineyard. Crop yields stay fairly even year to year. Consistent growth throughout the vineyard.
3. Correct match of varietal, rootstock and site
There is no other decision that will impact the final quality of your homegrown wine. Do as much research as humanly possible concerning what belongs in your backyard, not what you’d like to grow in your backyard.
2. Grower in the field with a notebook
Knowing what your vineyard needs and what it can produce is a function of experience and observation.
1. Perfect fruit on harvest day
In the end, it’s all about the fruit. Planting, labor, testing and harvest all culminate with a container filled with fruit in your home winery ready to make into wine.
How To Balance Your Grapevines
In a vineyard, balance is defined as a vine that has enough leaves to ripen its crop load evenly. The total crop load will vary with vine vigor. Low-vigor vines may produce only one ton of grapes per acre, while very vigorous vines may produce eight tons (although that level of yield makes me a bit uncomfortable). A balanced vine bears just enough fruit to make intense wine, but not so little crop as to make the ripening occur too quickly. A balanced vine will allow sunlight and wind to penetrate the canopy, but not so much as to burn the fruit. A balanced vine is neither too stunted nor too vigorous. The idea of balance in the vineyard is critical. With that in mind, I think my own viticultural training might prove instructive in communicating my ideas about balance in the vineyard and how it can be obtained.
In 1994, I returned to my native California. My mother and stepfather had purchased forty acres and they needed someone watch over things. In 1996, my stepfather, Steve Pepe, hired the best viticultural consultant in Santa Barbara County (Jeff Newton) to plant the first half of our new vineyard.
Before he left Clos Pepe, Jeff gave me a valuable bit of advice. He told me that if I spent five years working in the vineyard, I could be a great winemaker. I immediately began to sign up for extension courses offered by the University of California at Davis. Later, in 1996, I quit my job and went to work at Babcock Vineyards and Winery. I was able to work in the vineyard and to assist for a full “crush season” with Bryan Babcock, who instilled in me a passion for vines and wine. It was while “kicking the dirt around” with Bryan that I first understood the relationship between well-tended vines and fine wine. Bryan showed me how the workers would remove leaves around the developing clusters after they bloomed to ensure the clusters would be bathed in light. He would instruct the workers to tuck all the shoots up into the vertical shoot-positioning wires above the vines to make sure the vines wouldn’t sprawl and shade the fruit.
A few months later, after making careful crop predictions, Bryan decided there was too much crop in the field. I then participated in my first “green harvest” — cutting one cluster off shoots that had two clusters of grapes. We dropped nearly half of the Pinot Noir crop on the ground that year. I figured that at $2,200 a ton, we probably dropped $30,000 worth of fruit. However, the wine was much improved as a result.
This was my first lesson that winemakers have to make serious sacrifices to improve their wine.
Before harvest and crush, I attended UC-Davis’s three-day Varietal Winegrape Production course. I found myself drowning in a stormy sea of confusing lingo. These teachers used terms like inflorescense, interveinal chlorosis and evapotranspiration. It shook my liberal-arts intellect to the core . . . who knew science could be so useful later in life? I flipped through the glossary of viticultural terminology as fast as I could, trying to tread water in the tempest of valuable knowledge that stormed around me. One thing the professors repeatedly stressed was, “Viticulture is site specific!”
At the end of the three days, my head was swimming with facts, theory and ideas. I was energized to get back to Clos Pepe and spend some time in the vineyard. I understood vineyard balance in theory, but I lacked the practical skills to make it a reality at Clos Pepe.
The following season (1997) was our vineyard’s second year. The lessons I learned at Davis had led me to visit the bookstore before I left. These books kept me company in the evenings after my days tending the vines as a vineyard laborer. My life was now consumed with grape growing. The reading helped me understand what I was seeing in the vineyard, but the actual work taught me many things that books cannot.
It is impossible to describe in words the pressure one can exert on a growing vine shoot without snapping it. It’s impossible to describe the color of a healthy vine, or the texture of a leaf that has been wind-damaged, but not infected with a virus. Working the vineyard every day for a year taught me more about plants and vines than any other experience in my life. It also taught me things specific to our vineyard — what our vines needed, how much water they required, how quickly our weeds grew and which of them were noxious and which weren’t.
After working for a year in the vineyard, I took the same course at Davis again. After attending the second set of Davis lectures, I began to feel that I understood the rhythm of the vineyard season. My vines would be alright as long as I listened carefully to the cues they offered.
As the years passed, I progressed from a struggling, confused farmer to someone getting top dollar for his fruit. My grapes have made wine that scored 90 points in Wine Spectator reviews. I was honored to accept the Central Coast Wine Growers’ Association Grower of the Year Award for the 2001–2002 seasons. And now that I make commercially salable wine from my vineyard, I am increasingly motivated to grow the best fruit I can.
I have learned some valuable lessons in my years of training that can help you grow better fruit. So here are some of the basics of achieving balance in your backyard vineyard.
Balance means that there is a certain ratio of leaves to every cluster of grapes. Some sources say 8 to 12 leaves per cluster is optimal, while I prefer 15–20. If there are too many leaves, try to remove shoots that bear no fruit. If they are too tall and vigorous, hedge off the top of the shoots. If there are too many clusters, remove them to make the ratio more balanced.
I recommend removing the top cluster on shoots that bear two or more clusters. Don’t remove all the clusters from one shoot, leaving multiple clusters on other shoots. Balance also means giving each cluster equal vine resources to ripen. This will help your fruit ripen evenly. If your vines continue to be too vigorous, reduce fertilization or irrigation. If there are too few leaves, think about finding a fertilizer that adds nitrogen to your soil or increasing the amount of irrigation.
Balance can be measured by determining the ratio of grape yield to pruned cane weight. To do this, weigh the amount of grapes harvested off each vine at harvest. Later, in the dead of winter when you prune, weigh the pruned canes that you cut off. Keep records of both measurements and compare the grape yield (in pounds) to the weight of the pruned canes (in pounds) for individual vines. You might want to do this for 10 vines per acre to get a fairly accurate ratio.
The yield of grapes should be between five to 10 times the weight of the pruned canes. In cooler climates, 4 to 8 times more grapes than canes might be more appropriate. This is a mathematical way of measuring balance in your backyard vine that is a common practice in commercial vineyards.
A balanced vine allows sun to penetrate the canopy and fleck the fruit. On a sunny day, at least 10 percent of any cluster should be flecked by sunlight. In cooler areas, more leaves can be removed around the fruit to further expose the fruit. The key is to find out how much sun the clusters can take without burning, cracking or raisining. Clusters exposed to sun and wind will also have lower mildew and disease pressure. It is also advisable to give each cluster their own little space on the canopy, so no clusters are touching or bunched up and the crop load looks evenly spaced along the vine. Clusters that are touching are a perfect breeding ground for pest animals and disease, rot and mildew. Allowing the sun to fleck your fruit will improve color, add flavor and remove vegetal aromas and flavors in the wine. Leaf removal is best done right after the vine has finished blooming.
Balance means little if the fruit you harvest is poor quality. The final measure of balance in your vineyard is the quality of fruit and the quality of wine that results. Here are some specific activities to help you achieve balance in your backyard vineyard.
a. Position the longer shoots up and away from the clusters — using catch wires in a trellising system if possible — and remove a few leaves from near the fruit. Experiment to see how much sun you can provide without burning the grapes. If your shoots grow so long that they droop (sprawl) back over and shade the fruit, hedge off the tops of the vines. Be wary, though, because sometimes hedging vines will cause the shoots to ‘bush out’ near the bottom. You may have to remove a few more leaves near the fruit if this occurs.
b. Make the vines look tended and orderly, and make sure your “fruiting zone” is open enough to get some sun and wind inside the canopy to reduce mildew and disease pressure. Watch to make sure the fruit isn’t being burned. Cut some crop off half your vines, make the wines from both halves separately, and taste the wines blind after they are finished to see if crop reduction increased intensity, color or both. Cluster removal is best done after bloom and fruit set and before veraison, when the grapes turn soft.
c. Keep a hand’s width between growing shoots, and remove stunted shoots altogether. If the canes are too crowded with small shoots, or shoots that bear no fruit, remove those shoots to make more room for the good shoots to grow. Remove basal shoots or “suckers,” shoots that grow from the bottom of the vine or not out of a bud that you left for shoot development. You can do this by ripping them off by hand (a good downward yank usually works), cutting them off with pruning shears, or — if you’re really good — with your boot as you walk down the rows.
d. Experiment and take time to learn from your vineyard. Listen to what the vines have to say through the finished wine. If there’s a problem in the wine, and you are sure your cellar practices are sound, try to find a way to balance your vineyard to produce better fruit. If the wines are light-colored and vegetal, remove a few more leaves. If the wines lack intensity, try to leave less fruiting wood on the vine at pruning — or reduce the crop — while keeping the vine in balance.
Viticulture is site specific and every vineyard has a different definition of balance. General advice is a starting point, but not a substitute for getting to know your vines. The final solution should be clear: the more time you spend in your vineyard trying these techniques, the more you will understand what is needed to achieve balance.
Summer Session
Summer is the workhorse of the vintage, but is often undervalued by viticulturists — if summer becomes a vacation from your vineyard, your wine will underperform as a result.
Of course, summer in California won’t coincide exactly with summer in Michigan. So to make this article as instructive as possible, let’s think of “summer in the vineyard” as a period of time that starts when shoots are long enough to begin canopy management, and extend through the period of time to when we expect cap drop, flowering, fruit set and bunch closure. Here are some ways to avoid the hazards of summer and to get to veraison with a tidy canopy and a balanced vineyard.
Rapid Shoot Growth
To make alcohol we need sugar. To get sugar in the grapes, the vines need sunlight, water and nutrients. The engine of a vine is its leaves. Most shoots of a grapevine carry one or two grape clusters, and most varieties need at least ten leaves per cluster to get the fruit ripe. Leaves absorb sunlight, triggering photosynthesis. Water vapor is released from pores (stomata) on the back of the leaves, which keeps the “wick” inside the vine (phloem) dry enough to soak up more water through root hairs via osmosis. This will also transport soil-borne nutrients. So before the vine can get down to the work of ripening fruit, it must first operate in a vegetative growth cycle. If a vine was a car, it would have three speeds. Dormancy (parked), vegetative (getting to highway speed) and ripening (cruising under solar power). It is our hope as grape growers that summer will bring the sunshine necessary to grow the shoots needed for sugar production mode.
Grapevines grow and ripen at peak performance around 87 °F (31 °C), so these warm months are crucial to get our shoots grown and our ripening initiated. Three to 4 feet (30.91–1.2 m) of shoot growth prior to the shoots starting to lignify (or harden into wood) is about optimal. With leaf nodes every 3 inches 7.6 cm) that will give us 12–16 leaves — add a few lateral shoots and we could easily be up in that 24–30 leaves per shoot that is optimal for full ripening of two clusters. Less than 20–24 leaves per shoot may mean the vine needs a touch more water or nutrients (mainly nitrogen for growth) — but be slow and methodical when you change your watering or fertilization to make sure you don’t go overboard and end up with a rank vine that makes thin wine. If you get over 5 feet (1.5 m) of shoot growth per year, you can likely cut back on the watering and stop fertilizing altogether.
Canopy Management
Understanding canopy management is the most important single element of managing a vineyard. Wine quality is driven by canopy management. Most wine geeks think they know what microclimate is, but most are wrong. Macroclimate is the area where you grow your grapes — like Napa Valley or the Finger Lakes. Mesoclimate describes a specific area, such as the Beckstoffer Vineyard or the Western Cayuga Lake region. Microclimate gets much more specific, and the reason should be obvious. The only climate that really matters to wine quality is the climate inside the canopy and at the exact place where the fruit grows and ripens. You could grow Nebbiolo in the Cannubi vineyard in Barolo, but if the fruit is hidden deep in a burly overgrowth of vine, you will not make good Cannubi Barolo. As a result, the primary focus of canopy management, then, is to promote perfect climatic conditions for the fruit to develop and ripen on the vine.
During summer the focus is to get the shoots to grow, then to remove leaves and lateral shoots to promote sun flecking and wind movement through the fruiting zone. Leaf removal should commence after flowering as the fruit sets. Windbreak and sun protection from leaf shading may be helpful for the flowers to gently drop their magic dust on the emerging ovaries, but once the fruit is set, they need sunlight and wind to keep flavor developing and rot/mildew at bay. Proper canopy management opens the canopy to sun and wind to the maximum level allowable without threatening the fruit with sunburn. There should never be more than a one leaf layer between the fruit and the sky on either side of the vine row, so you can start with reducing congestion that way. From there I recommend a slow and methodical approach over many vintages. Expose 10% of the fruit on the morning sun side of the vine row, see how the fruit reacts, and keep removing a few more leaves each year until you find the right balance of exposure, flavor, and sound fruit without burn or cracking.
By the end of summer, your canopy should be dialed in. There should be a ratio of leaves to clusters around 12–15, shoot lengths between 3 to 5 feet (0.91 to 1.5 m), an open canopy that exposes fruit in a safe and site specific manner. These three paragraphs are just an introduction. For more on canopy management, see Dr. Richard Smart’s handbook Sunlight Into Wine.
Cap Drop and Flowering
If you look closely at a grape cluster before flowering it appears to be a tiny little green pumpkin — enclosed by a textured protective cap. When the time is right, the caps will dessicate (dry up) and fall off to expose the delicate yellow flowers underneath. Once the caps drop and the flowers are exposed throughout the vineyard, hope for warm weather and only light winds. Flowering will dictate yield; so if there is a terrible rainstorm, high winds or hail, we can lose much of our harvest. As mentioned above it is not recommended to do leaf removal from the fruiting zone before flowering so those crazy hermaphroditic clusters can do their business in the relative privacy within the canopy. A foliar application of zinc prior to bloom has shown to increase successful flowering by up to 10%. I spray zinc every year for this purpose, a nice insurance policy with no down side, if applied according to label instructions.
Nutrient Management
It is important to note that grapevines perform admirably in many locales in the US without any supplemental fertilizer. If you can produce 3–5 feet (0.9–1.5 m) of cane from each shoot position and the grapes get ripe and the leaves are a dull green as they grow, allow the vines to produce their crop without adding nutrition. Supplemental fertilization is only necessary for underperforming, low-vigor vines that struggle to produce healthy shoots and keep green leaves. Again, leaves do not have to be huge and waxy green — that is a sign of too much nitrogen. Vines can show a little spring fever until summer — a milky cast to leaves that may also seem a little yellow in their color. In the warmest months, vines should have leaves no larger than a man’s hand and a dull or dusty green color. These are the signs of a vine that is in balance.
If the vine isn’t growing enough shoot length for ripeness, you may need a little nitrogen along with phosphorous (nitrogen mainly for vigor, and phosphorous for fruit development). If the leaves never get green, you may need a little potassium. If the grapes are pumpkin shaped (after cap fall) and have no seeds, you may have a zinc deficiency. My message here is: never apply fertilizer to vines that don’t need it, and be very specific with your applications to promote vine balance. You can collect a petiole sample during bloom to send to a lab for nutritional analysis, and I recommend this at least every three years. Overly vigorous vines produce poor wines, as do vines that struggle throughout the season.
Water Considerations
Irrigation is a contentious subject in viticulture. Those areas that can dry farm quality grapes without irrigation are clearly at an advantage economically, if not viticulturally. The costs of establishing a dry farmed vineyard are reduced drastically, rainwater is better for plants than ground water, and it can be argued that dry farmed grapes better represent a vineyard’s terroir. On the other side of the argument, irrigation offers tools to the vineyardist with an irrigation system that are unavailable to the dry farmer. I can better control the cycle of vine growth with irrigation or deficit irrigation. I can extend the vine’s season for longer hang time, stave off a heat spell or encourage the vines to speed up their sugar accumulation. Irrigation, if needed, is worth the investment to guarantee adequate water status for the vineyard. So how do we know if your backyard vineyard needs a watering system? A five-dollar grapevine from a local nursery should do the trick. Plant the vine where you want to put a vineyard and watch it for a few years to see how it grows with no supplemental water. In most backyard situations the vines will be much happier sucking up rainwater than municipal water, which often times has chlorine and fluorine residues. Well water is better than municipal sources, but rainwater is still the best.
Summer is clearly the peak of a vine’s water requirements. Budbreak through July is a period where the vines need a constant supply of moisture to get the shoots growing and the canopy established. If the vineyard achieves this naturally in most years, count your blessings. Most dry farmed vineyards rely on about 20 inches (51 cm) or more of annual rainfall. You can use a rough estimate of 15 gallons (57 L) per plant to make up each inch of rain lacking — but putting down more than 10 gallons (38 L) per plant at once is generally a waste of water, except perhaps as a post-irrigation flooding. Just like the suggestions for fertilization, if your vines grow balanced without adding water, don’t screw with nature! If your vines show water stress, start with an application of 5 gallons (19 L) per plant and see how they react, then fine tune from there. Clay soils hold water longer and need less water than sandy or loamy soils.
Remember there are a few tricks for eyeballing water status in your vineyard. While the vine is in vegetative stages, the tendrils on the top of the shoots should extend significantly beyond the growing tip. This shows that the vine is attempting to climb higher and soak up more sunshine. When the tendrils pull back even to or behind the growing tip, that means that the vine is in water stress, or that it is finishing vegetative growth and focusing on ripening the crop. The angle of the leaf blade (the actual leaf) and the petiole (the leaf’s stem) can also give us clues about the vine’s water status. The leaves will wilt in water stress and the angle of the blade to the stem becomes acute. With proper water status, the blade will be at a right angle (or even slightly obtuse) to the petiole. (Feel free to call your high school geometry teacher at this point and let them know that all that work with triangles is finally paying off in the real world.)
Heat spell hazard is defined as high temperatures for at least 48–72 hours that can cause crop and vine damage. Sustained temperatures in the 100+ °F (38+ °C) range may reduce yield by as much as 3% per day if steps are not taken to moderate the heat stress. A deep irrigation before the heat wave hits is always a good idea to buffer the roots with moisture and to cool the soil profile. Mulch also seems to protect the soil from getting too hot underneath, and will also make applied water stay in the soil longer as it protects it from rapid evaporation. Water can also be used by setting up overhead sprinklers to douse the vineyard. The sun will have to turn the water into vapor before it goes to work on harming the vines. There is some controversy over whether a vine shuts down at 104 °F (40 °C) or not. The shut-down theory is usually taught in US viticulture programs, although research is emerging from Australia that disputes those claims. As the Aussies support their research programs in a manner we don’t choose to match, my bet is on the Australian research. Unchecked, these are the results of heat stress (>103 °F/39 °C) on a grapevine in summer:
• Erratic fruit set and small berries (especially in Cabernet and Merlot)
• Shoot tip dieback (especially in Chenin Blanc and French Colombard)
• Burned fruit and the production of off-flavors
• Very rapid ripening/raisining
See the sidebar below this article for a list of practices to combat moderate heat stress.
Critters and Disease
If you live in a region where bugs have struck a balance and stay busy eating each other, you are very lucky. The moment a vineyard pest becomes a management issue is when they begin to threaten your healthy crop. So a few grasshoppers nibbling leaves (a hole here and there) is not a big deal, but a swarm of locusts skeletonizing the whole vineyard — that’s a big problem and one that needs to be brought to the attention of your local agricultural commissioner.
Populations of some pests such as bees, wasps, ants, yellowjackets, gophers and ground squirrels need to be culled early in the season before breeding and their numbers exceed the capacity for control. For instance, gophers and squirrels breed twice — in spring and in late summer. May is a great time to knock their numbers down if you failed to control them right as they woke up in January and February. Do what you can to remove food sources and habitat, and do your best to trap, exclude and kill the pests that threaten your vineyard. Do not kill all animals and insects in the vineyard, though.
In general, having a diverse habitat will help the vineyard as the critters will be battling amongst themselves while your vines grow relatively unmolested. Try to observe your vineyard constantly and see what species live there and in what seasons the populations increase. Do your research to find out what species are beneficial (encourage populations), and which are pests (destroy with impunity). Always follow local laws and use low-impact methods for pest control. Remember that spraying may kill more beneficial insects than pests if you’re not careful. Try to target the pest species specifically and let nature work for you, not against you!
Summer weeds should be kept knocked down in the vine row and manageable in between rows. Weeds should never touch the grapes or the canopy, but small weeds in the vine row rarely root deep enough to compete with vines for water and nutrients. Having some permanent plant growth in the vineyard is usually attractive, as it can bring in beneficial insects and offer pests something to nibble on besides the grapevines. If the vine is the only green the pests see, you can guess where they’re going for their meals.
The major diseases that you will have to avoid in summer are mildew and bunch rot. Both of these problems can be controlled by careful fungicide programs you can work out with other local growers, nurseries and your local college, ag commissioner or other experts. Stick to your spraying schedule and follow label instructions. An open canopy also slows the growth of fungus, so the more open your canopy is (within reason), the more effective your sprays become.
Conclusion
It may be a struggle to see the world on vacation while we’re captive to the vineyard’s needs, but summer is the time when we pay for our wine with hard labor in the backyard. Summer sets the stage for that dance of denouement we call harvest and crush.
Combating Heat Stress
• Run overhead sprinklers to bring vine temperatures down
• Moisten soil with irrigation by drip, flood, furrow or microsprinkler. Apply-ing water three to five days before a heat event is recommended
• Maintain more leaves between sun and fruit to shade and protect
• Build soils with mulches and composts that add organic carbon to the vineyard soil. Organic carbon has shown great promise in Australia for moderating heat stress damage
• For the pro, there are products such as Parasol, which reflects sun and protects vines from heat stress
• There is evidence that groundwater moderates heat stress in heat events three days or shorter. There may be very little we can do for our vines in extended heat spells — but sprinklers and canopy management are a good start.
Grape Growing Regions
Around the world, wine grapes are grown almost everywhere environmental conditions permit, excepting countries where alcohol is prohibited. Grape vines require a growing season that is long enough and hot enough to produce grapes with sufficient sugar. Yet, they also need winters that are cool enough for them to give them their chilling requirement. These conditions exist in two “belts” circling the globe — from 30–40 °S and 30–50 °N. The local climate and soil conditions must be accommodating, so not every bit of arable land inside these zones is suitable for growing quality wine grapes.
An exhaustive list of grape growing regions would be, well, exhausting to read. So, instead, here are some the major grape growing regions around the world, with a somewhat deeper look at regions of importance in North America.
In the Southern Hemisphere, the countries that produce the most wine are Argentina, Australia, South Africa, Chile, Brazil and New Zealand. Argentina produces the most wine of any country in the Southern Hemisphere and is the fifth largest producer in the world. (Note: Production totals vary year by year and acreages devoted to vineyards expands and contracts over time.) Arguably the best known Argentine grape growing region is Mendoza. Argentina grows a wide variety of grapes, but is best known for its Malbec.
The Australian wine industry has been growing vigorously in recent years and Australia is now the fourth largest exporter of wine in the world. Shiraz is the most widely planted wine grape variety there.
The biggest producers of wine are located in the Northern Hemisphere. Italy produces more wine than any other country in the world and is also home to some of the oldest wine-producing regions. A wide variety of grape varieties are grown there, with Nebbiolo (red) and Trebbiano (white) being widely-planted.
France is nearly synonymous with wine and any attempt to summarize their production in a paragraph would be fruitless. It contains some of the most famous wine growing regions on the planet — Burgundy, Bordeaux and Champagne — and is the home of many classic grape varieties, including Cabernet Sauvignon, Chardonnay, Pinot Noir and Sauvignon Blanc. Merlot and Granache are their most widely-planted varieties.
Wine grapes are grown in all 50 states of the United States. California is the leading producer, followed by New York, Washington State and Oregon. California has many famous wine growing regions (including Napa and Sonoma) and it’s output is larger than most countries. 90% of the wine produced in the United States comes from California. Wine regions are grouped into four large regions, the North Coast, Central Coast, South Coast and Central Valley. Cabernet Sauvignon, Chardonnay, Merlot and Zinfandel are all widely-planted.
New York is most famous for the Finger Lakes growing region. Although the best-known New York wines are probably Rieslings, less than 10% of the wine produced in New York is made from Vitis vinifera grapes. American hybrid grapes (such as Catawba) and French hybrid grapes (Baco Noir) are widely grown.
Washington and Oregon are both home to multiple wine-growing regions and are best know for their whites — Riesling in Washington, Pinto Gris in Oregon. Oregon also produces a fair amount of Pinot Noir.
The southern parts of British Columbia and Ontario are home to Canada’s wine industry, most known for its icewines.