The Science of Winemaking
When I graduated from UC-Davis in 1983 the industry was undergoing exponential growth, with small wineries popping up everywhere. These were almost entirely second careers, so these newbies didn’t have time to earn a four-year degree in enology before setting out to realize their dreams. This jump straight to production meant a lot of winemakers had a shaky understanding of all of the chemistry involved in winemaking, and it showed as a lot of commercial wines were being produced and distributed that would be unmerchantable today.
Why study wine chemistry? Chances are your high school chemistry teacher gave you a bad attitude about the subject, and after all, winemaking got along pretty darn well for 8,000 years without it. The ancients learned empirically down through the generations, no doubt a superior method than today’s modern enology, of which I am highly critical.
The reason to continue reading is that you want to make great wine reliably before you die.
Nothing in this article is absolute. You will doubtless find my system in conflict with others you know. But in this article I will summarize rules of thumb that have served me well over five decades of winemaking.
Getting Started
In the August-September 2022 issue I covered the intricacies of vineyard selection, monitoring, and harvesting grapes, so we’ll start this article at the crusher, mostly concerned with correcting Brix, pH, and titratable acidity (TA).
I always add water if Brix is excessive. This addition means more wine, but also better wine. Lower alcohol actually increases extraction in reds and increases aromatics in whites. I like my reds around 13.8% ABV, which corresponds to 23 °Brix. Whites and dry rosés are best at around 12.5%, which corresponds to 21 °Brix. If your Brix is lower, you can chaptalize with sugar up to these levels, though there are many lovely German Rieslings and Iowa La Crescents at 8% ABV, so a lot depends on your goals. Since Brix is a weight percentage these calculations are tricky. Online calculators are available, including the one I use at winebusiness.com/calculator/winemaking/. Strangely, diluting the must diminishes titratable acidity (TA) proportionately but has a negligible effect on pH.
The colloidal nature of red wine means that lowering must Brix results in greater phenolic extraction, producing wines with more aromatic integration and longevity, vital elements in encouraging a healthy microbiome, and the development of profound bottle bouquet.
If a red wine is dry and has undergone malolactic fermentation (MLF) it will not require filtration beyond possible clarification, and even that is seldom necessary. New World commercial winemakers tend to sterilize their wines at bottling in paranoia concerning development of Brettanomyces in the bottle. I think this is a mistake, as these wines never develop in bottle. In my opinion, you have nothing to fear but fear itself.
Old World cellars have developed a beneficial microbiome that permits these nuances, which, after all, are what made us fall in love with red wine in the first place. Home winemakers have the advantage that Brett in the bottle is a risk they can afford, and the results are generally, though not always, quite gratifying. Nurturing a stable beneficial microbiome is a tricky business that requires eschewing draconian cellar practices and maintaining stable temperature and humidity in the cellar.
The Basics About Acids
An acid is any compound that can ionize, giving up a proton (H+) and leaving behind the rest of the molecule, whatever that may be (A-). The acids in wine are said to be “weak.” This means they exist in both forms and ionize at different pHs, called “pKa’s.”
TA and pH are very different things. TA tells us how many protons we have altogether, whereas pH tells us how many are ionized, thus free at a given pH. TA stimulates the action of a salivary gland. It tells us how tart the wine is. Different wine styles require different TAs in the bottle, generally between 5–9 grams per liter. TA has nothing to do with microbial stability or aging potential — that would be pH. You can’t taste pH, but it controls wine chemistry and microbiology. The pH affects the speed of oxidation, visible color, propensity for microbial spoilage, freshness of aroma, the effectiveness of SO2, and much else. It’s the speedometer of aging. A pH of 3.0 is like driving 10 MPH. A pH of 4.0 is like driving 100 MPH. Neither of these is generally a good idea.
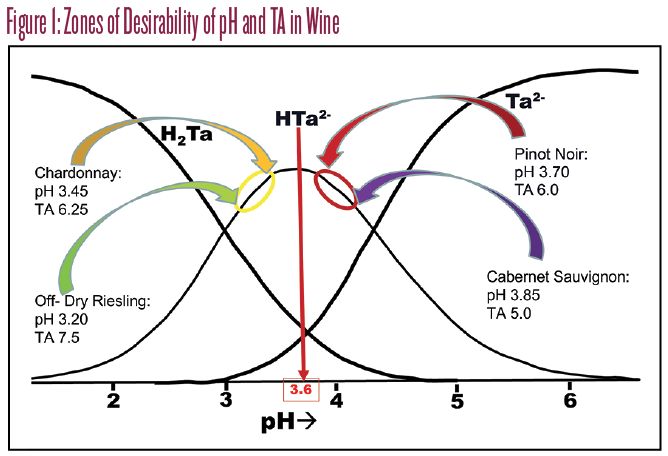
The remarkably simple bottom line is that you should adjust all acid-deficient musts with tartaric acid to pH 3.45 as freshly crushed must. For reds, we generally don’t measure pH or Brix until after a 24-hour soak out, which will shift the desired pH target from 3.45 to 3.60 since considerable buffer is extracted from the skins in that first day. To make this adjustment, the rule of thumb is that 1.0 gram per liter of tartaric acid will shift the pH by 0.2 units. Through the action of tartrate precipitation, skin contact, and malolactic, these adjustments will fortunately move almost any wine into the correct zones of desirability for the full range of whites and reds, as shown in Figure 1.
Additions of tartaric acid (and very occasionally malic acid) are very easy. Tartaric acid is the stronger of the two, and additions will stimulate bitartrate precipitation, lowering the TA and the pH simultaneously, so you get much more pH bang for your TA buck. Malic acid should only be used in that rare ripe white wine with a low TA and also a low pH. I had a Sémillon once with a TA of 5 g/L and a pH of 3.50. The correct addition was 2.5 g/L malic acid, which took me to 7 g/L and 3.30 at bottling. A similar tartaric add would have put me down at pH 2.85, a disaster for free SO2 management as we’ll see.
Unless you’re using brass and mild steel fittings (shame on you), citric acid has no place in wine, but it’s great for shining stainless and for barrel holding solutions in combination with SO2. One of the silliest products you’ll find in home winemaking shops is the so-called acid blend of tartaric, malic, and citric acids, combining the disadvantages of all three.
As you’ve seen, adding acid is pretty easy. Reducing acidity is a different story. If you are lucky enough to have a low pH, potassium bicarbonate will lower your TA quite easily. Its effect is a little uncertain, but depending on your potassium content, to lower TA 1.0 g/L you need somewhere between 0.25 and 0.5 g/L of potassium bicarbonate (KHCO3). This doesn’t work so well if your pH is also high.
There are two kinds of conditions that can cause high pH/high TA. The one we tend to see in California is characterized by high potassium (K+), and the cure is simple if scary. Let’s say you have a Chardonnay with a TA of 10 g/L and a pH of 3.9. Jeez. But if your K+ is high, you simply acidify to pH 3.60 with tartaric. This puts you on the peak of the bitartrate (HTa-) curve (see Figure 1). If you have gobs of K+ and gobs of HTa-, they will combine to precipitate KHTa crystals in spades. Try this at lab scale first. Take 500 mLs of juice, acidify to pH 3.60 and fill up a 12-ounce (355-mL) plastic water bottle, squeezing somewhat to allow for expansion when you freeze it overnight. If it’s working, in the morning you’ll see a heavy white precipitate. Thaw it out and read the pH and TA. You should have normal numbers, in which case make the same addition to the tank.
The other cause of high pH/high TA is high malic acid, which is characteristic of cool climates and cold-tolerant varieties like Marquette and Frontenac.
We now have yeasts that can lower malic acid by as much as one third. Lalvin 71b also enhances fruitiness. You have to be very careful to hydrate these at precisely the prescribed temperature. Dead yeast are the main cause of failure. There are several other malate-consuming yeasts out there – talk to Scott Labs, Lamothe-Abiet, and Enartis for recommendations.
You can also consider malolactic fermentation, which if conducted during primary fermentation with a low diacetyl producer such as VP41 can still result in a fruity wine without the buttery character. If you like the butter, BETA is a strain that will give it to you if you run the MLF after alcoholic fermentation.
Sweet Wine Chemistry
If you are making a sweeter wine at home you will not be set up to properly sterilize a bottling line. Even commercial wineries commonly employ half-million-dollar mobile lines to do this right, so don’t try this at home. The easiest way to make sweet wine at home is to add high-proof spirit during fermentation and make Port- and Sherry-like wines. For these to be stable, you’ll need over 80 Delle Units. Delle was a Russian enologist who in 1905 figured out that if %ABV x 4.5 + %RS (residual sugar) exceeds 80, the wine will be stable. Ports typically run 18% alcohol and 9% RS. In the equation, this looks like:
(18 x 4.5) + 9 = 90
Dom Perignon’s discovery was that if you referment wine in the bottle to 5 atmospheres (this takes about 19 g/L of sugar), then when you disgorge, you can add a dosage and sweeten as much as you like. The CO2 pressure will keep the wine from refermenting.
While it is not recommended, it is worth mentioning that you can also stabilize non-ML whites with potassium sorbate, although this process will lead to an aroma with a distinct chemical smell. This is converted to a horrible vegetal “geranium tone” in wines that have undergone MLF, including almost all reds, so don’t use it on these wines. Even when you wish to make sweet, non-ML whites, the magnolia blossom aroma of sorbate is never delightful, so for heaven’s sake, don’t use it indiscriminately.
From here on, I’m going to assume that you want to make dry wine.
Rules of Thumb for White Wines
• Add either 30-ppm SO2 at the crusher (“Green Juice Club”) or none (“Brown Juice Club”). Green Juices end up with more golden color (think Rhine Rieslings); un-sulfited juices precipitate phenolics, look like mud, but believe it or not, end up lean, fresh, and age-worthy (think Mosel Rieslings).
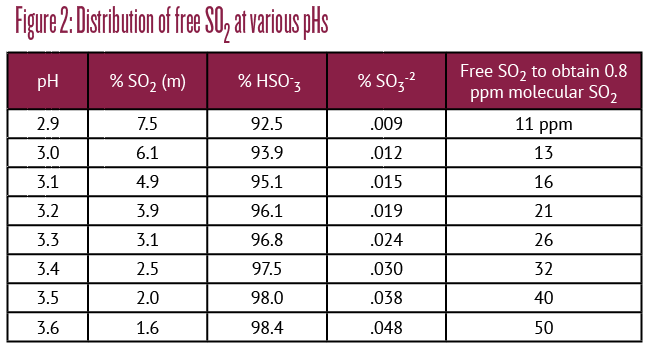
• For most whites and rosés, you will want to suppress malolactic by racking onto SO2 immediately after dryness. Assuming that your wine is in the desirable zone between pH 3.20 and 3.40, an initial ~25 ppm free SO2 puts you in the right ballpark. To get there, our Green Juice Club wines should start with 70 ppm, while Brown Juice Club wines only need 50 ppm. No, that’s not backwards. The goal is to achieve 0.8 ppm molecular SO2 as calculated in Figure 2, below. Keep below 60 °F (16 °C) and rack off all lees as soon as practical. Then adjust as needed.
• The most common exception is Chardonnay, which you may want to put through MLF. In this case, you inoculate with a high or low diacetyl-producing strain, depending on the amount of buttery character you wish to impart.
• You may elect to employ MLF to reduce acidity while retaining your fruity freshness. This is often achieved sequentially during primary fermentation by inoculation with a vigorous low-diacetyl culture. If you’re incomplete post alcoholic fermentation, leave the wine on its lees for two weeks, keep it around 70 °F (21 °C) until complete, then sulfite according to Figure 2.
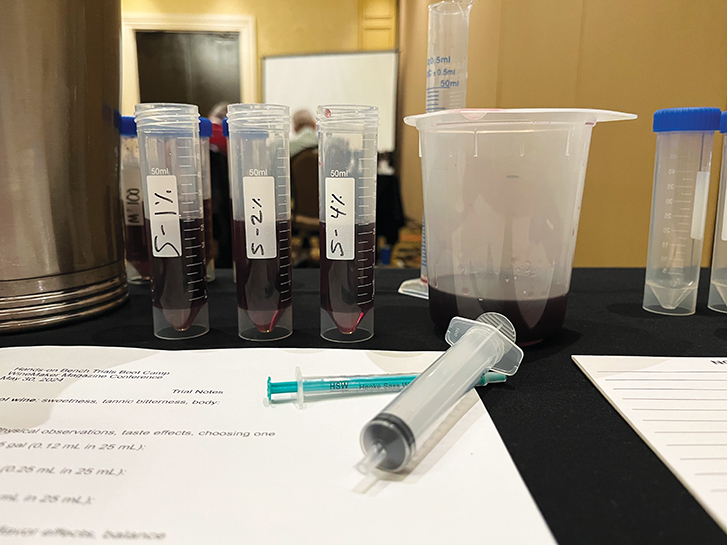
• White wines will generally throw a protein haze if unfined. Adding bentonite is the surest way to prevent this occurrence in the bottle. Over-fining can result in unnecessary loss of flavor and volume. While it is advisable to perform a bench trial on a series of samples, to do so at home is difficult. Assessing precisely how much is needed requires some fancy equipment (you need some screw-capped test tubes, a temperature-controlled water bath, a centrifuge, and a series of syringe filters), so your best move is to farm this out to a lab. Alternatively, you can estimate your requirement based on past history with a specific variety and location. Wines with high tannin levels such as Pinot Gris, Chenin Blanc, St. Pepin, rosés, and Chardonnay, particularly when barrel aged, generally need little (0.2 g/L) or no bentonite, while high-protein grapes such as Sauvignon Blanc, Gewürztraminer, Muscat, and Riesling can require much higher doses (0.6–1.2 g/L), particularly from heat-stressed vines.
• Most home winemakers (and many small commercial outfits) lack the glycol system necessary to chill-proof whites against crystal formation in the bottle. I’m not a fan in any case, as stripping K+ results in decreases in body and flavor persistence in the finish. Recently a product called potassium polyaspartame, marketed by Enartis as Zenith One, has been developed that stabilizes against tartrate precipitation without chilling. Unlike previous products such as metatartaric acid and carboxymethyl cellulose, it is highly reliable as long as you’re protein stable.
Rules of Thumb for Dry Red Wines
• Red fermentations generally benefit from high anthocyanin content. This means monomers that have not been field-oxidized by excessive hang time. Sacrificial tannins in the 100 to 200 ppm range at the crusher are useful in pre-emptively combining with grape proteins, leaving the more comely grape tannins to contribute to elegant structure. Higher doses are useful to deactivate laccase, the oxidizing enzyme in rot.
• Anthocyanins are positively charged, so they repel each other and won’t coordinate into colloids by themselves. We use co-fermentation factors to slip between them. Sources of co-fermenters include the skins of complementary varieties — a high color/low tannin variety mixed with a low pigment/high tannin variety. Co-pigmentation additions include well-cured untoasted oak chips or the skins from such as terpene-rich white skins.
• Porous vessels are essential for off-gassing funkiness and to provide some micro-oxidation to refine your tannins. Small new oak barrels tend to over-oak. Hot water soda ash treatments can tame new oak character, and neutral small oak is a prized possession to be cherished. Many winemakers are moving to porous plastic vessels designed to breathe like a barrel, then controlling aromatics with carefully crafted barrel alternatives that are less expensive, easier to control, and more environmentally responsible than new oak barrels.
• Red wines are always protein stable because the tannins take out natural protein. Since they aren’t chilled, tartrate precipitation isn’t a big deal, so they usually aren’t cold stabilized.
Sulfur Dioxide for Red Wines
• Nearly all red wine undergoes malolactic fermentation because pigment binds the SO2 that would otherwise prevent it.
• Forget about molecular SO2 calculations. Free SO2 doesn’t actually exist in red wines, as it is all bound to anthocyanins. These forms are in rapid equilibrium with the free SO2, and are incorrectly measured as free in both iodometric and aeration/oxidation analyses.
• The desirable pH zone for reds is between 3.70 for light reds and 3.85 for big, long-aging Cabernets and such. In this zone, maintain 20 to 30 ppm “free” to scavenge aldehyde without reference to pH, thus avoiding oxidation and browning.
• Pigment-bound SO2 is ineffective against vinegar bacteria. What protects reds from Acetobacter spoilage is the wine’s ability to absorb oxygen, or “O2 appetite.” The real take-home message is that your reds will take care of themselves if made from sound, properly ripe (but not over-ripe) grapes so that they have a healthy oxygen-consuming reactivity. One sign of high reductive potential is the production of small amounts of H2S. This can be a good thing. Your 15-year-old son’s pimply face indicates a healthy testosterone level that promises a happy marriage in old age.
• Brett is kept at bay by beneficial microbes that compete with it for essential micronutrients. Since it employs a whole suite of clever practices to hide out from SO2, what the preservative mainly accomplishes is to kill off beneficial microbiome, leaving a clear path for Brett. Although petri dish plating of sulfited wines does show diminished numbers, it has been recently discovered that the preservative renders it “viable — nonculturable.” Enology’s funniest joke.
Lab Gear
You can, at considerable expense and delay time, send out your wines for all kinds of analysis. But you must have a modest lab at home with the capability to measure Brix, pH, TA, residual sugar near dryness, and free SO2. You cannot send these out. Free SO2will deteriorate in transit, and your need to know pH and TA can’t wait. Fortunately, there are tools available to home winemakers for these measurements. The Vinmetrica SC-300 is an instrument that can measure all three and retails for around $550.
Brix also needs to be measured on site, as it will change in transit and you have an immediate need to know. A simple Brix hydrometer with a built-in thermometer is under $30. These aren’t very precise but will get you by while you save up for a set of four that accurately measure parts of the scale from 30 °Brix on down to -5 °Brix for about $200. If you have a lot of fermentations and money is no object, you won’t regret acquiring a portable densitometer. Even the best Brix measurement won’t tell you if your wine is dry. You can determine this quite accurately with a test pill marketed as Clinitest or Dextrocheck at 50 cents a pop.
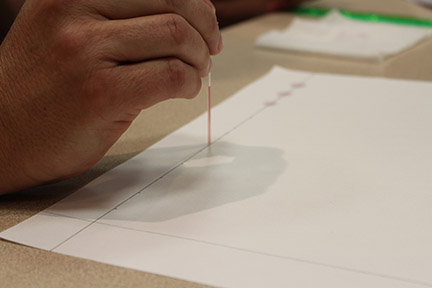
If you make red wines then you will almost certainly also want to set yourself up with a paper chromatography setup for around $100 to monitor your malolactic fermentations.
Conclusion
So there you have the basics of the wine chemistry you need to understand to make great wine. Besides understanding the science, the other key to becoming a master winemaker is to make a lot of mistakes and learn from them. Thought is born of failure, so embrace those mistakes and benefit from them.


