What’s This? and Calculating Proper Yeast Pitching
 Q
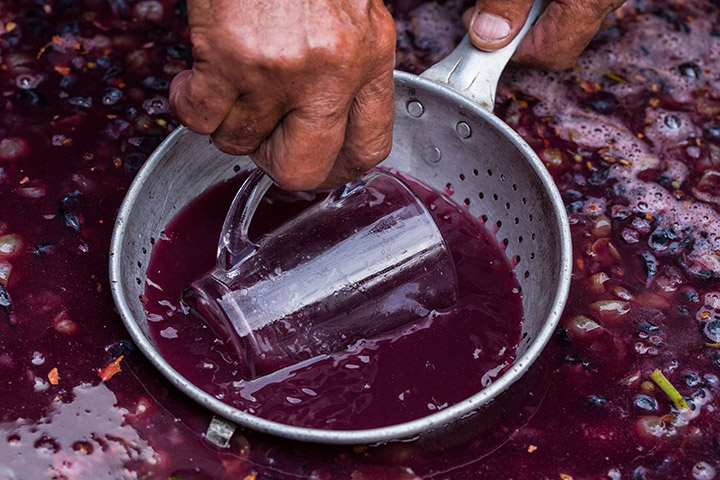
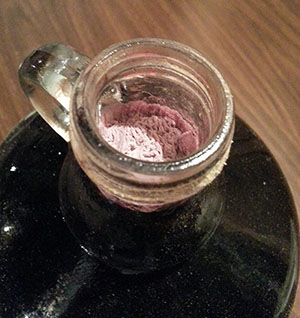
My father-in-law makes wine from grapes, de-stemmed and put in pails. He does the usual vatting and filtering and transferring demi-johns, etc. Once the wine is ready, we put it in gallon (3.8 L) bottles and store it in our basement cold cellar until we need some, at which time we transfer it into 750 ml bottles. When we open the gallon (3.8 L) jugs, there is sometimes (not always) a topping of what appears to be mold or something. It doesn’t smell or anything. The father-in-law says to carefully remove it, but often some bits remain, which we filter with a strainer when bottling. The wine always tastes fine, but I wonder if it is okay to drink?
Ron Wilson
Hamilton, Ontario
Q
My father-in-law makes wine from grapes, de-stemmed and put in pails. He does the usual vatting and filtering and transferring demi-johns, etc. Once the wine is ready, we put it in gallon (3.8 L) bottles and store it in our basement cold cellar until we need some, at which time we transfer it into 750 ml bottles. When we open the gallon (3.8 L) jugs, there is sometimes (not always) a topping of what appears to be mold or something. It doesn’t smell or anything. The father-in-law says to carefully remove it, but often some bits remain, which we filter with a strainer when bottling. The wine always tastes fine, but I wonder if it is okay to drink?
Ron Wilson
Hamilton, Ontario
Q I have been making wine since 1998 and it has been a great hobby. I have made wine from both kits and grapes, and recently tried my first cider. Some wine kits come with 1 or 2 packages of yeast. A recent Winexpert kit I made used EC-1118 and Bourgorouge RC212. Questions: What do the 2 yeasts do, versus just using 1? Do they compete somehow? When I make wine from grapes, how do I know I am adding enough yeast, if these special kits add 2 packages? Bob Kyle Michigan
A Good for you for branching out. Apple cider has astronomically increased in popularity in the United States in the past few years and I see an increasing number of wineries trying their hand at the fermented-apple beverage. But back to the questions at hand. As to your wine kit coming with two packets of different yeasts (and I have no idea what the instructions say): Is it possible the kit says to choose one or the other? Do the directions say to use both? My first instinct would be to follow whatever the directions say, to the letter. A lot of test batches have been done on these kits before they are released in order to arrive at the given ingredients and instructions provided. If none are given, then my next instinct would be that, if each packet is sufficient to ferment the batch size (see addition rates on page 18), you are to choose one of the yeasts only. Part of this reason is that EC-1118 and RC212 are very different yeasts. EC-1118 is also known as Prise de Mousse or “PDM” and is considered the biggest workhorse yeast strain in the wine industry. It is not nutritionally fastidious, ferments rapidly and cleanly, isn’t fussy and importantly, contains a killer factor that allows it to out-compete most other strains. RC212 is interestingly known as being a classic yeast for Pinot Noir production though there’s no reason it couldn’t make a wide array of wines. It is possible that you are supposed to use both yeast strains, just at different times and for different purposes. If your kit has you making a sparkling wine, it’s possible that the RC212 yeast is intended for the first yeast fermentation, where the sugar from the juice is transformed into alcohol and carbon dioxide. The EC-1118 yeast, therefore, is intended as the “secondary” fermenter, or the yeast that you’ll add when you dose the new still wine with a little “priming sugar” and a little yeast before you bottle. EC-1118 is a strong yeast and, of the two, would be the most likely to survive the relatively inhospitable conditions found in a higher alcohol wine. It is also possible that the kit intends you to use these yeast together in the fermentation, all at once in a single vat. Sometimes we winemakers do this in order to engender complexity in the aroma and mouthfeel of a wine, though the practice is not without risk. Generally, if two (or more) yeast strains are present in a fermentation, they may compete for resources (nutrients, minerals, nitrogen, etc.) and will end up causing a troubled and potentially stuck fermentation. Sometimes, however, it can work out and in this case, with RC212 and PDM (EC-1118), I think it could. If you co-inoculated (the term for using more than one yeast strain simultaneously) with both of these yeast at the same time, or even got the RC212 started before pitching the EC-1118 around 4–8 °Brix drop, you could end up with characteristics of both strains in the ferment. Some complexity from RC212 with the assurance that EC-1118 would finish the job in case the RC212 was not up to finishing the task.* So what’s the intention of your kit maker in giving you two packets of different yeast strains? I have to admit, I’m not really sure, not having access to your instructions. One thing that can help you figure it out is to weigh out the yeast in each packet to see how much you have. Hopefully, your kit maker will have the weight nice and spelled out on the package, but if not, you can weigh out the yeast if you have a gram scale that weighs in the 1-100 g range. Keep in mind that the typical calculation most large-scale winemakers use is 2 lbs. of yeast per 1,000 gallons juice (0.24 kg/L). That is, for every 1,000 gallons (3,785 L) of juice you want to ferment (and for red grapes assume about 165 gallons/ton or 0.69 L/kg yield) budget adding 2 lbs. (0.91 kg) of yeast. Most yeast come in 500 g packages, which is just about exactly one pound (1 lb. = 454 g). To run through the math, 2 lbs./1,000 gallons is about 908 g/3,785 liters or about 0.24 g/L or about 0.90 g of yeast per gallon of juice. If you’ve got 1 g/gallon (0.26 g/L) of yeast, then that means you have enough of one yeast strain to ferment the whole batch. If you have only 0.5 g/gallon (0.13 g/L), that means, barring any other instructions, the kit makers meant you to use both yeast strains. Don’t forget that you could just throw all of this to the four winds and just buy enough of another yeast strain from your friendly local winemaking supply store (or the interwebs) to ferment as many gallons as you want with whatever yeast strain you want. This is just my attempt to interpret what the kit makers were trying to tell you.