A Quicker Route to Bubbles
Making non-traditional sparkling wine at home through force carbonation is simple and can yield amazing results. With just a few pieces of equipment, one can make delicious bubbly in a matter of weeks. In this article I will outline how to keg, carbonate, and bottle sparkling wine to be enjoyed with friends and family.
Force carbonation is done by injecting carbon dioxide (CO2) into a solution, as is the common method of carbonating soft drinks, sparkling water, and often beer. By racking wine into a keg, refrigerating it, and connecting the keg to a CO2 tank set at a specific pounds-per-square-inch (psi), over time, results in the wine becoming saturated with Co2 and turning into sparkling wine. There is more to it, but this is basically the process. Even though we are not reaching traditional Champagne psi levels (75–99 psi), you can still achieve delicious bubbly at home with readily available equipment.
Before you get started, I must warn you that you will be working with contents under pressure. Be sure to wear protective clothing and eye protection. Keep children away when handling pressurized kegs, especially when bottling. Wine could spray out or bottles can fail during the bottling process. Tell those kiddos to go play some Fortnite.
Required Equipment
This method of making sparkling wine requires some specific equipment, which I will list and then briefly describe in more detail. The equipment required is:

• 5-gallon (19-L) Cornelius keg and necessary connections
• CO2 tank and regulator
• Refrigerator
• Stainless steel counter-pressure bottle filler with pressure gauge
• Hoses and tubing
• Bottles for carbonated wine: Champagne, flip-top, or beer bottles (if bottling under 50 psi)
• Bottle closures (crown caps, Champagne corks and wire, or plastic stoppers)
• Bottle capper or Champagne wire tightener tool
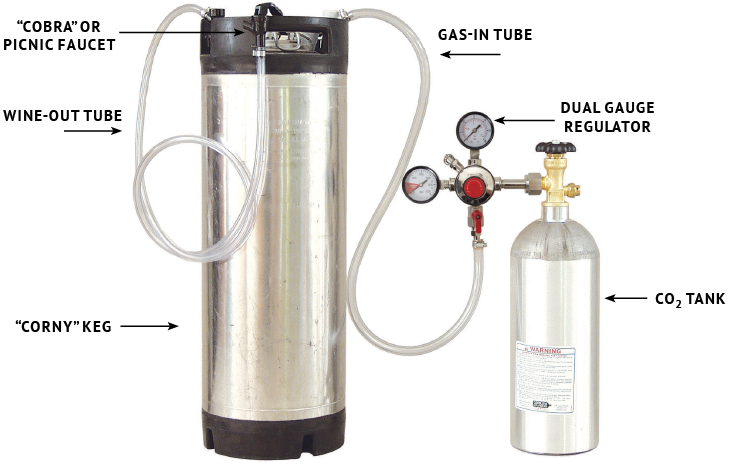
Kegs
Cornelius kegs are the most popular kegs for carbonating wine and beer at home. They come in various sizes, but most common are 5-gallon (19-L) kegs, which can hold about twenty-five 750-mL bottles of wine. They are readily available from local and online homebrew outlets and can usually be found used at a discounted price. There are two different kinds: Pin lock and ball lock. Pin and ball simply refers to how the connectors will attach to the keg. Ball lock is a quick-disconnect style and the pin lock actually has pins on the post to secure the connector. Within each post is a spring-loaded pin called a poppet. Within each black and gray connector is a pin that will depress the poppet to allow gas to enter the keg through one and liquid to come out through the other. Another difference between these kegs are their height, with 5-gallon (19-L) pin lock kegs measuring at around 22 inches (56 cm) tall and ball lock kegs approximately 25 inches (63 cm) tall with another 1⁄4- to 1⁄2- inch (~1-cm) added to each for the connectors. Be sure to measure the height of the inside of your fridge to ensure a good fit. Each keg is equipped with a pressure relief valve that will allow excessive pressure to escape in the event the keg is over-pressurized. The pressure relief valve on the ball lock keg has a pull-ring and can be engaged any time whereas the pressure relief on the pin lock can only be engaged when the pressure exceeds 130 psi. No matter what keg you choose, either keg style will do the job just fine.
CO2 tanks
These can be rented or purchased from local welding and gas supply outlets, or found for sale at many homebrew retailers. If you plan to make sparkling wine production a part of your yearly winemaking practices, the less expensive option, in the long run, is to purchase the tank and simply pay to have it refilled or exchanged as needed. A 5-lb. (2.25-kg) tank will carbonate a few kegs before needing a refill. Choose the size that fits your output.

Dual Gauge CO2 Regulator
These can also be purchased from welding and gas supply stores, as well as many homebrew retailers. These regulators have two gauges — one tells you the approximate gas level in the tank and the other informs you of the current psi level in the tank. The psi level is adjusted either by turning a knob or a screw with a flat-head screwdriver. Most regulators go up to 50–60 psi.
Refrigerator
CO2 is absorbed into wine more readily at lower temperatures. To avoid wasting CO2, be sure to cool the keg of wine first before beginning the carbonation process (more on this later). Depending on your desired setup, you could use a spare fridge or a kegerator — just be sure the height allows for the size of your keg.
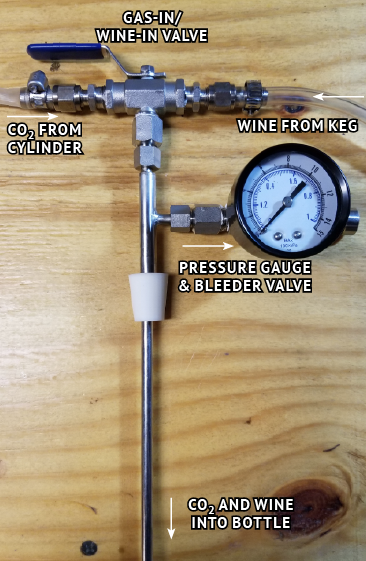
Counter-Pressure Bottle Filler
These are handheld units that fill Champagne and beer bottles under pressure, free of oxygen exposure. You will see a few different versions for sale online. Since we are bottling wine, only a stainless steel bottle filler should be used. I recommend the bottle filler with a pressure gauge so you are aware of the pressure while filling.
Champagne Bottles
Only Champagne, flip-top (E.Z. Cap bottles), or beer bottles suited for bottling carbonated beverages should be used as they are made to withstand pressure. Be sure not to exceed the maximum pressure in order to bottle safely and securely. Remember to always wear personal protective equipment when bottling your carbonated beverages. Consider the maximum psi levels for the bottle when choosing how to bottle your sparkling wines:
• Beer bottles: 50 psi
• Flip-top or E.Z. Cap bottles: 58 psi
• Champagne bottles: Up to 90 psi
What is a Good Wine for Force Carbonation?
The Answer: Anything and everything! What is great about kegging and carbonating wine is you can take a single gallon (4 L), carbonate it, and determine if sparkling is a good fit for that wine. I prefer to carbonate sweet wines that I make such as black/red raspberry, Catawba grape, cranberry, blueberry, and many others.
One thing I have learned is that carbonated sweet wines will taste dryer than their still versions. This is because some of the carbon dioxide turns into carbonic acid and contributes to the overall acidity of the wine (think of a wine that has not been degassed). This is something to consider when back-sweetening a wine before it goes into the keg. You may want to bump up the sweetness level just a bit. Be sure to experiment to nail down your usual suspects you will carbonate every year. Documentation is key to future successes. Rather than relying on your memory for sweetness levels, psi levels etc., write it down and refer to it later.
How to Carbonate: Step by Step
1. Ensure your base wine or cuvée is enjoyment-ready. This means clear, stabilized, and ready to drink. The wine will not develop any further once in the keg and shut off from oxygen forever.
2. Sanitize everything.
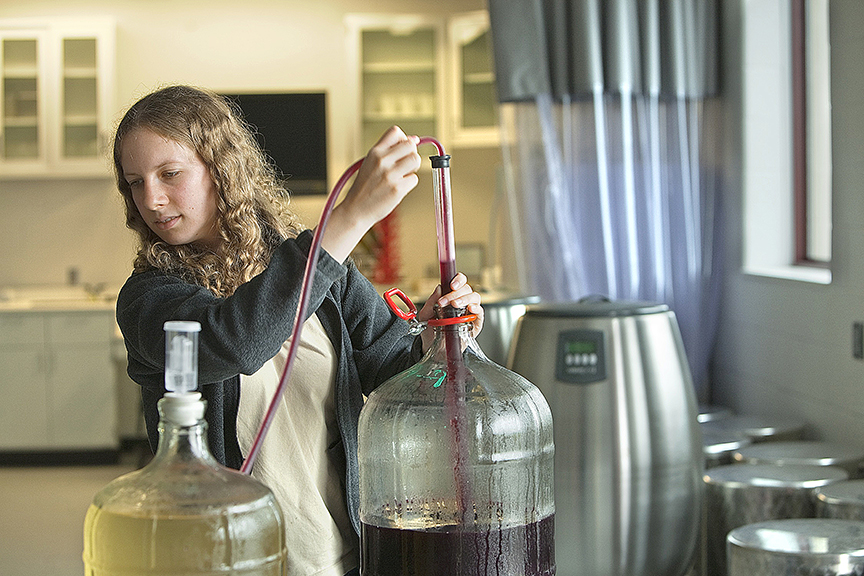
3. Rack the wine into the keg. Stop filling once the wine has reached just below the gas-in dip tube. If there is any negative pressure and it is filled beyond this point, wine will be forced through the gas line back into the CO2 regulator, potentially ruining it.
4. Close the keg’s lid making sure it is properly seated.
5. Connect the keg to the CO2 tank and set it to 30 psi, allowing gas to flow into the tank (remember the gray or white connector is for the gas-in post and the black is for the liquid-out post). Once the sounds of the keg filling with CO2 subsides, remove the gas-in connector to the keg and slightly depress the poppet in the center of the gas post (pin-lock kegs) or pull the pressure relief valve (ball-lock kegs) to release the gas. By doing this you are purging the oxygen from the keg. Repeat this a few times and then finally allow CO2 into the tank without releasing it. As you wait for the gas to flow into the keg, spray the lid and posts with Star San or other no-rinse sanitizer to check for air leaks. A leak is indicated by bubbles forming where sanitizer was sprayed. In the event of a leak, tighten the posts or release the gas and seat the lid once more. It also helps to spray around the regulator and all gas connectors to ensure there are no leaks.
6. Refrigerate the keg down to 32 °F (0 °C) over night. Cold temperatures allow the CO2 to saturate the wine more effectively.
7. The next day, connect the keg to the CO2 and set the psi to 55–60.
8. Allow the CO2 to saturate the wine for up to two weeks.
9. After two weeks has passed, the now sparkling wine should be ready to bottle. If you would like to serve this wine on tap, initially carbonate the wine to around 15 psi. At this low-pressure level, the sparkling wine can be served from a stainless steel tap faucet (chrome plated brass will degrade from the acidity in the wine). Although it’s a far cry from traditional psi levels of sparkling wine, it is still very enjoyable and convenient at this lower psi level. Otherwise, proceed to bottling.
Bottling Procedure
1. The stainless steel counter-pressure bottle filler comes with set-up instructions. Follow those to get the unit set up and ready to fill bottles. Be sure to chill everything (wine and bottles) prior to bottle filling. The tubing and filler will cool down from the wine flowing through them, but you could even chill those things too. Warmth causes a loss of carbonation as well as foaming, which we would like to minimize.
2. Practice using the bottle filler first to gain an understanding of how it works. Practicing with water is fine, just know water is not a highly carbonated beverage and when it is showtime, the bottling procedure will be a little different. Your first time may be a bit messy with sprayed wine and half-filled bottles, so consider this when deciding where to fill your bottles.
3. Place the keg of wine in an ice bath to keep it cool. I fill my bottles in a dish tub to catch foaming and any spray that may occur.
4. Sanitize everything
5. Release the gas in the keg, reconnect the CO2 and set it to 15 psi and allow it to fill the tank.
6. Place the bottle filler wand into the bottle and secure firmly by pushing down, ensuring the rubber bung makes a tight seal. Once the CO2 enters the bottle, the bottle filler will want to push out to some degree. Do not allow that to happen as foaming will result.
7. Engage the 3-way ball valve on top to fill the bottle with CO2, engage the pressure relief valve on the side of the bottle filler to allow oxygen to be purged out of the bottle for a few seconds.
8. Close the 3-way ball valve and the pressure relief valve on the side. Turn the ball valve to allow wine to flow into the bottle. Wine will not enter the bottle until the pressure relief valve is opened to allow CO2 to escape. Do this slowly until the wine starts to flow into the bottle at a moderate rate, making sure foaming is kept to a minimum. Excessive foaming takes time to dissipate, prolonging the bottle filling process. Open the pressure relief valve more to increase the flow of wine and close it to slow the flow of wine into the bottle. The relief valve will need to be managed to address any excess foaming as the bottle fills.
9. Fill the bottle to the top. The fill level will be perfect once the pressure filler has been removed.
10.When the bottle is full, shut the flow of wine off with the 3-way ball valve. Slowly unscrew the pressure relief valve just enough to allow excess CO2 to escape and the pressure gauge on the filler goes down to under 5 psi.
11. Remove the bottle filler and apply the closure immediately. If using a plastic stopper, insert it into the bottle (placing the bottle on a wood block and using a rubber mallet works well), secure it with the wire hood and insert the wire tightener tool to pull the wire tight, ensuring the wire is under the lip of the Champagne bottle. Twist six half-turns, creating a loop. Bend the loop up or down and then a foil wrap and a label can be applied for decoration.
Now that the bottles are filled and the closures are in place, they can be kept at cellar temperature on their side or upright. When you decide to enjoy this wine with friends, be sure to use Champagne flutes as that will display the bubbles beautifully.
An easier alternative to the hand held counter-pressure bottle filler is Williams Warn Bottle Filler. It is countertop positioned, hands free, does not foam, and does not lose carbonation. Consider this if you really ramp up your sparkling wine production at home.
Making sparkling wine at home with the force carbonation method is simple, and gives you excellent results. With just a few pieces of equipment, you can now add more diversity to your cellar and have something different to share with family and friends at a fraction of the time and effort as making traditional sparkling wines.