Build a Backyard Vineyard Sprayer
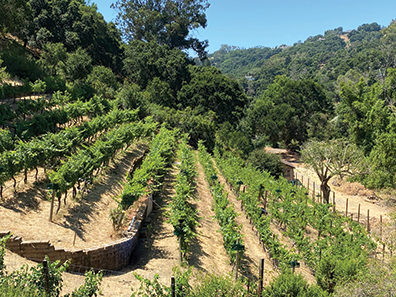
Last fall I found myself in need of a different sprayer system for my 1,000-vine (2-acre) vineyard. Searching through the readily available sprayers from the ag/farm stores and catalogs, I determined they were all too light duty for the workload of a vineyard the size I have, and none incorporated a blower system.
Next, I looked specifically for manufacturers of vineyard spray equipment and was quite impressed with the designs and quality of the options available. The problem with those, however, was that all the options were too large for my vineyard and tow equipment, and too large for the pocketbook of my backyard hobby. I then came to the conclusion that I had a winter project on my hands!
I searched the Internet looking for articles, blogs, and photos of projects similar to what I wanted to build. I was in need of information to help create the image and I found a few designs. They ranged from a small hand-towed unit to a gas-powered leaf blower mounted off the rear of a tractor with a single nozzle mounted at the end. I decided to build a mixture of the many different sprayers that I saw. I wanted it to be durable and for repair parts to be readily accessible from my local ag/farm center.
Parts and equipment list
Trailer:

Small utility trailer kit
¾-inch treated plywood decking
(2) wide turf tires
Spray system:
35-gallon (132-L) poly tank
(2) bulkhead fittings
PTO (power take off) roller pump
40-ft. (12 m) ¾-inch 300 psi
sprayer hose
In-line strainer
300 psi pressure regulator
200 psi pressure gauge with “T” fitting
(6) sprayer nozzles/tips/strainers/seals and caps
(16) ¾-inch MNPT x ¾-inch HB
nylon fittings
(5) ¾-inch nylon HB “T” fittings
(6) ¾-inch nylon female caps
(2) ¾-inch MNPT x ¾-inch HB metal fittings
(2) ¾-inch MNPT x ¾-inch FNPT metal street elbows
(2) ¾-inch full port brass ball valves
¾-inch MPT jet agitator
Roll Teflon tape
(45) stainless steel hose clamps
Air system:
8-hp parking lot blower
4-4-inch “Y” dust collector fittings
(2) Aluminum blast gates
(2) 4-inch 45-degree fittings
10 feet (3 m) 4-inch dust collector hose
(4) 4-inch wire clamps
5-inch x 4-inch x4-inch “Y” splitter
Custom fabricated adapter (blower to splitter)

Metal for rack and mount fabrication:
22 feet (6.7 m) 1.5-inch x1.5-inch steel square tubing
36 inches (91 cm) ¼-inch x 6-inch steel flat stock
Piece of ¼-inch x 16-inch x 12-inch steel flat stock
Large assortment of 5⁄16-inch and 3⁄8-inch
Hardware for assembly to decking
Tools needed:
Ratchet socket set
Combination wrench set
Screwdrivers
3⁄8-inch drill with bits
Measuring tape
Circular or table saw
Adjustable wrenches
Welder
Hand held and bench grinders
Drill press (optional)
Hand shearsUseful Websites:
www.sprayerdepot.com
www.teejet.com
www.dultmeier.com
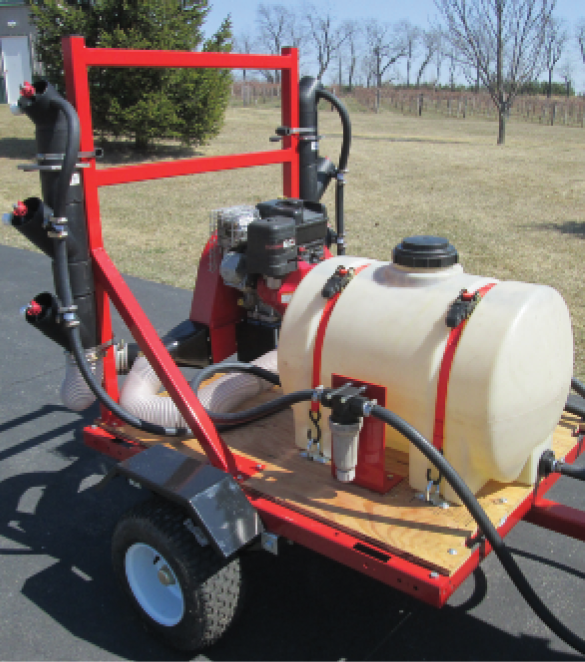
How to Assemble a Backyard Vineyard Sprayer
Step 1: The Trailer
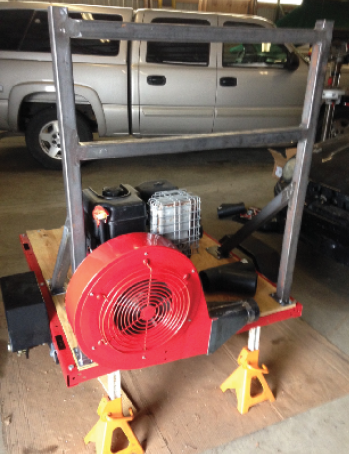
My starting point was my sub-compact tractor, which was too small for a 3-point mounted sprayer, but it had enough power and a PTO (power take off) output for running a trailer-based sprayer system. With my horse and sprayer power in place, I needed to come up with a cart as well as an air supply that was mobile, dependable and forceful enough.
First was finding a properly sized trailer. I found a 40-inch x 48-inch (101 x 122 cm) at a local tool store in a kit form. Once I assembled the trailer, I installed a ¾-inch treated plywood decking. I upgraded the tires to a wider turf-style lawn tire to help minimize rutting of my lawn and vineyard.
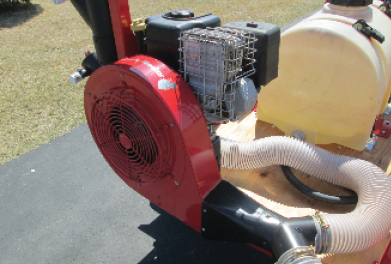
Step 2: Blower and Rack
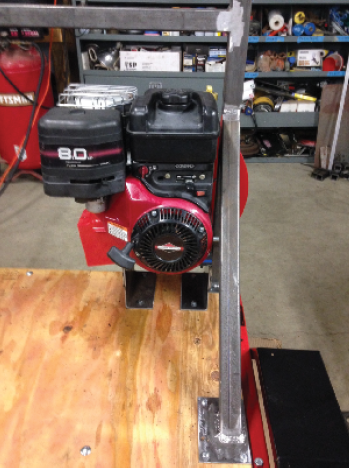
Next, I settled on transforming a parking lot blower to be my “Grape Blaster.” I located a used 8-hp blower that I found on the Internet, gave the motor a quick tune-up, and stripped it down to the motor, motor mounting plate, and blower/fan unit. After fabricating simple brackets and welding them to the motor mount, I was able to reassemble the motor and fan to the mount using appliance isolation pads to reduce vibration to the rest of the sprayer. I then mounted the blower to the trailer for initial mock up of the “rack.”
The rack was designed to support the air delivery tubes and sprayer supply hoses and nozzles. I chose to fabricate this out of 1.5-in. x 1.5-in. (~40 x 40 mm) square tube steel with steel plate bases for secure mounting to the decking. At this point, I also bent some flat stock into a mount for the inline strainer and a mount for the regulator and pressure gauge. All of the steel parts were powder coated for finish durability and appearance. (I believe the rack and mounts could be constructed from wood as well if preferred.)
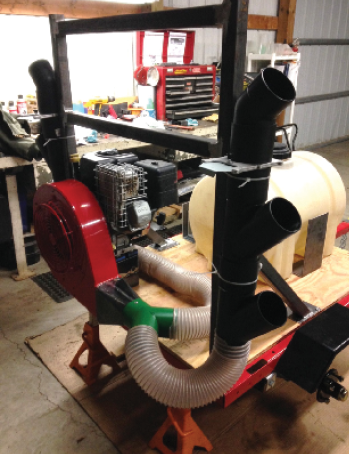
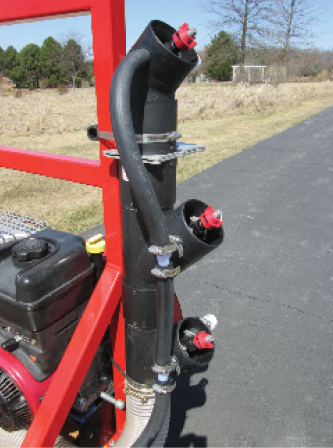
Step 3: Air Tubes
With the blower and rack in place I was able to work on the routing and mounting of the air tubes. A local sheet metal company fabricated an adapter to go from the blower housing outlet to a metal “Y” splitter. The splitter was needed to direct equal amounts of air to both sides of the sprayer. A walk through the home improvement center gave me the idea of using woodworking dust collector components to channel the air. I decided on 4-inch (10-cm) collector hose and ran this to the bottom of each air stack and secured with wire clamps. Each stack consists of 2 “Y” fittings, an aluminum blast gate and a 45-degree nozzle. I used screws to secure the air fittings and keep them from vibrating apart. The stacks are attached to the rack with rubber bumpers and large hose clamps. By loosening the hose clamps, I have several inches of adjustability in the height of the spray, and the blast gate helps regulate air flow to the lower air outlets. (Note: If necessary a second blast gate could be added to the air stack, between the “Y” fittings, for additional air control.)
Step 4: Spray Volume
The next challenge was figuring out how to spray with enough volume and pressure. After researching many different types, sizes, and ratings of pumps, I decided on a roller pump (22.5 gpm / 300 psi) made of stainless steel and with a coating to help minimize corrosion and wear from the spray chemicals. I went with a larger pump than what was probably necessary, but I wanted the flexibility to run different pressures and tip sizes if I found I needed to down the road.
Any formula needed for calculating pressures, volumes, and speed can be found at many different manufacturer and supplier websites. This is an important step of determining your spray details to ensure you have the correct nozzles and tips if you choose to build your own sprayer. I decided to go with a manufacturer that offers a series of hollow cone tips specifically designed for vineyards. Each nozzle assembly consists of barbed nozzle housing, strainer, rubber seal, stainless tip, and a quick release cap. The quick release caps allow me to change tips for a change in volume, or to clean the strainers. This can be done in seconds and does not require any special tools.
Step 5: Securing the Tank
A large box appeared on the door step in early February and I was ready for the home stretch. The order from the sprayer supply company had arrived and it was time to finish assembly and hope for a warm day to give the sprayer a test.
I secured the tank to the decking with 2 cam buckle straps and 4 “D” rings. I placed the shutoff valve at the rear bulkhead fitting with a hose running to the inline strainer and then to the pump inlet. From the pump outlet the hose runs to the pressure regulator. The bypass from the regulator is directed to the agitator nozzle mounted in the front bulkhead fitting of the tank and keeps the spray solution nicely mixed. Make sure to have long enough hoses to and from the pump to prevent any binding while turning. Also, I used brass fittings at the pump for added durability from increased handling and the risk of being damaged from the 3 point arms during turns.
Step 6: Finishing Up
After the regulator and pressure gauge, I placed a second shutoff valve. This allows me to stop flow to the nozzles and push all the fluid through the bypass for a good initial tank mixing. (Note: I suggest a lower PTO speed when doing this to prevent excess foaming.) From there I used a “T” fitting to run spray flow to both sides of the sprayer, another “T” was used at each air outlet with holes drilled for the hose and nozzles to snugly fit in and maximize the “air blast” effect. The backside of each spray nozzle is sealed with a barbed hose fitting and a cap.
Some additional assembly notes: All hose fittings were secured with stainless steel hose clamps. I used large washers on the backside of the decking to help secure all the anchor bolts, and u-bolts were used to mount the regulator and pressure gauge to the mount. Make sure to properly anchor and support the roller pump before using as well.

Finished Sprayer
I had a couple of warm days in March so I filled the tank with water and turned on the PTO for a test run. I had a couple of small leaks to tighten up and made some adjustments to the blast gate, but otherwise everything functioned as designed. Successfully building your own projects are always more satisfying and I am ready to spray this season!