Maceration Tips and Techniques
“Maceration,” says the Concise Oxford Dictionary, is to “soften by soaking.” In red winemaking it is so much more! Indeed, maceration may be viewed as the very essence of what distinguishes the making of red wine from that of white wine. With very few minor exceptions, all grapes have colorless pulp. To achieve the color, flavors, aromas and tannic structure for which red wines are known, the winemaker must extract critical component from their dark skins: maceration.
When home winemakers make red wine, it often seems like the goal is to extract as much of everything as possible out of the skins. That isn’t really how it goes, though. While we may think we never get too much color, it is entirely possible to extract too much tannin. The key is to get just the right amount of all the good things and not too much of the bad things when macerating grapes on the way to wine. While white grapes are sometimes allowed a bit of skin contact time, a maceration roughly equivalent to a “cold soak” for reds, neither color nor tannins are generally desired in white winemaking. A few hours of contact may contribute body and structure, but for the most part, maceration is of interest only in making red (or, briefly, rosé) wines.
The pigments in red or black grape skins are mostly polyphenolic compounds called anthocyanins. They are more soluble in water than in alcohol, so it is no surprise that color is best extracted in the early stages of winemaking. The other major group of polyphenolics in red wine, the tannins, include some fractions that are more soluble in alcohol than in water, so extraction increases as fermentation progresses. Because of these differences, the winemaker may be interested in enhanced maceration before, during, or after alcoholic fermentation. For any given lot of grapes, the key will be to balance extraction of color, aroma, flavor and mouthfeel through manipulation of the must. Maceration begins with physical breakage of the skins: crushing. It continues through some period of contact between juice and skins, progresses through rising alcohol levels during fermentation, and may extend to a contact period after fermentation is complete. Upon pressing, maceration and the extraction of skin components is terminated.
Common Ground
Almost all homemade red wine from grapes begins with crushing and destemming. The crushing, of course, breaks the skins and begins physical release of some components. While destemming may not seem like a maceration technique, one might think of it as “anti-maceration.” Stems are typically high in harsh, green-tasting tannins and if left in the must as alcohol rises, would make an unpleasantly astringent wine. Removing them with the crusher/destemmer begins the process of controlled and desired maceration. Since most home winemaking equipment crushes and then destems, some stems will be broken. Care must be taken to minimize that breakage by crushing slowly and steadily and allowing the grapes to be pulled into the rollers, rather than trying to push the most fruit through in the shortest possible time. Inspect the must as it falls into the catching tub and pick out any stems that manage to get through the stem grate. This is also a good time to remove any “MOG” (material other than grapes) such as leaves that may have escaped pre-crush inspection. While equipment is available that destems and then crushes, or just destems, those machines are usually too large and costly for most home winemakers. Grapes may also be destemmed by hand — just tear the grapes off the clusters over a fermentation bucket and discard the stems. That process is, however, very tedious and labor intensive for all but the smallest lots of grapes.

After crushing and destemming, some winemakers cold-soak. Since the color compounds, anthocyanins, are water-soluble, the cold soak contributes to improved color in the finished wine. As soon as the grapes are crushed, add about 50 ppm of sulfur dioxide to inhibit wild organisms. To avoid spoilage or a premature start of fermentation with wild yeast, the must needs to be maintained at a temperature low enough to retard microbial growth, generally below about 46 °F (8 °C). If you have a chilled wine cellar or walk-in cooler large enough for your fermentation bins, you may simply keep them in that environment during the cold soak. Most home winemakers will have to make do with ambient conditions. In that case, you may add dry ice — solid carbon dioxide — directly to the must and stir it in. WARNING! Do not use dry ice in a confined space. The sudden warming of the dry ice will release large volumes of CO2 that could quickly render you unconscious and could lead to death by asphyxiation. Dry ice pellets may be purchased at most welding gas suppliers; take a rigid-wall picnic cooler to carry them home. Do not touch the dry ice with your bare hands — it flash freezes anything it comes in contact with. Also, do not transport the dry ice in a closed cabin of your car — the bed of a pickup truck is a better choice, especially for longer distances.
A slower but safer way to chill the must without a large refrigerator is with conventional ice. Freeze a few plastic gallon jugs of water, sanitize the outside, and drop them in the must. Stir thoroughly and replace each day, watching the must temperature to keep it from rising to a spoilage level. However you cool the must, two or three days is usually considered sufficient for cold-soaking. Allow the must temperature to rise, and inoculate with yeast in the usual manner.
There is another pre-fermentation maceration technique used often enough that we may call it “common ground”: the use of macerating enzymes. Before the mid-1980s, pectic enzymes were sometimes employed to improve juice yield. In that decade, producers developed targeted macerating enzymes containing not just pectinases, but also cellulase, hemicellulase and other carbohydrase enzymes. By more thoroughly breaking down cell wall polysaccharides in the grape skins, these enzymes may go beyond improving juice yield to provide other maceration benefits. Possible improvements include improved color extraction, increased aroma and flavor, and improved body and structure.
Lallemand Lallzyme® EX and Scottzyme® Color Pro are examples of macerating enzyme preparations for red wine. Follow manufacturer’s instructions in using these products. Generally, the use rate is about 10 g for 1,000 lbs. (454 kg) of grapes. Dissolve the powder in one liter of water or grape juice and stir into the newly crushed must. If you have sulfited the must, wait 15 or 20 minutes before adding enzymes to allow the sulfite to dissipate somewhat. After adding enzymes, allow the must to sit overnight (or longer, if you wish to cold soak) before adding the yeast and initiating fermentation.
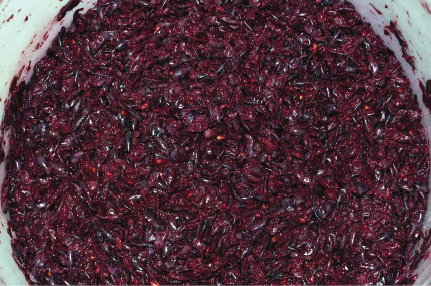
Once fermentation begins, additional maceration techniques are applied. As the grape skins become inflated with carbon dioxide, they float to the top of the fermenter and form a mat called the “cap.” Within the cap, the juice between the grapes is much higher in yeast population than the juice below the cap. The juice directly in contact with the skins becomes higher in color compounds and tannins than the general wine volume. Heat also accumulates in the cap. Since the surface of the cap may dry out and may be exposed to the air, risk of bacterial spoilage on the cap is higher. For all of these reasons, the cap must be frequently broken apart and mixed back into the fermenting wine. You want to distribute the yeast and heat, expose new wine to the skins in place of the saturated wine in the cap, and keep the top moist and protected from spoilage.
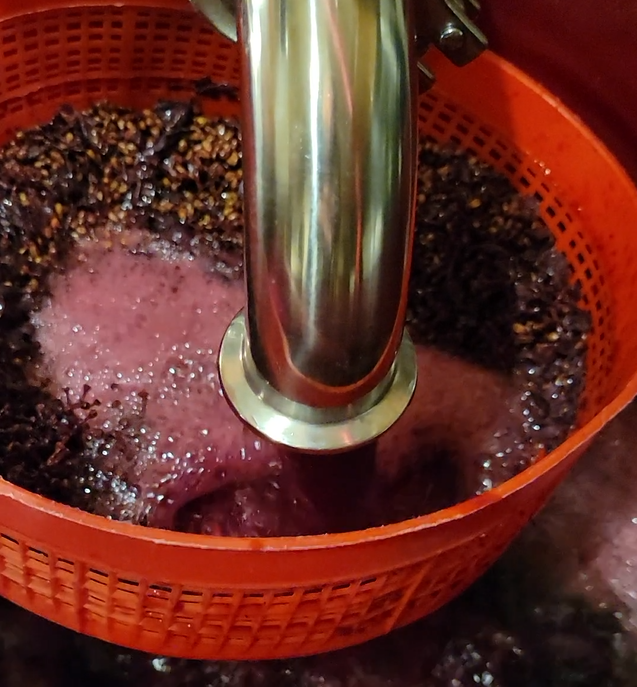
By far the most common mixing technique for home winemakers is the punchdown. While sometimes referenced by the French term “pigeage,” that word really means “trod with the feet” rather than just “punchdown.” In some shallow tanks, true “pigeage” is still the punchdown technique of choice. Once the cap rises, the workers step into the tank with well-washed bare feet and tromp from one side to the other and back until the cap is completely broken and mixed. For your punchdown at home, you will likely need a tool other than your feet. Home winemaking shops sell a variety of stainless steel plungers with wire or perforated disks for this purpose. You can also use a large potato masher or a plunger made of sap-free hardwood.
To punch down the risen cap, first sanitize the tool you will use. Since carbon dioxide is heavier than air, the open space in the fermenter above the cap will be full of CO2 when you take off the lid or tarp that you are using to keep fruit flies away. Yeast grows better and wine color is stabilized with some exposure to air in the first few days of fermentation. Therefore, you may want to fan off the carbon dioxide, replacing it with air, before you begin to punch. Similarly, after you push your plunger down through the cap and into the wine below, you may wish to lift it sharply, splashing the wine in the tank to get some air exposure. If the cap has risen very close to the top of your tank, begin in the middle to create a hole in the cap and allow grapes to fall toward the center as you continue. Avoid punching so hard at the bottom that you break seeds that may have accumulated there. Punch down at least twice per day during active fermentation. This is also the time to pay attention to controlling your fermentation temperature. As I mentioned earlier, heat will accumulate in the cap, so this is the time to start paying attention to maintaining a consistent fermentation temperature. Don’t let the fermentation create too much heat.
Red wine may be pressed early if a lower tannin profile is desired. Since tannins are more soluble in alcohol, pressing off the wine with four or five percent sugar still remaining will stop further tannin extraction. The fermentation then finishes in carboys, tanks, or barrels, much like a white wine fermentation. More commonly, however, red wine is pressed with little or no sugar remaining; a reading of 0 °Brix by hydrometer. If a more robust tannin profile is desired, the winemaker may employ our final “common ground” technique: extended maceration. This is the process of keeping the already-fermented wine in contact with the skins, pulp, and seeds for some period of time after completion. Note that the color does not increase during extended maceration and may even re-absorb or precipitate during this period. Increased color is best addressed earlier, through use of enzymes, cold soaking, or elevated fermentation temperatures. Extended maceration will continue tannin extractions and is thought to “mellow” or “round out” the tannin profile for some robust reds. Ideally, extended maceration would be carried out in a closed tank with an inert gas (carbon dioxide or nitrogen) introduced to the headspace to prevent oxidation. In conventional plastic fermenters, you may need to take extra precautions to avoid oxidation if you extend the maceration. Seal the fermenter as thoroughly as you can, opening it just once a day to mix the wine and taste it for softening of the tannins. As you reseal it, purge with inert gas. On the day the tannins seem to mellow remarkably, press the wine and finish in the usual manner. Remember, however, that excessive maceration promotes more extraction of seed tannin and if not checked frequently, will result in excess bitterness.
The Road Less Traveled
This next group of techniques, while well established in commercial wineries, may be new to many home winemakers. Specialized equipment may be needed, but can sometimes be improvised in the home cellar.
Carbonic maceration is used to achieve light, fruity, easy-drinking red wine. French Beaujolais Noveau is produced by this technique and is released every year in November, rather closely following the harvest. This is a whole-cluster technique and is best carried out in a closed tank. I have made a Merlot this way in a 100-L (26-gal.) floating lid tank and the process worked very well. In large commercial tanks, the whole clusters are loaded in and the weight of the grapes themselves crushes some of the fruit, producing a bit of juice at the bottom, which will begin fermenting with indigenous yeast on the grapes. On a small scale, you may wish to crush and destem about 10% of the lot of grapes and pour this in the tank first and add some selected yeast to it. Then, load the whole clusters in the tank. Since a carbon dioxide atmosphere is essential, it is best if you can run a CO2 hose to the bottom of the tank and fill around it with the grapes. Run your gas line through the bung hole in the lid, put the lid on the tank, then add CO2 to displace the air. If you place a short candle on the lid as you add the gas, the carbon dioxide will extinguish the flame once all the air is out of the tank and the CO2 layer blankets the lid. Seal the tank with a fermentation lock and keep it at warm room temperature for several days. During this time, intra-cellular fermentation occurs in the whole grapes, using up a large amount of the sugar and producing alcohol. Once this process slows down, press the grapes. They do not need to be crushed as they will have softened during the carbonic maceration, although they still look very much like whole clusters. Finish the fermentation in closed carboys or tanks, fine or filter, bottle soon and drink young!
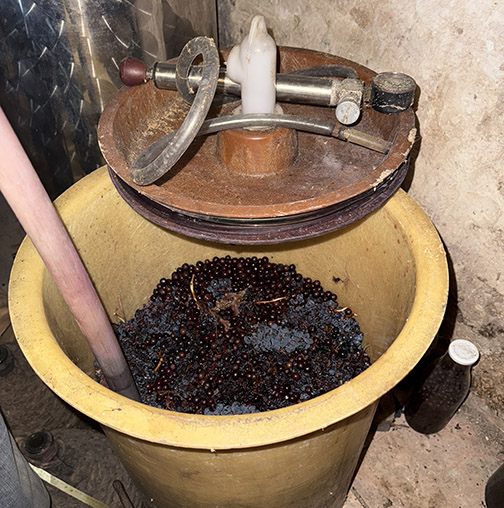
To avoid extraction of harsh seed tannins, winemakers may use the technique called rack-and-return (or, in French, délestage). Commercially, specialized tanks are employed, but the technique can be improvised at home. In a rack-and-return fermentation, the actively fermenting wine is drained through a valve (racked) from the bottom of the tank. Seeds that are entrained with the wine are separated by a screen or sieve and discarded. After the cap settles completely to the bottom of the tank, it is allowed to rest for an hour or two without the fermenting wine. Then, a high-volume pump is used to pour the wine back into the fermenter on top of the cap, breaking up the cap and thoroughly mixing the fermentation. The process aerates the wine and provides the other benefits of mixing as in punchdown, but also facilitates removal of seeds.
To set up a délestage at home, you will need a fermenter with a good-sized valve (one inch or larger, if possible) located on the bottom (if the bottom is cone-shaped) or on the side near the bottom (if the bottom is flat). For a flat-bottom tank with a side valve, arrange the fermenter on blocks to slant down toward the valve so seeds can slump into this area and be removed. After the cap has risen, once a day or every other day, rack and return. Drain out the wine into a bucket, running it through a sieve to collect seeds. Pour the wine into carboys using a funnel; discard the seeds. Seal the carboys with fermentation locks while waiting. Leave the valve open to allow wine to continue to drain into your bucket as the cap settles. After an hour or so, when no significant amount of wine is draining, close the valve and “return” the wine. Rapidly pour the carboys of wine back over the cap, trying to fill the fermenter faster than the cap is rising. This will help break up and mix the cap, optimizing the process. If you have a high-volume pump, you may find it easier to pump the contents of the carboys over the cap, flooding it, rather than pouring. As the process is time consuming and laborious, you will probably want to alternate your délestage with conventional punchdowns.
A related technique used in commercial wineries is the pumpover, or remontage. Often used in closed tanks or those with only a small opening at the top, it allows mixing of the cap in situations that are not suited to conventional punchdowns. To do this at home, you will need a tank with a side valve that is positioned above the seed layer on the bottom of the tank, as seeds may interfere with the pumping. You also need a substantial pump; generally a must pump that can accommodate grape solids and has at least 11⁄2-inch diameter fittings. For each cycle, wine is pumped out from the bottom of the tank and sprayed over the top of the cap, breaking up the cap and mixing the wine. This process aerates the wine, mixes the yeast throughout the must, and improves contact of grape skins with fermenting wine. A target pumpover would be 1⁄3 to 1⁄2 the volume of the wine, once or twice a day.
Blazing New Trails
Rare as some of them are, the above techniques are not unheard of in home winemaking circles. In this last section are some techniques for maceration that are used commercially, but do not typically come up in home winemaking. The first is mechanical immersion. This is a fermentation carried out in a tank with a perforated plate (usually stainless steel) positioned below the top of the must volume. As the cap rises, it is caught under the plate and remains in contact with the fermenting wine. The technique has the advantage of very low labor input and the cap is protected from spoilage, but that is about the extent of it. Since the cap is not actively mixed with the wine but merely submerged in it, the yeast population and heat are not as well distributed as in other maceration techniques. No beneficial aeration occurs. The wine nearest the skins is only displaced to the extent that bubbles rising though the submerged cap move it around. If you decide to try this at home, it will probably work best in a stainless steel tank.
As an aid to rapid fermentation and quick turnover of needed capacity, commercial wineries sometimes use rotary fermenters. These are horizontal stainless steel tanks that resemble stationary cement mixers. Red must is loaded through a large port, the port is sealed closed, and the entire tank is rotated to mix the contents. A spring-loaded vent valve allows carbon dioxide to escape when the tank is right side up and closes to prevent leakage as the tank turns. The tanks are often equipped with spiral blades on the inside wall to facilitate mixing as they turn. Modern examples may include an air injection apparatus to gain the benefits of must aeration as well. Often under computer control, a rotary fermenter is slowly turned a few times a day. This method has the benefits of thorough mixing and can include aeration. Fermentation is often complete in only three or four days, allowing the winery to use the fermenter for another batch of wine. Because of the short fermentation and relatively aggressive mixing, some winemakers believe rotary fermenters make harsher and simpler wines than other maceration techniques. I have not seen a rotary fermenter for home use, but that does not mean there isn’t someone tinkering with it.
How Will You Macerate?
Maceration must be kept in balance for the desired wine profile. Pre-fermentation cold soaking and enzymes may be employed. During fermentation, we can choose punchdown, rack-and-return, carbonic maceration, pumpover, mechanical immersion or rotary fermentation. Post-fermentation, we have the option of engaging in extended maceration. How will you macerate your next red wine?