TA or titratable acidity — sometimes referenced as total acidity — is one of the most important contributors to the taste and stability of your wine. While it is linked to pH it is loosely linked and one of these measurements cannot substitute for the other. We need to measure TA independently of pH and that is what this column is all about.
TA has one clearly identified method of analysis because the answer itself — titratable acidity — defines the means of determining it. It is exactly the amount of acid as determined by titration that makes it TA. Unlike, say, the tartaric acid content or the copper concentration in a wine, for TA you apply the prescribed method and the result speaks for itself. That is, you could use any of several well-established and rugged analytical procedures to analyze for copper content, but for TA you must do an acid-base titration of a wine sample following a specific procedure using a strong base as the titrant.
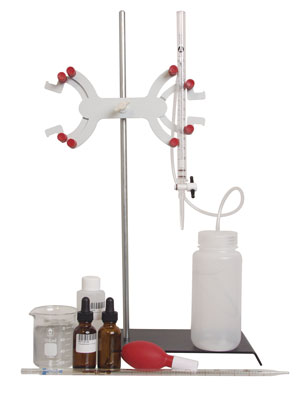
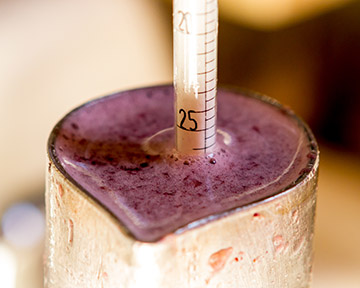
A quality titration set comes with buret with a stopcock that can add the titrant one drop at a time to measure for a wine’s TA. Photo courtesy of MoreWinemaking.com
TA is mostly about tartaric acid and malic acid as those dominate in grapes. There are smaller amounts of citric and succinic acid and lactic acid comes along later as a conversion from malic acid during malolactic fermentation (MLF). All of these are referred to as fixed acids to distinguish them from the volatile acids like acetic acid and butyric acid that are spoilage products. All of the fixed acids, when titrated together for TA, are reported as tartaric acid equivalent.
Tartaric acid is a dicarboxylic acid, meaning it has two hydrogen atoms that can be titrated in the TA test. Malic acid is also dicarboxylic. Lactic acid on the other hand is a monocarboxylic acid, with each molecule featuring only one titratable hydrogen atom. That difference is what causes the drop in TA after MLF — from the dicarboxylic malic acid to the moncarboxylic lactic acid.
The combination of fixed acids produces the tart flavors of wine that contribute so much to its appeal as an adult beverage. Malic acid has a sharper taste than tartaric acid even though there is usually less of it in the grape. Indeed, Warheads Extreme Sour Hard Candy derives its sourness primarily from a coating of malic acid. Lactic acid is milder than both tartaric and malic, leading to further mellowing of flavor with malolactic fermentation. If the acid level is too low in grape must, the wine is likely to taste fat or flabby, lacking sharpness and definition. Low acid content also implies high pH, which results in instability as described in the June-July 2020 issue’s “Techniques” column. If the TA is too high, the wine will taste excessively sharp and potentially unpleasant, although leaving some sweetness may achieve a lemonade-like balance of flavors.
At grape harvest for dry wine, we usually look for a TA of about 4 to 6 g/L (0.4 to 0.6 g/100 mL) in reds and about 5 to 8 g/L (0.5 to 0.8 g/100 mL) in whites. Different laboratories and test kits may report in either units, grams per liter or grams per 100 mL. They differ just by the factor of 10 since one liter is exactly ten times the volume of 100 mL. You may use either designation in your own notes, but be aware that you may see either one on a wine bottle or in a wine critic’s tasting notes.
A use for TA testing beyond flavor and stability is to help as a harvest indicator. That is the first time the test is applied in a particular vintage. You can collect 100 or so grapes from throughout your vineyard, put them in a zipper-type sandwich bag, and pop each grape with your fingers. Squeeze the bag a few times to release the juice and then you can pour out a sample for testing. If your result is much above the levels noted, it implies that your malic acid level is still too high and the grapes are not yet mature. If too low, you will either need to pick right away or add tartaric acid later or both. When you do make the picking decision (or when you receive purchased grapes) will be the next testing moment. You will crush and stir the must, then drain off or scoop out a sample of juice for testing. If crushing day has you too busy to do the test right away, put the covered sample bottle in the refrigerator and then let it come to room temperature again the next day for testing. This crush day test is probably your most critical TA analysis as it will inform you about any need to add acid or possibly to deacidify. When must needs acid adjustment, many winemakers prefer to do it as early in the production cycle as possible, feeling it better integrates into the final wine. If I need to add acid, I will typically just add half of the indicated amount early and then test again later. It is much easier to add a little more acid later than it is to back compensate for having added too much.
You can verify that the addition worked or that the natural acid is still in the right range by running the TA test again after fermentation. It may have changed a bit through the process, but should still be close to the desired range. Next, if you do MLF, you can test again to see how much the TA dropped in the conversion of malic to lactic acid. You cannot predict that drop from TA alone, since the original acids are titrated together and you do not know the ratio of tartaric to malic in your particular must. Once again, you want to verify that the TA falls in the desirable range for your wine type and style.
If I need to add acid, I will typically just add half of the indicated amount early and then test again later. It is much easier to add a little more acid later than it is to back compensate for having added too much.
The principles of testing TA are very simple. A measured portion of juice or wine is placed in a small beaker or cup and a solution of a strong base, sodium hydroxide, is added to it in measured amounts. A syringe or buret is used for dispensing the sodium hydroxide titrant. Some test kits rely on the color-changing pH indicator phenolphthalein, which goes from colorless at acid pH to pink near pH 8.2. The indicator can be supplemented or replaced by a pH electrode and meter with a digital endpoint of pH 8.2. Select an electrode with a fast response time to avoid bypassing the endpoint as you titrate. Calculating the TA depends on the sample size you titrate and the concentration of sodium hydroxide you use. Instructions with your kit should have the details of the calculation. Following are examples of a basic kit method and a more advanced home wine lab setup.
Country Wines is one popular brand of basic TA test kits and other similar kits work the same way. A small cardboard box contains a clear plastic beaker, a 10-mL syringe, a bottle of 0.1 N sodium hydroxide titrant, and a dropper bottle of phenolphthalein indicator. You measure 10 mL of wine into the beaker and add a few drops of indicator. Rinse the syringe with distilled water, empty it, and fill to exactly the 10.0 mL mark with titrant. Swirling the beaker with one hand, add titrant from the syringe with the other. Watch for a flash of pink where the drops contact the wine. As you swirl, the pink will disappear as the acid neutralizes the titrant. Soon, the pink zone will last a few seconds. Stop titrating at the first persistent pink color throughout. Subtract the remaining volume in the syringe from 10.0 to determine mL used. TA in g/100 mL is mL used x 0.075.
The advantages of a kit like this are that it is inexpensive, quick, and easy. It is reasonably accurate for home winemaking as long as you can see the endpoint well. That is more difficult in red wine or dark must. To lighten a dark sample, you can dilute it 2:1 with distilled water prior to measuring your 10 mL portion, then multiply the answer by 2 to get your final result. Avoid diluting more than that. Kits cost less than $15.
The best answer to titrating dark red wines is to get a pH meter setup. For the best results, use a bench top pH meter with an electrode holder, pH buffers to calibrate it, a 10 mL buret for titrant, a magnetic stir plate with stir bar, a glass or plastic beaker, standardized sodium hydroxide solution (typically 0.1 N or 0.067 N), and phenolphthalein indicator. You can use the beaker, titrant, and indicator from a kit as parts of this setup.
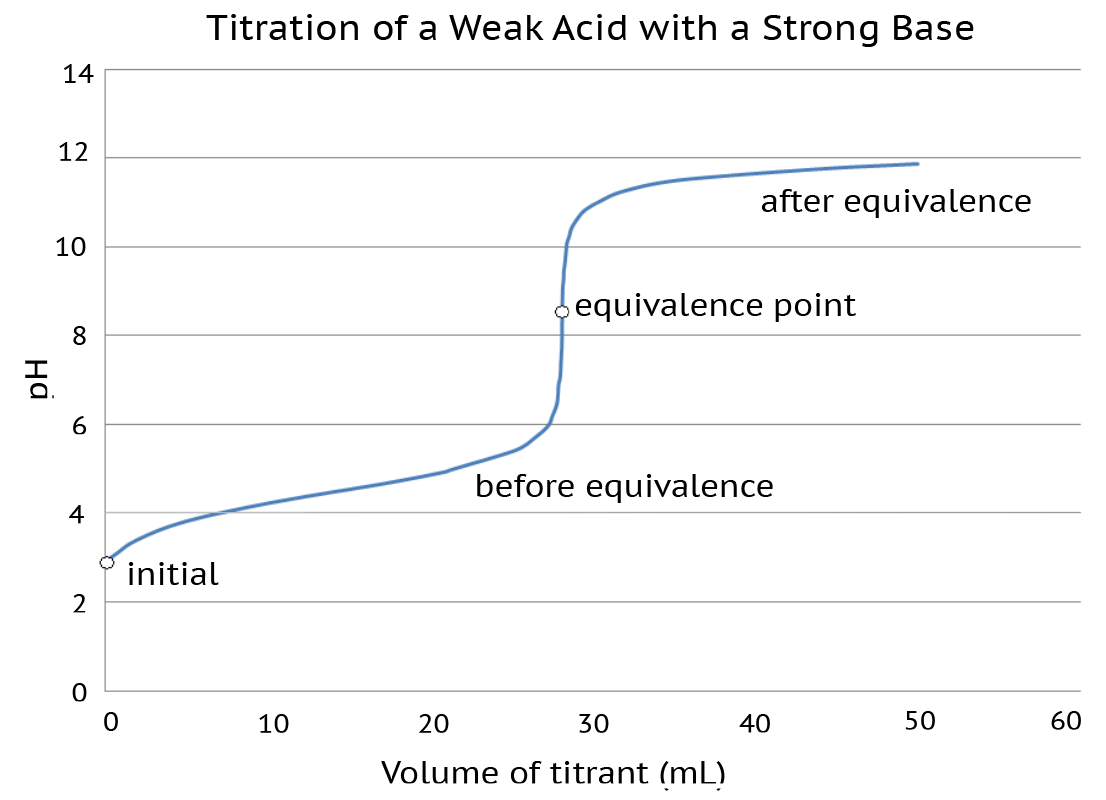
Being slow and steady with your titrations is important since the equivalence point is easily overshot as seen in this graph. And since the indicator solution we use to tell us we have reached the equivalence point is pink, a pH meter is the best way to tell when that point is reached with red wine.Graph courtesy of Wikimedia Commons
Carbon dioxide dissolved in the wine will titrate as an acid, but is not part of TA. This could cause erroneous titration if you are testing right after fermentation before the wine has degassed. To avoid that problem, heat the wine sample to 140 °F (60 °C) to drive off CO2. Cool to room temperature. Also boil and cool distilled water that you will use for the test. Add some of that water to the beaker to enough depth to submerge your pH electrode tip while remaining clear of the magnetic stir bar. Measure in 5.0 mL of wine and begin stirring. Add a few drops of phenolphthalein. Fill the buret to 0.0 with titrant and then add dropwise while watching the pH. As you approach pH 8.2, you will see the same pink zone described earlier — seeing it will help you slow down your additions near the endpoint. When the pH reaches (or first passes) 8.2, stop adding and note down the mL of titrant used. With this method, the calculation using 0.1 N NaOH is:
TA (g/L) = [(mL titrant) x (N of titrant) x (0.075) x 1,000]/(mL of wine)
Using 0.067 N NaOH eliminates the extra math and the equation reduces to, for a 5 mL wine sample: TA (g/L) = mL of NaOH used. Advantages of the lab method are improved accuracy and precision, independence of visual detection of the colored endpoint, and good correlation of results if you also send samples to a commercial laboratory. Disadvantages include higher cost, more complex execution, more cleaning, and required calibration of the pH meter. Depending on the meter and stirring options, expect to spend a couple hundred dollars. Replace titrant solution at least once a year since NaOH does absorb water and the strength of the solution changes over time. Also keep away from heat and light.
Sodium hydroxide is the only significant safety risk with either method. The very dilute solutions we deal with during titrations are not dangerous, but clean up any spills as any dry residue would be highly corrosive. As with any lab procedures, wear eye protection and rubber gloves. And when you’re done, you too can start printing the TA on the back label of your wine!