Tune Up: Calibrating your wine testing equipment
“Correlate readings of with a standard.” That simple definition of “calibrate” from the Concise Oxford Dictionary is often overlooked in home winemaking. Some winemakers rely on guessing or intuition instead of testing and even many who test just assume the answer they get is inherently correct. Unfortunately, neither of those approaches is entirely correct. Guessing is obviously risky, but why might a testing system or instrument be wrong? It is possible that the device was not properly calibrated before it left the factory. Or it may have been correct when new, but calibration can drift over time. In either case, your wine lab results would be false and you could ruin your wine.
Throughout the laboratory career I had before co-owning a fermentation supply store, I followed a set pattern for calibration. The first step is to present a synthetic or authentic reference sample of known value to the instrument. Then, you change the instrument reading to match the known value. If the instrument design does not allow such an adjustment, you record the offset of the true value from the indicated value and apply that correction to future sample readings.
The tests in this column are sugar (by refractometer and hydrometer), pH by electronic meter, temperature, and titratable acidity (TA). For each test, we will look at what it is, what it does, how it works, and how to calibrate it.
Sugar Levels
A refractometer is an analog or digital device that measures the bending of light through a liquid sample. A drop or two of grape juice is placed on the lens or prism, light shines through the sample, and the user records the analog value from an optical scale or the numerical value if it is digital. For juice we use refractometers graduated in degrees Brix — which is a measure of percent sucrose by weight.

To calibrate your refractometer, purchase a 20 °Brix sugar standard. That is a precisely prepared solution of sucrose in distilled water. Keep the bottle in the refrigerator to avoid spoilage, but let it come to room temperature before use. Put a drop or two on the lens and, for an analog meter, look through the eyepiece toward a bright sky and note the reading. If it is not exactly 20.0, use the tiny provided screwdriver to turn the adjustment screw until the line falls exactly on 20.0. Rinse and dry the prism and you are set to do measurements. Digital models vary with specific calibration routines. Using the same solution, follow the instructions that came with yours.
It is possible that the device was not properly calibrated before it left the factory.
Since pure water is 0 °Brix, you can calibrate at zero with that instead of at 20 °Brix with a reference solution. I prefer to use 20 °Brix solution because if there is any lack of linearity in the readout, 20 °Brix is a lot closer to your grape juice reading than zero is. Any linearity error after calibration will be much smaller that way. Note: Alcohol also affects light refraction, so use your refractometer only prior to commencing fermentation. After that, switch to
a hydrometer.
A hydrometer is often the first instrument acquired by a home wine-maker. This hollow glass tube has a scale in the stem, usually graduated three ways: Potential alcohol, Brix, and specific gravity. While brewers often use the specific gravity numbers, which display the density of a solution as a ratio to pure water, winemakers more often will use the Brix scale. The potential alcohol scale is just a calculation from the other scales. It estimates how much alcohol might be produced from a given sugar reading.
Since the floating position of the hydrometer is showing only the density of the sample, a “sugar” reading includes the assumption that the sample is a pure mixture of water and sucrose. Indeed, that is how you can calibrate your hydrometer. You can purchase a standard sucrose solution as described earlier, measure it, and record any offset correction that may need to be applied to future readings. Alternatively, just as with the refractometer, you can do a “zero” calibration. To do this, fill your test cylinder with distilled water at the temperature specified for your hydrometer, float the hydrometer in it, and record the offset from 0.0 °Brix to apply to future readings.

Although possibly less accurate than a 20 °Brix standard, it does not require a large volume of standard solution and is probably good enough for monitoring fermentation. Do not be concerned if a sugar reading on juice is not exactly the same for the hydrometer and the refractometer, even after both are calibrated. Neither is truly measuring “sugar.” One is measuring light refraction and the other is measuring solution density. As fermentation begins, just switch from the refractometer to the hydrometer and go on.
pH Meter
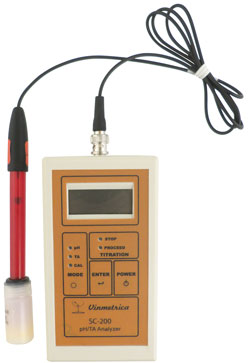
When you are ready to advance your home winemaking lab, pH will likely be the next number to monitor. Although you can buy little pH strips that turn colors on exposure to a sample, they are not accurate enough to be useful in winemaking. Most of them measure ± 0.5 pH. You will want to look at the better choice, a pH meter. These come at many price points and with different features, but basic principles are the same. The electronic part is a high-
impedance voltmeter — that means it resists passage of electrical current through the meter. The millivolts it measures are proportional to the hydrogen ion concentration in the sample and the result is displayed as pH. That measurement is carried out by a probe placed in the solution. The probe contains two parts: A reference electrode and a glass electrode. The glass electrode’s response changes on contact with a solution while the reference electrode remains constant. The change reports out as pH. Because the measurements reflect relative change, the particular probe and meter must be calibrated prior to use and periodically over time.
Calibration is based on presenting known pH solutions to the probe and applying an adjustment as needed. Those standard solutions are called buffers — they are solutions of predictable pH that resist pH change in the face of small environmental changes. We commonly use pH buffers of pH 7.0 and pH 4.0 (or 4.01). Once you have your pair of buffers, bring them and the meter to room temperature (68 °F/20 °C). Soak your electrode in tap water for at least 30 minutes. Do not use distilled water for this. You want some minerals in this water so you have a mix of calcium, magnesium, potassium, sodium, and hydrogen ions soaking into the surface of the glass electrode. It is displacement of other ions by hydrogen ions that produce pH readings. Rinse the electrode with distilled water, blot dry with absorbent paper, and place in a sample of pH 7 buffer.
At this point, follow the specific instructions that came with your meter, probably something like “press CAL.” Rinse and blot dry again, place in the pH 4 buffer, and press “CAL” or maybe “SLOPE” to set the second calibration point. There are two set points because the one you set first adjusts the response of the meter — the strength of the signal in that buffer. The second point sets the slope of the response line — the angle at which it proceeds from the first buffer response to the second. Because wine is nearer pH 4 than pH 7, I like to have 4 as the second buffer. If any error has been introduced, it should be smaller there and give you more accurate readings on real winemaking samples. Your pH meter instructions may recommend pH 4 first and then pH 7, which is correct for many general lab purposes. For wine, it is best to do it my way and calibrate 7 first, then 4 if your meter allows.
Temperature
You may not give much thought to calibrating a thermometer, but for sensitive tasks like rehydrating yeast it can make a difference. For home winery use, there are three different types of thermometers. Fluid that expands with heat fills a calibrated glass tube for conventional thermometers (alcohol-filled thermometers are safer than mercury-filled ones around the winery). A metal coil that expands with heat drives dial-type thermometers. A change in electrical resistance with heat — a thermistor — provides the sensing in a digital thermometer. Some digital thermometers have added value with a sensor probe on a cable that can be remote from the meter.
To calibrate any thermometer, boil some distilled water. Immerse your thermometer or probe in the boiling water, and note the reading. Nominally, it will be 100 °C (or 212 °F) at sea level. You can look up a boiling point correction for altitude here: https://www.engineeringtoolbox.com/boiling-points-water-altitude-d_1344.html. Then turn the dial to correct the reading, adjust the digital readout according to your thermometer’s instructions, or make a note of the offset to apply as a correction to future readings.
Titratable Acidity
Our final calibration builds on some of the others. This one is for titratable acidity or TA (also sometimes called total acidity). It is the sum of all acids in the sample, titrated as tartaric acid. A titration system consists of a vessel like a beaker, a graduated device to add standardized sodium hydroxide titrant like a burette or syringe, and a means to detect the endpoint like phenolphthalein indicator or a pH meter.
For a TA test, you measure a sample into the beaker and then add measured increments of standard sodium hydroxide to it. When the endpoint of pH 8.2 is reached, phenolphthalein indicator will turn pink and your pH meter will go to pH 8.2. You note the number of mL of sodium hydroxide added and calculate the TA. The general formula for this calculation is found in Wine Analysis and Production, by Zoecklein, Fugelsang, et al. In this notation, “N base” is the normality of the sodium hydroxide solution you are using. Common values are 0.1 N or 0.067 N, but with this formula you can use any standardized solution in a convenient range:
Titratable Acidity (g/L tartaric acid) = [(mL base) x (N base) x (0.075) x (1,000)] / [mL sample]
If you purchase a kit for the test, it may include a simplified calculation. TA is also sometimes reported as g/100 mL (roughly, percent) instead of g/L. To convert, multiply any g/100 mL value by ten.
For the test to be accurate, you must calibrate your pH meter as noted earlier. Very inexpensive and rugged pH meters for field use may be too slow in response for effective use in titration. Meters with a separate probe, portable or bench-top style, usually work very well. Calibrating the burette or syringe for accurate volume delivery is beyond home winemaking, but you can calibrate or standardize your sodium hydroxide solution. You need to either buy fresh solution every six months or so, or restandardize the solution you have, because dilute sodium hydroxide is subject to degradation over time that may invalidate your TA results.
Standard hydrochloric acid solution is much more stable than sodium hydroxide solution. If you want to restandardize, purchase standardized hydrochloric acid solution of the same molarity as your sodium hydroxide’s normality. Titrate 5.0 mL of this standard with your sodium hydroxide. Now calculate your own true standardized normality to use in the earlier equation as follows:
Standardized normality of your sodium hydroxide = (Labeled normality x mL hydrochloric acid) / (mL sodium hydroxide)
Use this value in your TA calculation.
So there you have it! Calibrations and standardizations for some of the most important home winemaking tests: Brix, pH, temperature, and TA.