Zinfandel Wine Case Study
The concept of a case study to help learn or understand a process is well known in the science and medical fields. During my previous career as a clinical laboratory scientist, my Friday afternoon lunch hours were occupied by a brown bag lunch teleconference delving into the symptoms, clinical, and pathological workup (and subsequent diagnosis) of a patient’s condition. So what does that have to do with winemaking?
The process of case studies can cross multiple disciplines, and in this article I will share a winemaking case study, from veraison until post malolactic fermentation (MLF), which provides information and the science behind how a particular Zinfandel wine was developed. When I say the wine was “developed,” I need to include some personal philosophical aspects of winemaking. While some winemakers like to see a recipe (as I include each issue in my “Varietal Focus” column), sometimes a recipe cannot be followed. Winemaking is a biological process, and all kinds of things happen along the way. There are conditions occurring in the wine that cannot be entirely covered by following a recipe. For a baker, a recipe is rigid; for a chef, a recipe is a guideline; for a winemaker, a recipe is great if everything follows the numbers, but it can be a disaster if something goes wrong. In this case study we will look at a real life winemaking situation stemming out of the 2014 harvest at University of California-Davis. Hopefully, with these details, you will be able to judge how best to proceed in these particular situations should you encounter them in your own winemaking endeavors.
This particular case study begins with a research wine lot that was produced last year at the UC-Davis pilot winery. The goal of the experiment was to see if there were any differences between five different clones of Zinfandel. For simplicity, I have assigned them names of Clones A, B, C, D, and E. The first order of business was to determine a specific harvest criteria; in this case, we chose ripeness and maturity, which would make things a little more difficult for a few reasons. Logistically, there was great distance between the vineyard site and the winery, so potentially we would have five separate harvest dates. Zinfandel is also one of those varieties that can have berries of differing stages of ripeness on the same cluster. So the first criteria was one of simple acceptance: To do this study we had to accept up to five separate trips to the vineyard. How we would achieve the second criteria is through careful field sampling.
As the summer progressed, with berry sugars approaching 14–16 °B, it was time to think about field sampling. This is the time of veraison. Veraison is a French term translated to mean the “onset of ripening,” where the berries of white grapes begin softening and the red grapes begin to change color from green to red. At the UC-Davis vineyards, I initiate sampling white grape blocks starting at fourteen days post veraison, and the red blocks about a week later when the color of the clusters are more uniform. The theory behind field sampling is that you are looking for randomized sample collection of at least 200 berries, which are randomly selected from the clusters in the block. While letting a human decide what is ‘random’ can be somewhat of a subjective process, we train our samplers to follow this regimen: Sample every vine, and every cordon of that vine, alternating cordon positions from vine to vine, in addition to randomizing the location on the cluster. The samples are brought into the winery, analyzed for Brix, titratable acidity (TA), and pH. We then taste the remaining juice for flavor.

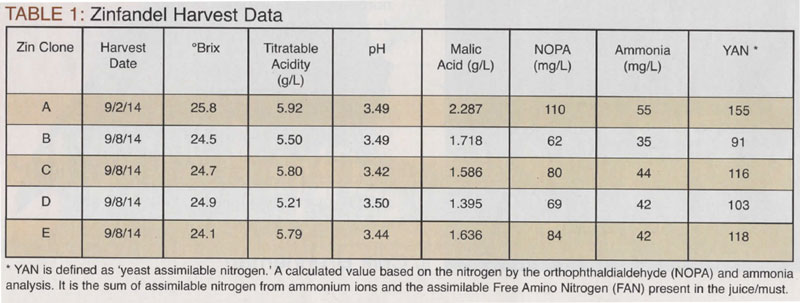
For our experimental Zin, as the summer of 2014 progressed, we determined that only one clone stood out as being significantly ahead of the others and there would be two harvest dates. Harvest data is listed in Table 1, below. To determine ammonia, I use this equation:
(Ammonia x 0.82) + NOPA = YAN
This equation takes into account that ammonia is comprised of 82% nitrogen and 18% hydrogen, hence the 0.82 multiplication factor.
From the harvest data, we saw several items that warranted discussion and associated decision-making based on the discussion.
Potential Alcohol (PA)
Assuming a standard conversion factor of 0.6, the PA concentrations for the experimental Zinfandel wines ranged from 14.5 to 15.5%. Zinfandel grapes are known “to soak up,” or in other words leach more sugar from the berries, and after 24 hours the Brix increases 1–2 °B, sometimes more are not uncommon. The challenge of high alcohol, i.e. above 14.5 °B, is that there is a danger of the primary fermentation slowing down, or for that matter sticking and the MLF being slow and not happening at all. Water additions are permitted in both home and commercial winemaking processes to facilitate fermentation (www.ttb.gov). The interpretation of this ruling is to give winemakers tools to prevent stuck or slow fermentations caused by higher alcohol levels. With the high alcohol in our Zinfandels, watering back was a decision we needed to consider. To calculate how much water to add, set up and follow the standard equation:
Where
M1 = Beginning Brix
V1 = Beginning Volume
M2 = Desired Brix
V2 = Final Volume

However: V2 = V1 + X
Where X = the volume of water needed
M1V1 = M2V2
Substituting for V2
M1V1 = M2(V1 + X)
Solving for X: X = M1V1 – M2V1/M2
pH, Acidity, and Potential Sulfur Dioxide Levels
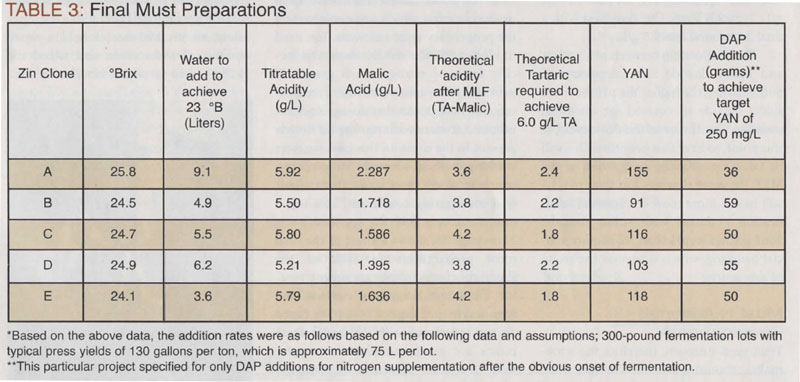
All the pH values of the Zin clones were in a good range. Any consideration for pH adjustment would come with respect to reviewing the acidity values. When adding acid to musts, it is best added at the must stage, that is, pre-fermentation. The idea here is to get it close, and then dial it in after the MLF. After the completion of the MLF, the acid should be measured again and evaluated for a subsequent addition (or reduction, as the case may be). As the MLF proceeds, there will be a concomitant rise in pH, relative to the depletion of malic acid. While the resulting pH in this case does not look unreasonable, the decrease in acidity is more of a concern. While some titratable acids are formed during primary fermentation, with the complete or nearly complete depletion of malic acid, the theoretical final TA would be around 3.6–4.2 g/L. Typically Zinfandel does best with a final TA around 6.0–6.5 g/L.
The relationship between pH, acidity, and sulfur dioxide is a complex one. Suffice to say, the higher the pH the more sulfur dioxide is required for microbial stability. The Zinfandel did not appear, at this point, to have that problem. This will be taken up after the completion of the MLF. In general, wines less than pH 3.6 will have a more reliable microbial stabilization potential with sulfur dioxide; wine greater in pH than 3.6 require special handling, which is beyond the scope of this article.
Must Nutritional Requirements
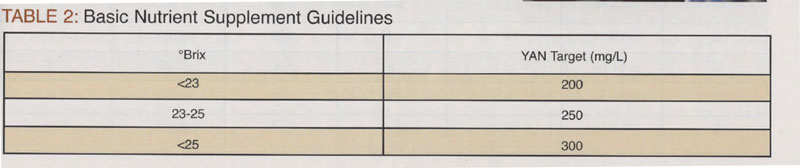
Yeast need nitrogen, therefore the winemaker should have an evaluation of the must nutritional status performed. This testing capability is beyond the scope of most home winemakers lab set/skill set, but there are outside reference labs that specialize in this and will perform the service for a fee. It is the individual winemaker’s prerogative to pursue this. The objective is to give the yeast just enough nutrients to complete primary fermentation. Nutrient supplements should be given in order to give the yeast everything they need for a successful fermentation. Basic nutrient supplement guidelines are generalized as in Table 2, below.
Nutrient supplements come in the form of di-ammonium phosphate (DAP) or proprietary yeast nutrients sold by companies such as Scott Labs, Lallemand, and Enartis Vinquiry. DAP yields 50 mg/L of nitrogen when used in the standard US dosing of 2 pounds per thousand gallons, which is the metric equivalent of 25 g/hL. Be careful to note that DAP is just nitrogen and should not be added to the yeast rehydration medium or must until it shows signs of fermentation. In some cases, the yeast need micronutrients, which are contained in the proprietary yeast nutrients. You need to check with the vendor about the specific levels of nitrogen each gram will provide. Most labels provide a recommended dosage, but that dosage does not take into account what nitrogen is already present in the must. In this case, we were working with a research lot of wine, which in many cases looks at standardized winemaking conditions.
The target alcohol on our test case wine was in the range of 14–14.5%. Based on my experience with Zinfandel, these musts are good candidates to “water back.” It was safe to assume we would get a good sugar-to-ethanol conversion so I was a little adventurous and targeted a starting Brix of 23°.
All of the clones required an acidity adjustment; we chose to target 6.0–6.5 g/L TA in the final wine by the addition of tartaric acid to all the treatments. In 300 pounds we estimate the volume produced will be about 20 gallons (~76 L), therefore a 2 g/L addition will be 152 grams of tartaric acid. Calculating acid additions is somewhat tricky and comes with experience. I concur that this is a shotgun approach, but so much happens during fermentation, that being the formation of other weak acids, which contribute to the TA, that I always take another look at the pH and acidity after the alcoholic and MLF fermentations. If I’m lucky, I will be spot on and no further adjustments are necessary, but that really depends on how the wine tastes, rather than what the ‘number’ is.
To make the additions, the tartaric acid is weighed and dissolved in the water required for water back. I personally make my acid and DAP additions separately, so in this case, I held a small amount of water aside, and added the DAP after the tartaric acid was mixed in.
The yeast, EC1118, was pitched after the must warmed to 77 °F (25 °C). An addition of 25 g/hL is standard.
The fermentation temperatures were not allowed to exceed 86 °F (30 °C), and the fermentation proceeded without a hitch until the Brix was about 2–3 °B when a smell of rotten egg came up in all the fermentations. It was not very strong, but was a definite indication that something was deviating from the norm. The culprit was hydrogen sulfide (H2S) being produced by the yeast. Presumably, they were running a little low on nitrogen, and they started scavenging sulfur containing amino acids in the must. The question begs, did we add enough nitrogen at the beginning? Even if the nitrogen were limiting, this would not be the time to add it, as the yeast would not assimilate it. Nitrogen additions when the Brix is less than 10° are not useful and only leave excess nitrogen around for some potential spoilage organism. I looked at the Brix curves and they all looked normal; as expected, they were slowing somewhat, but all looked like they would finish. In any event, the options to remedy the situation were pretty much limited to aerating the must during the final pump-overs. A little extra oxygen for the yeast would help build their cell walls as they adjust to the increasing ethanol levels and blow off the H2S as well.
We pressed each batch after seven days of skin contact and just as the Brix was passing through zero. We gave each batch a little extra aeration at pressing as well. While the sulfide smells had gone away, we were anticipating a little extra sugar being pressed out of the berries, and the primary fermentation would pick up a little. As expected, the fermentation did pick up a little so I kept the temperature around 77 °F (25 °C).
The alcohol levels ended up on the order of 1.5–2.0% higher than I predicted. I am not surprised, as I have seen this with Zinfandel before, which was the rationale for me targeting a lower Brix when I watered back. The ‘soak up’ in this case was more than I expected, thus the higher alcohols will change my strategy for the MLF. A little residual sugar in Clones C and E was of no concern as I could still visibly see the fermentation was progressing to completion.
At this point, I would have inoculated the new wine with the CHR Hansen product Viniflora oenos, a freeze-dried version of malolactic bacteria that is very commonly used. Instead, I decided to use another product by the same manufacturer called CH16. This is also a freeze-dried culture but is more alcohol tolerant. I like to follow the primary fermentation with the MLF because it is easier to monitor. The evolution of carbon dioxide through the MLF, while not as vigorous as the primary fermentation, is easily monitored, and when the rate of bubbles decreases, it would be time to start measuring the malic acid levels or performing paper chromatography testing.
Ten days after the inoculation with CH16, there were no signs of the MLF starting. Looking back on the post fermentation data, in addition to the higher than expected alcohol, the pH values were on the low side of where the MLF bacteria are comfortable, but certainly not completely inhibitory. We added a MLF bacteria nutrient called ML Red Boost (from Scott Labs), and 24 hours later, we re-inoculated with CH16. The wines were then stirred weekly. This is an old technique used to suspend the lees to add additional nutrient to the wine. The yeast cell components are released into the wine as the cells breakdown and are very helpful in getting low pH wines through the MLF. Within a few weeks we started seeing decreases in the malic acid concentrations in each wine, but it was obvious, this was to be a slow process.
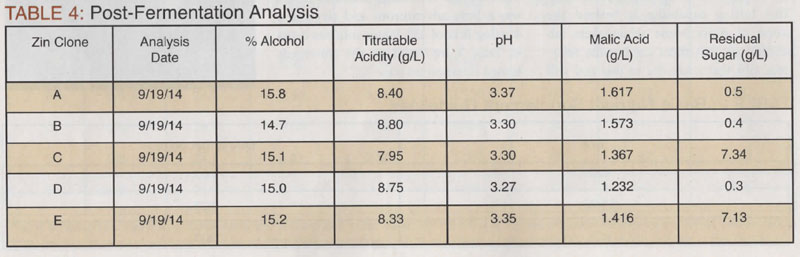
After six weeks, the first wines were completing the MLF. Interestingly, it was Clone A, the one that had the highest alcohol, that finished first. It was followed two weeks later by Clone C. Clones D and E finished in mid-January 2015. Clone B remains the one holdout, plodding along slowly, just passing under the 200 mg/L malic acid level around the first week of April 2015.
There is some risk in these secondary fermentations taking so long. When the wines are not copiously producing carbon dioxide into the headspace, there is a risk of the wines developing surface films, or turning aldehydic. In this experiment, we racked the wines into appropriate vessels where there was no headspace, thus minimizing oxygen exposure. We kept the temperature of the room at 68 °F (20 °C). As they completed the MLF, we were prompt on the first sulfur dioxide addition of 50 mg/L, waiting a week; measuring and adjusting appropriately in order to achieve 0.8 mg/L molecular.
Looking back, perhaps a co-fermentation of the yeast and bacteria would have been more successful. This would have allowed the bacteria to start multiplying before the alcohol levels got too high. We did employ this technique in the 2012 vintage, with the same study, and while successful, we had slightly higher volatile acidity (VA) concentrations. The bacteria converted glucose to acetic acid in some conditions.
Final Wine Analysis
Looking at the wine data from this study, I think we still need to look at how well we did with respect to TA and pH. It was a little worrisome seeing such high TA values immediately post fermentation. I sometimes second-guess myself with respect to acid additions. In my real- world winemaking (at home, as opposed to my real-job winemaking at the college), I never check the TA and pH until the MLF is completed. The reason being, is that there is not much you can do about them until the MLF is completed; at least in California. In retrospect, this exercise showed just how valuable that interim measurement was. It allowed me to see the conditions under which the malolactic bacteria were struggling. In the end, everything came out almost exactly where I set things out to be. After tasting the wines, evaluating for aroma, flavor, and mouthfeel, no further adjustments were necessary. Despite the challenges of the secondary fermentation, from a sensory standpoint, the wines are sound, contain no defects, and are everything I wanted them to be. I look forward to the sensory data to determine if real differences exist between the clones.
Winemaking is inherently challenging, and there are some styles of winemaking where the recipe is the most important component. Kit winemaking is a good example of that; kits have been optimized for success — if they weren’t, no one would continue to purchase them. Keep up on sanitation and each kit wine will be just as good as the last one. Winemaking from grapes is a different game. It is a biological process, where one organism after another, including the winemaker, have an influence on the final product. A sound understanding of the whys and hows of winemaking are the best recipe. That allows for sound decision making when something atypical starts happening. Grapes and wine don’t read books, and it is your experience with the process that gets you through the winemaking process. Taking good notes throughout your vintage helps you to make future decisions. It is best to take those notes at the time of observation or action. It is with these notes that perhaps you can develop a wine case study of your own.