On April 17 learn early to mid-season grape growing techniques for your small-scale vineyard with “Backyard Vines” Columnist Wes Hagen. Register now to ensure a smooth start for your vineyard this spring!
Q I purchased Pinot Noir grapes from Santa Ynez, California. The crushed grapes readings at harvest were 3.35 pH and 24.5 °Brix. When the grapes arrived at our location we confirmed those readings then put the crushed grapes in A cold room for four days. After the first day, the air conditioner (A/C) started to lose power and the room hit 70 °F (21 °C) for two days. By the time we discovered this fact, the natural yeast had taken off and reduced the must to 10 °Brix. At this point we added Lalvin BRL97 to finish fermentation and moved it on to malolactic fermentation (MLF). Two weeks later we picked up Syrah grapes with a pH reading of 3.55, which we again confirmed locally. The A/C was working this time so we were able to use our traditional yeasts we use for Syrah while the must was still at 24 °Brix. After fermentation we also put the Syrah through MLF. The pH of the Syrah was now 3.73. Unlike the Syrah, the Pinot pH has gone from 3.35 to 3.94. I checked my pH meter by checking against a cream of tartar solution (3.52) before testing the Syrah (3.73) and Pinot (3.94). I had consistent results over 3 different occasions so I have to believe the readings are correct. Any thoughts as to what would have caused such a dramatic shift in the pH? the native yeast?
Al Basiulis San Pedro, California
A I applaud you for trying fresh winegrapes in your home winemaking, you’re lucky that you are (relatively) close to a fine winegrape growing area like the Santa Ynez Valley. I grew up just down the California coast from there and one of my first harvests was at Curtis Winery in the area that at the time had its own estate vineyards containing Pinot Noir and Syrah. My current company grows many acres of Pinot Noir in Santa Barbara County and it continues to be one of my favorite grapes to work with.
The data you report for your Syrah is extremely typical. Syrah tends to come in quite high pH after MLF is complete, so your 3.55 to 3.73 shift is entirely normal. In fact, I’ve seen Syrahs with a 3.55 starting pH register in the 3.90s after MLF so 3.73 isn’t that high and is in fact quite a good number. Your situation with your initially acid-balanced Pinot Noir (pH of 3.35 at 24.5 °Brix), in contrast, is indeed a strange one.
Having a starting pH of 3.35 in Santa Barbara Pinot Noir is entirely normal. However, such a quick shift from 3.35 to a pH of 3.94 (indicating a large deacidification) is not. From a starting point of 3.35 I’d expect a pH of about 3.45 or so after primary fermentation and maybe 3.60–3.65 after MLF was complete.
First of all, because you had an uncontrolled feral fermentation, which dropped your Brix from 24.5 to 10.0, I’m sure that your wine went through primary fermentation (sugar converted to alcohol and carbon dioxide) and secondary fermentation (malic acid converted to lactic acid and carbon dioxide) simultaneously. There are many “wild” yeasts that can also metabolize malic acid (and you likely had some) so it’s entirely possible that by the time your primary fermentation was finished, technically so was your ML fermentation.
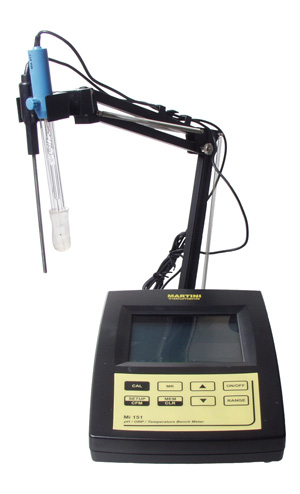
A good benchtop pH meter can reveal several aspects of grapes and fermentation that can go unnoticed to the casual winemaker.Photo courtesy of MoreWine!
That by itself, however, isn’t quite enough to explain the precipitous acid drop in its entirety. I also suspect that your pH number of 3.35 reflected a high malic acid content, so that, naturally, when all of the malic acid was consumed, the pH shift reflected its absence and posted abnormally high. I’ve had this happen to me before; some vintages just seem to be “high malic” years (a function of climate and growing season) and some vineyards are also “high malic” vineyards, seeming to produce fruit with a higher than normal proportion of malic to tartaric and other acids. You could get a sense of this (if you buy this fruit again) by sending a juice sample to a lab for a pre-fermentation malic acid assay.
I’ve got another suspicion about your feral fermentation organisms. Volatile acidity (acetic acid) is also produced by yeast and bacteria during primary and secondary fermentation, contributing slightly to the total acidity (TA) and pH of finished wines. While some wild yeast species (and cultured species as well) produce acetic acid, some like Lachancea thermotolerans actually consume it. If one of your wild yeast strains was a voracious acetic acid-consumer, it’s possible that the normal amount of acetic acid produced during a fermentation (it varies widely but could be 0.15–0.50 g/L), which would help keep pH low, wouldn’t be present. It’s hard to correlate between pH and TA in such a buffered solution and complex situation but if I had to guess I wouldn’t be surprised if a complete disappearance of acetic acid could contribute to a pH shift upwards of 0.05–0.15 or so.
The minute you crush a grape, you’re putting any organism that happens to be on the skins in contact with all of that tasty, sugary juice and fermentative chaos is the inevitable result.
So long story short, I agree with you, I think that wild party the feral yeast threw in your grape bin really did shift some things around. In the future, to knock down the activity of these rogue yeasts, and to make sure that your yeast of choice conducts your fermentations in a predictable way, you may want to make sure the crushing winery adds around 30 ppm SO2 (total, not free) to your grapes. Keeping the grapes cold is also critical, as you’ve found when the A/C quit on you. I also do recommend not waiting so long between the crushing and inoculating. The minute you crush a grape, you’re putting any organism that happens to be on the skins in contact with all of that tasty, sugary juice and fermentative chaos is the inevitable result. A little bit of chaos in winemaking can be a good thing . . . but a little control is also advised.
Q I’ve enjoyed reading about the home lab tests you should perform to make better wine, but what about wine made from wine kits. The instructions in kits usually only mention monitoring the specific gravity to monitor fermentation. I’ve followed the instructions religiously and have made some good wines, as well as some that are not as good. Some feedback I’ve received from recent competitions indicate that my acids were “off balance.”
In using kits, what should you measure for and when?
Ted Welch Glenwood, New York
A Wine kits are so wonderful because they tend to be easier and more predictable than just starting from a fresh batch of grapes. Kits have instructions to follow and you’re right, most of them only have you measure the specific gravity (or Brix) to monitor the fermentation. The idea is that the acidity levels are “built in” and if you add all the powders, do all the mixing and follow instructions, the final pH and TA (and as a result, the final flavor balance) is predestined and will come out “just right.”
Or will it? “Just right” depends of course on your taste and the tastes of the person who engineered the kit in the first place. Personally, I think that kits are made to be crowd pleasers, which is another way of saying they skew towards rounder, sweeter, and less acidic than you might want. Now, I’m not saying that they’re made to have dangerously high pH’s (low acidity), but there’s no doubt that lower acid level contributes to a wine that’s easier to enjoy sooner, something that some kit winemakers might appreciate. Competition judges, however, tend to be trained and experienced wine tasters if not winemakers themselves. That means they appreciate and will look for a competition entry to approximate the quality and typicity of professionally-made wines, which often carry a decent amount of alcohol, acidity, tannin, aroma, and character. I’ve got to be honest and tell you it’s tough for shelf-stable concentrate and powders to possibly approximate the complexity of a fermentation made from real fruit material, with the skins, seeds, warts, and all.
All of which means that I think you’re right, you probably can improve your kit wines by paying a little bit closer attention to their acid balance. Doing this is no easy (or cheap) feat. It involves testing at multiple points and making measured tweaks when necessary and appropriate. I could write an entire issue of WineMaker magazine on the topic and indeed whole articles here have been. To answer your specific question, and to give you some direction in which to head, see my tips that follow for a list of when you might want to pay a bit more attention to the acidity (or lack thereof) of your wine. Some kit wines are sometimes a bit, shall we say, lackluster . . . which means they just might not have the guts to stand up to robust acidity (this can happen with fresh grape winemakers too!). That’s a caution to listen to your material (kit or otherwise) and try to get a sense of where it can go — but also where it cannot go. Please remember that when adjusting acidity, always do bench trials, taste as you go, and be careful of over-acidifying. If that happens, you’ll definitely find your wines out of balance. Points at which commercial wineries measure acidity (critical points for home winemakers are highlighted in yellow):
• In the field (for deciding when to pick): TA, pH, malic acid
Home winemakers may be able to get by or rely on taste. I don’t do the above for most of my picking decisions, I go on experience. However, if you’re getting new grapes from a new vineyard for the first time, these numbers can be a good baseline and can help you with your decision.
• After crush/juice phase: TA, pH, malic acid, volatile acidity (VA)
These are your baseline numbers on which to base your tartaric acid adjustment for fermentation and are very important to measure. If you don’t have the equipment for titration and a pH meter, send out to your closest local wine lab.
The VA measurement is to get a baseline to measure future activity against. High VA is often a sign of yeast or bacterial spoilage and tends to increase as wines age.
• After primary fermentation: TA, pH, VA, malic acid
• During malolactic fermentation: Malic acid every 2 weeks
Home winemakers can probably get away with measuring every 3–4 weeks.
• After completion of MLF: TA, pH, VA, malic acid
• Monthly: VA (to keep track of possible spoilage)
Home winemakers can probably get away with measuring VA every 2–3 months.
• Bottling: pH, TA, VA
Except for VA, home winemakers can get away with just having some going-to-bottle numbers, that I’d hope they’d check to make sure that the wine wasn’t getting attacked by spoilage organisms.
Q Professional winemakers measure more data points because, having labs in-house or contracts with large wine laboratories, it’s cheaper and easier for them to get the information. We also have to anticipate and track the evolution of our wines for the larger commercial marketplace and for historical as well as quality control reasons naturally want and need more data. If you’re trying to save money, don’t feel like you have to be on the data geek squad with us; we get it.
I read in many publications to only add enough SO2 to bring the total must up to 50 ppm. I also read quite a bit about adjusting the wine (pre- or post-pressing?) based on the pH level. My question is — would it be best to add potassium metabisulfite based on the pH post-crushing or just go with the 50 ppm calculation?
Ron Rudnick Liberty Lake, Washington
A For harvest purposes, when adding SO2 to grapes in order to knock down feral yeast and bacteria (with the goal of reducing VA and letting your yeast of choice get a foothold), I tend to add 35 ppm total SO2 (calculate based on 1 ton of grapes = 170 gallons wine/1 metric ton = 710 liters). 50 ppm seems a bit much unless your fruit is compromised by mold, rot, or Botrytis, etc. That being said, if I know I’ve got high pH fruit to begin with, like a hillside Syrah I know will land post-crush over 3.7 pH, then I might up it to 40 ppm.
In the fruit stage, I don’t sweat it so much and neither do many winemakers. This addition is a theoretical target as well. It is a bit of an over kill if a winemaker was taking sulfite readings to make sure they’ve hit their target at this stage in the game. Adding a little over or under won’t hurt too badly because much of the excess free SO2 will get bound up during fermentation whereas a slight under-addition will be OK. On the other hand, when a wine is finished with fermentation, and especially when it’s clear and approaching bottling, you have very little wiggle room for error. For long-term bulk aging (in carboy, barrel, or tank) it is important to take final pH into consideration and err on the high side for low-acid (high pH) wines in order to give them a fighting chance against oxygen and microbes.
Adding a little over or under won’t hurt too badly because much of the excess free SO2 will get bound up during fermentation whereas a slight under-addition will be OK.
Don’t forget, you can always help the situation by making sure your wines are in the microbial “safer zone” by keeping your whites under pH 3.55 and reds below 3.75. Most of you know I’ve never been an advocate of trying to achieve the “molecular SO2 gold standard” of 0.8 ppm (mg/L) of SO2 because for most modern-day reasonable table wine pH’s, you’d have to add so much sulfur dioxide the quality of the wine could be compromised. Not such a good goal, eh?
Q I received a mini-American oak barrel for Christmas that isn’t charred. How well would this work for a red wine? Is there any way I can toast the inside? Will I need to add toasted oak to my oak barrel? I’m fairly new to winemaking and have only made a couple of Winexpert kits so far. They have been fine, but I’ve wondered if this is the best brand out there? Thank you for your time.
Patricia McGrath Downers Grove, Illinois
What an intriguing question. I’m having some pioneer-prairie-blacksmith-shop fantasy thoughts on how you might be able to toast the inside of your barrel on your own. Depends on how crazy you want to get. Before I go there — with all the non-OSHA approved tactics — let me address your other mini-questions.
“Untoasted barrel — how will this work for red wine?” I often use about 1⁄3 untoasted wood in my wine aging. It contributes mouthfeel and finish (not to mention barrel-aging dynamics like micro-oxygenation) without contributing toast or char. It’s a net positive. However, you won’t get the typical “toasty” elements one might expect from oak-barrel aging. “Will I need to add toasted oak to my oak barrel?” You could but you don’t have to. Use toasted oak chips in a nylon stocking a la easy tea bag style. You’d be surprised by all the high-quality oak chips, beans, segments, and pieces available today.
“I’ve only used Winexpert — is this the best brand out there?” Winexpert is one of the two major manufacturers of wine kits, RJS Craft Winemaking being the other. Both have a full spectrum of kits, ranging from the affordable value brand kits, to the much pricier high-end kits. Not knowing what line of kits you purchased from Winexpert one generality is that the value brand kits have more concentrated grape juice, meaning more water is added to reach proper volume, while the higher-end kits have less concentrated juice so less water is added, while the top-end kits generally are 100% grape juice. The higher end kits often have grape skins included in their red wines to get some tannin/polyphenol extraction during fermentation as well. I know in WineMaker we frequently write about kits and each year we run our annual WineMaker International Amateur Wine Competition where wine kits are judged up against fresh grape wines. So you can flip though some issues, or the website, for topic specific article and check through the results of the various winner’s circles from the Competition to see what kits are winning awards. Each December-January issue of WineMaker, we publish a Top 100 Kits based on results from that year’s Competition as well. Finally, you may want to check out my response to Ted earlier in this column for possible help with acid balance, as that can be one of the keys to crafting a balanced wine (kit or otherwise).
Now, on to how to toast your own barrel, if you’d like to. In an abundance of caution I’ll say “don’t try this at home” and indeed, I never have, but I imagine that if you heated up some small metal bits, say like some screws and nuts, and somehow rolled them inside your barrel, you’d heat and toast the inside. Your barrel is already fully formed so you can’t upend the barrel head over an open flame like the coopers do, but how about heating up (in a fire or a very hot oven) a length of chain, then with tongs and gloves feeding that through the bunghole and rolling it around on the inside of the barrel? Quench with water if it gets too hot, and watch for burning/charring aromas. I’d go for a nice toast as opposed to a big burn. I’ve never done this before myself but if I were in your situation it’s what I’d try . . . very carefully.