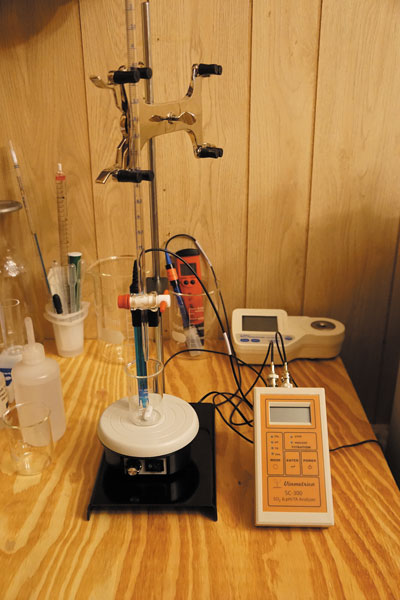
Free SO2, Bottle Drop, First SO2 Addition, and Oak Sanitation
Q Last fall, I purchased a Vinmetrica Free SO2 tester and tested/adjusted the 10 kits that I had going. After I adjusted (based on pH) I’m bulk-aging all of them in 6-gallon (23-L) carboys. Is there any reason for me to “re-test” the free SO2 after 12–18 months, or can I rest assured that they’ll be fine? (I’m not a fan of blind faith, if there’s anything I can do about it!)
Paul Scott
Southfield, Michigan
A Good for you for investing in a way to track your free SO2 (FSO2) levels. It’s one of the most important ways we can keep our wines safe. You can buy something like a Vinmetrica kit or send out samples monthly to a local wine analysis lab (like ETS here in Napa County), which is what I do for many of my own commercial wines, when the winery I’m working out of doesn’t have its own free-standing lab.
Yes, you just read correctly — monthly. FSO2 gets bound up quickly and is essentially used up in the wine as it reacts with wine components, especially when the wine is young. It’s only a portion of the FSO2 that is doing our antimicrobial and antioxidant work, so depending on the pH of your wine (high-pH/lower-acid wines need more sulfur dioxide to be protected from oxidation and microbial spoilage), you’ll want to keep your FSO2 hovering between 25–35 ppm all the time.

Like I said, it’s standard industry procedure for wineries to sample each lot for VA (volatile acidity) and FSO2 every month. If your VA is climbing and your FSO2 is under 20, it’s a good indication that you’ve got an active bacterial infection and will need to take quick action. You’re potentially lucky in that you’ve got all of your wine in smaller vessels, so if one vessel goes bad at least (hopefully!) the others won’t have. The downside to your small storage regime is that you’ve got a lot of vessels to sample and keep track of, and you might lose a lot of wine in the process.
So to my small-scale winemaking friends I say this: If you want to save wine, and not sample every single carboy, if your wine batch is all the same, you could potentially only open one of your carboys every month to test. Or you could try testing two different carboys every other month. The point is to try to get a handle on if your VA is climbing and your FSO2 is disappearing at an alarming rate. A normal, ideal rate of FSO2 consumption (loss) for wine that’s at least 6 months old would be losing 4–8 ppm FSO2 every month. It needs to be replaced monthly, too.
If your VA is climbing and your FSO2 is under 20, it’s a good indication that you’ve got an active bacterial infection and will need to take quick action.
I can absolutely guarantee that after 12–18 months of aging, with only one FSO2 check and adjustment in the beginning, your FSO2 will have completely disappeared, your wine will be unprotected, it might have turned to vinegar, and you’ll be very unhappy with the results (unless you were trying to make vinegar, then right on!). So yes, please test your FSO2 once a month, and if you can’t bring yourself to do that, then please do it every other month. Once you get a handle on how quickly the SO2 disappears (or gets turned from “free” to “bound” form), you’ll be better able to predict how often you need to adjust it and how much you need to add with every adjustment. For more on the forms of SO2 and the testing process, check out my fellow columnist Bob Peak’s piece covering this exact topic found in the October-November 2020 issue of WineMaker. Best of luck to you!
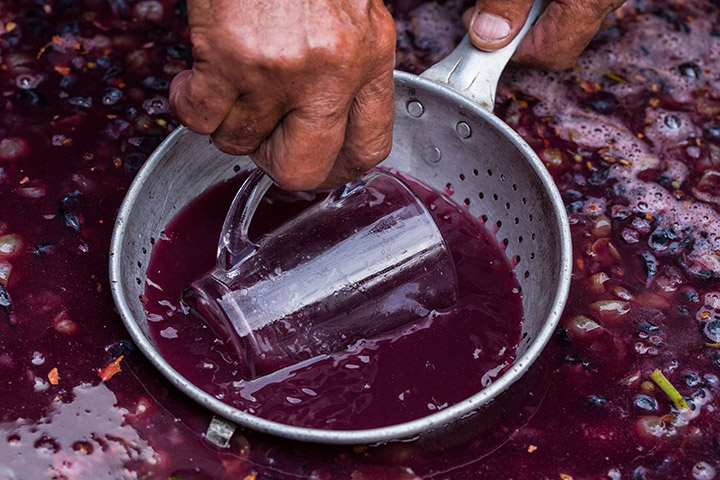
Q I make a Syrah/Petit Verdot field blend from a small vineyard each year and have had some color plating on the bottle. Can you address the cause and possible solution to keep the color from dropping out and sticking to the bottle?

Mark Dawson
Simi Valley, California
A I’ll assume you’re going to do red (not rosé) — that’s the easiest for small-volume winemaking. I’ll also assume you’ll hand-destem, so you really don’t need a de-stemmer. Just get out as many stems as you can by hand. You’ll need a good food-grade fermenter like a small, food-grade trashcan or a bin that you can cover. For sure you’ll need a hydrometer so you can monitor the fermentation and a graduated cylinder to float the hydrometer in.
Then you need to have the ability to strain/press the skins from the juice. Try renting a small fruit press from your local fermentation supply store or borrow one from a buddy. In a pinch, you can use a colander and cheesecloth or a big dishtowel to drain and squeeze. You might laugh, but I’ve been doing some bucket fermentations this past harvest and have found a special kind of bag really helps me — it’s one of those reusable mesh sacks that some folks use in the supermarket to get their fresh produce. Mine is a small-grade white mesh that’s somewhat see-through. I’m finding it’s the perfect thing for draining my initial fermentations through. I simply hold a big kitchen strainer over the lip of my bucket and “free run” pour most of my new wine out into a new bucket, then scoop my wet pomace into my sack, wrap the ends around a big wooden spoon and secure with string, then let the whole thing drain over the bucket. In about 15 minutes I give it a squeeze and hey presto (no pun intended), I’ve just “pressed” my wine.
You’ll also need the ability to know when your wine is through the malolactic fermentation (MLF) — I recommend sending a 60-mL (2-oz.) sample to a wine lab like ETS Labs — most states have something similar.
Once through MLF you’ll need some sulfur dioxide to help the wine from becoming oxidized and attacked by spoilage microbes like Acetobacter. I like KMBS (potassium metabisulfite) powder for home winemakers’ sulfur dioxide needs because it’s easy to measure and relatively safe to handle. Also you’ll need some kind of aging vessel, like two 5-gallon (19-L) carboys, and then something to keep smaller volumes in for topping, like your standard 750-mL (25-oz.) wine bottles with bar-tops (aka T-tops). Keeping your aging containers topped up is key.
Don’t forget that red wines love (and some would argue, need) wood. For carboys, oak beans from companies like Stavin and other suppliers work well because they easily fit into the neck. But for folks that are aging in neutral barrels, I am a fan of The Barrel Mill oak spirals. They fit into the bungholes and give really great quality and flavor in about three months.
With a good fermentation supply store and a wine lab to provide numbers, you’ll be in really great shape. Don’t forget to check out Chapter 2, “Choosing and Using Winemaking Equipment” in my Winemaker’s Answer Book for more details. Winemakermag.com also has plenty of “getting started” columns.
Q How long do you wait before your first additions of SO2?
Bob Joakimson
Concord, California
A Thanks, Bob, for joining fellow columnists and me for our first ever virtual WineMaker Harvest Boot Camp this past September! This question didn’t get answered in my Q&A session held at the end of my “Top 5 Harvest Mistakes to Avoid” talk (there were a number of others that didn’t get answered either that I’ll try to get to in future columns) so, considering the depth of this question, I wanted to cover it here.
SO2, otherwise known as sulfur dioxide, is added as an antioxidant and anti-microbial agent and has been used in winemaking since ancient times. Yeast cells even produce a small amount of sulfur dioxide themselves during the fermentation process, so in fact, there really is no such thing as a SO2-free wine, no matter how many folks touting “natural wine” or other kinds of vinous charlatanism would like us to believe otherwise.
So back to the question of when it’s opportune to first add sulfite to wine: I almost always add a little bit, say around 25 ppm total, at the crusher or juice stage for reds, whites, and rosés. This is to knock down the bacteria and mold populations that came in on the grapes, making room for my Saccharomyces, the good yeast we want, to take hold (they are not as sensitive to SO2). I make a KMBS (potassium metabisulfite) solution and just sprinkle it on the fruit.
For whites and rosés that I do not want to go through malolactic fermentation (MLF), I wait until the wine is settled down after primary fermentation is done (at least 24–48 hours). Next I’ll transfer to a new vessel and add about 30 ppm total to the wine. I’ll wait another 24 hours and make a another addition, making sure I’m measuring about 28–32 ppm free SO2. For reds, which I almost always put through the MLF process after pressing, I’ll perform a test for malic acid to verify that secondary fermentation is complete, then similarly, I rack and make the two SO2 additions to get my free SO2 around the same range.
Be sure to sample your lots monthly for VA (volatile acidity) and free SO2 and make little monthly adjustments to keep your wines 25–30 ppm free SO2 over the life of the wine until you bottle. That being said, make sure you’re keeping your containers topped up as full as possible. Having an untopped container is a recipe for oxidation, VA, and other microbial disasters, and no amount of sulfur dioxide additions will make up for high-oxygen ingress.
Q I’m curious to hear your thoughts on preparing oak additions, like oak chips, cubes, or spirals, before adding them to my must or wine. Should they be boiled or sanitized in some way before adding or do I just toss them in? I have always boiled mine for 10 minutes but wonder with all the oak-y liquid that’s left if I just got rid of most of the flavor.
Brent Kumfer
Carmel, Indiana
A I never boil or rinse my chips because, you’re right, that’ll strip them of the valuable flavor and aroma right off the bat. The one thing you need to do first, either before you buy chips or before you add them to your wine batch, is to smell them. If they smell moldy, musty, or like TCA (like the water in bagged baby carrots — that’s a great everyday example of what TCA smells like, because they wash those babies in chlorinated water, by the way) then toss those chips or wood out right away. If you can smell the oak pieces you’re going to buy before you buy them, i.e. if the shop lets you sniff the bag you’re about to buy, make sure they smell sweet, slightly toasted (if that’s what you’re buying), and smells like something you’d like to put in your wine. If you smell anything off, do not buy them. Once you get them home, however, it’s up to you to put them in your wine right away, or to store them correctly, away from moisture.
The one thing you need to do first, either before you buy chips or before you add them to your wine batch, is to smell them.
Only buy chips and wood from reputable suppliers with good turnover. Try to ensure your oak products are sold in their original packaging or make sure your supplier can tell you their chip/wood packaging policy if they re-bag in smaller quantities. I love the spirals for neutral barrels — I think they add really good quality and are super easy to use. I use the ones from The Barrel Mill — good flavor and reasonably priced. For my stainless and glass vessels I like Stavin beans and Radoux’s staves.
Once you buy them you should use them. Opened bags of wood chips are notorious for not storing well, and if they get wet or come into contact with chlorinated water, that’s a perfect recipe for TCA and molds in your cellar and wine. If you’re small-scale and don’t want to spend the money on a big 10-kg (22-lb.) sack of fresh oak beans from a supplier, try to get into a buying scheme with some friends or other members of a home winemaking club. This is something I recommend doing with most supplies anyway — that way everyone’s getting fresh, professional-grade chemicals.