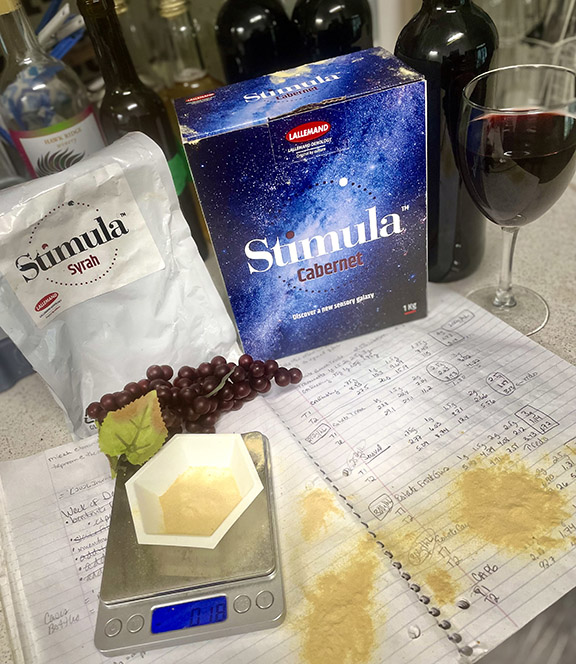
Grape Halos (DIY Grape Growing Stakes)
 Having long wanted to grow grapes, I finally had a chance to do so when I moved to a five-acre horse farm in Kansas with plenty of free space. I built two trellises when I got started — one for Chambourcin and the other for Noiret. Each trellis was 200 feet (61 m) long with 6-inch (15-cm) end posts with earth anchors 3 feet (0.9 m) in the ground, 12 commercial line posts, and 2,000 feet (610 m) of high tensile steel wire. They worked well and in 3 years, I was making Chambourcin wine. Don’t ask about the Noiret.
My Chambourcin were own-rooted and doing fine but a friend was growing grafted Chambourcin and his vines seemed more vigorous with larger clusters. I had the urge to experiment and ordered a dozen more vines, but the question then was where would I plant them?
There had to be an alternative to a full-scale trellis and all the work and expense that goes along with it. I had always been impressed with the pictures of 100-year-old head-trained Zinfandel, and it got me thinking, why not head-trained Chambourcin?
Head-training grapevines was used by the Romans thousands of years ago and it was an improvement from letting them sprawl on the ground. It is basically putting a stake in the ground to support it until it reaches 3 or 4 feet (0.9 or 1.2 m) off the ground, clip the vine to stimulate off-shoots and go from there. It is still used in some locales for grape varieties with an upright growth habit.

Chambourcin is described as having a trailing growth habit so I was apprehensive about it sprawling randomly and not being able to maintain control over its growth. I investigated the various pruning schemes used for head-training, but it looked too advanced for my skill level. I needed a different approach.
I envisioned a vertical stake with a horizontal component to act as a cordon wire to attach the shoots. I played with that scenario for a while but at some point, I decided that using a hoop at the top of the stake was the solution. I asked my father-in-law if he could use 1⁄2-inch rebar to fabricate a 24-foot (7.3-m) circumference hoop attached to a 6-foot (1.8-m) stake. Rebar is a soft but strong steel used in concrete reinforcement. In a few days, he produced 12 prototypes of what I was now calling a “grape halo.”
The following spring, I planted 12 vines in a row, each with a grape halo as a support. The grape halos worked wonderfully in all respects. They supported the vines in a circular array, which allowed me to manage the canopy for sunlight and disease control. By the third growing season, I had trained the vines to the halo and they gave us 8–10 lbs. (3.8–4.5 kg) of high-quality grapes at harvest.
One afternoon, as I watched the grape halos gently wave in the strong Kansas wind, it occurred to me that, without a trellis, I was no longer forced to plant in straight lines. I was free to plant the vines in any configuration that facilitate the installation of a vineyard. Whereas a home owners association might object to a 200-foot (61-m) trellis (as the one I lived in prior to my farm did), they may welcome a small plot with 25 neatly pruned grapevines resting on a grape halo. I also realized that this would allow almost anyone with 525 square feet (49 sq. m) to put a vineyard in their backyard. This amount of space would give us room for 25 vines planted on 5-foot (1.5-m) centers. This could be five rows of five vines, six rows of four vines, two rows of 12 vines, or no rows at all. They could be planted in circular groupings or any shape conforming to the configuration of your available space. If you have a garden, you could add a few grape halos in it for table grapes.
Out of curiosity, and unable to resist the urge to get 25 more vines in the ground, I decided to install a plot of 25 Chambourcin vines in a 25-foot x 25-foot (7.6-m x 7.6-m) area to get a feel for a boutique vineyard and what problems and advantages would be in store for an urban wine grower using this system. Because I lost the skills and patience of my handyman father-in-law, I was forced to design an alternative system with the same attributes as the original prototype but easier to fabricate.

The new design retains the use of rebar for the vertical component but substitutes 1⁄2-inch PVC pipe for the halo. The use of PVC allows more freedom in defining the shape of the halo and, after a few trials and tribulations, I had narrowed it to two styles: The original halo (now square) and a new configuration called the “4D Trellis” (4D because it points in four directions). I had retrofitted some of the original rebar prototypes with the PVC halo and the 4D trellis last year. It was a small sample, but I didn’t see any difference in yield or quality. I spent more time arranging shoots on the hoop design than the 4D, but it wasn’t significant.
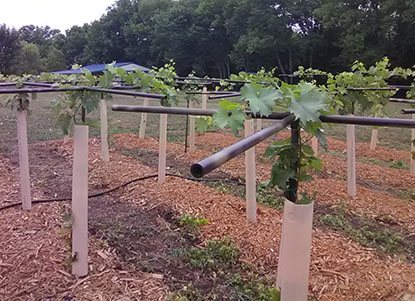
The 4D is easier to fabricate and more intuitive to use; giving you 8 feet (2.4 m) of cordon length in the space of 16 sq. ft. (1.5 sq. m), while the square halo offers more options in pruning and canopy management. The test plot has 10 of each style at a 4-foot (1.2-m) working height in addition to three 4D and two grape halos at a 5-foot (1.5-m) height. I am curious to see if the taller height works better with a trailing type vine and if it reduces loss of fruit to critters.
One drawback to the PVC components is the possibility of breakage. I didn’t experience any during the growing season, but I hit one of the 4D trellises with my tractor and broke an arm off. I replaced all the PVC components of that vine during the dormant season with little cost and little effort. I don’t see breakage as a problem during normal use, but it is a possibility. It may be worth mentioning that I also snapped off a 6-foot (1.8-m) end post with said tractor so the incident probably says more about my tractor driving skills than the 4D durability.
This test plot will measure the durability of the PVC supports, the efficacy of the 5-foot (1.5-m) spacing, mobility within the vineyard, spraying, and netting the vineyard, as well as how the style and height of the grape halos affects the growth of the vines.
Ground Rules for Installing a Grape Halo Vineyard
1. I would suggest a minimum of 25 vines in a minimum of 525 square feet (49 sq. m). Twenty-five mature vines will yield approximately 150–250 lbs. (68–113 kg) of grapes. Using the rule of thumb that it takes 15 lbs. of grapes to make a gallon (4 L) of wine, you can hope for 10–16 gallons (38–60 L) of wine — a good quantity for the home winemaker. Also, the 525 sq. ft. (49 sq. m) specification will only give each vine 25 sq. ft. (2.3 sq. m) to gather nutrients and water. This is about half the space allotted to each vine in a California commercial vineyard. But you don’t have to go very far to find passionate proponents for closer plantings. If you have the space, it will be easier to work if each vine has 36 sq. ft. (3.3 sq. m).
2. Call 811, the national clearing house in the US and Canada for the “Dig Safe” program. You can do it online or by phone, but be sure you give them 2–3 days notice. It’s free and required by law. You will be pounding steel rods at least two feet into the ground and hitting a power line or fiber optic cable would be bad news for everyone involved.
3. With only 25 sq. ft. (2.3 sq. m) for each vine to work with, I would suggest a bare vineyard floor to eliminate any competition for water and nutrients. One of the advantages of using a close grouping of vines compared to a trellis is it is much easier to set a small water sprinkler in the middle of your space and let it run for an hour or so rather than try to irrigate a 200-foot (61-m) row. You can leave it bare or cover it with mulch or crushed stone.
Building and Installing the Grape Halos
At this point you have planned the shape of your vineyard, had the area inspected for underground utilities, removed the sod, and chosen the variety you want to grow. Time to make a vineyard.
Here is the list of what you need and the approximate prices to install a 25-vine vineyard with grape halos. The total cost for equipment (not counting the vines) comes to around $325.
• 25 vines (price varies)
• (25) 10-foot rods of 1⁄2-inch rebar ($150)
• (38) 10-foot of 1⁄2-inch PVC pipe schedule 40 ($56)
• Hack saw with metal blade and medium blade ($10)
• (2) 8-oz. cans of PVC cement ($12)
• Pole driver ($25)
• PVC fittings ($70) (find specifics for each design later)
Let’s the get hard part out of the way; cutting the PVC and rebar. Ideally you will have access to a power saw (miter, circular, table etc.) to cut the PVC because of the number of pieces needed. If you don’t have access to a power saw, a hack saw for the rebar and a PVC cutter for the pipe will work. You can cut a 1⁄2-inch rebar in 2–3 minutes and the PVC cutter will make a clean cut that won’t need any prep work before cementing. You will be cutting several pieces of PVC and I would suggest doing some research before purchasing a PVC cutter. Look for one that automatically returns to a position ready to accept the next piece of pipe.
Specifications
All PVC pipe and fittings are 1⁄2-inch schedule 40. If you are new to using PVC, try to find some “slow set” PVC cement (glue). Regular cement sets in a matter of seconds and often a glued fitting needs to be adjusted before it hardens. The “slow set” cement gives you some additional time. There are many videos demonstrating basic PVC skills.
Because these halos won’t be used for any type of pressurized gas or liquid, we can take some short cuts. You don’t need to use a primer or coat both the fitting and the pipe with cement. Just use the included applicator to swab the inside of the fitting with the cement, insert the pipe until it hits the stop, give it a twist and you’re done.
I created a website at www.grapehalo.com that has videos demonstrating putting rebar in the ground, fabricating the grape halos and the 4D trellis, as well as some generic PVC tips.
Specifications for the 24-inch grape halos:
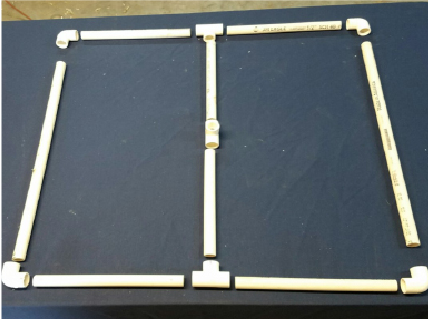
(All pieces and fittings are 1⁄2-inch Schedule 40 PC) (2) 22-inch (56-cm) PVC pipe pieces (6) 10.5-inch (27-cm) PVC pipe pieces (4) 90-degree fittings 3 Tees
4D Trellis:
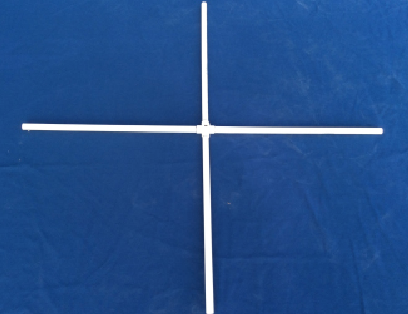
(All pieces and fittings are 1⁄2-inch Schedule 40 PC) 5-way fitting (this is designed for making furniture and will not be sold with the regular plumbing fittings) (4) 24-inch (61-cm) PVC pipe pieces
Installation of the Rebar
The correct length of the rod needs be calculated. You must consider how deep the rod needs to be in the ground to provide a stable and permanent support as well as the desired working height. In the clay soils of Kansas, 2 feet (0.6 m) in the ground is plenty. If you have a different soil type, you may have to adjust the depth. At most home improvement centers the rebar will come in 10-foot (3-m) pieces. You may be able to save money using longer pieces, but they can become difficult to handle.
After cutting the rebar to the proper length and the PVC pipe to the proper working height, insert the rebar in the ground as close as possible to the vine and push it down as far as it will go. Use a level to make sure it is close to true vertical. Slip the post driver over the rebar and give it a few whacks until it approaches the desired depth. Before you pound the rod into the ground, be sure that’s where you want it because it will take a fence post remover or something with a hydraulic lift to pull it out
Remove the post driver and slip the “working height” piece of pipe over the rebar until it touches the soil at the base of the vine. If some of the rebar is visible over the pipe, the rebar needs to be driven deeper. When the correct depth is reached, slip the pipe over the rebar and leave it there. It should spin freely. Top it with a grape halo or a 4D trellis after putting some cement in the fitting.
I usually use grow tubes on young vines, mainly to keep deer from the tender leaves but the tubes also accelerate vertical growth and it seems to force the vine to grow straighter. After the vines emerge from the grow tubes, tie them to the PVC pipe (I use twist ties). Most sources suggest removing the tubes in late summer. Remove them with care. Wasps love them.
When they reach the height of the halo, cut the vine to stimulate the growth of multiple shoots that will be trained for future production.
After installing all 25 of the grape halos, instead of harmoniously blending into nature, it looked as if I were trying to entice an alien landing party. There was too much white, so I decided to paint them dark brown with lighter brown highlights using spray paint recommended for plastic. No sanding, priming, or prepping was necessary.
Notes on the 2018 growing season and what I learned
The test plot performed well and was much easier to water than a 200-foot (61-m) row. If you have room, give yourself 6 feet (1.8 m) between plantings. The smaller 5-foot (1.5-m) dimension is workable but the extra foot between vines makes it easier to work and gives the vines more rooting area.
Of major importance, my older vines growing on halos demonstrated the necessity of proper pruning. Last year was their first season of full production and I had intended to prune to 20 buds, but I talked myself into a bigger crop load and wound up with an unruly mess; difficult to spray, to manage the canopy, and to harvest. Remember to be ruthless in your pruning. Have a plan and stick with it.