Notably Norton
A grape of great character
In this issue we are going to cover some more ground on one of the first varietals I covered for WineMaker magazine. I wrote about Norton early in my tenure at UC-Davis and I was not yet working as the Supporting Winemaker for the Pierce’s Disease grapevine breeding program. At the time I was not really keen on what went into grape breeding. There are many such programs throughout the world that specialize in developing genetically disease-resistant varieties, striving to create better clones of our favorite wine grapes. But back in the 1800s, grape breeders were just looking for a grape that would survive the elements and produce grapes with characteristics similar to Vitis vinifera.
They worked with the several new species of grapes found native to North America. This time period led to a great many discoveries by folks experimenting with grape genetics and cross-breeding in this New World. It was during this time period that a man named Dr. Daniel Norborne Norton came along who discovered a new grape and the variety we know as Norton (or Cynthiana as it is sometimes called). While we will talk about the grape . . . this is better told as a tale of two Nortons!
While grape breeding was being carried out to produce grapes of better quality and disease resistance in the New World, the appearance of Norton seems so accidental. To learn the origins of the variety, we must talk about Dr. Norton of Richmond, Virginia; a medical doctor by training, who was also referred to as a backyard hybridist. Norton is the only commercial variety he gets credit for producing. But that’s just what leads to the mystery surrounding Norton, the doctor; Norton, the grape; and Norton, the wine.
Tracing Its Origins
Norton, the grape, is likely a cross between Vitis aestivalis and an unknown V. vinifera species. Dr. Norton reported that it was a hybrid of the variety Bland, a V. labrusca x V. vinifera hybrid, and Pinot Meunier. At the time, there was a possibility of some contribution of V. labrusca. An indicator of this connection is that Norton is poorly propagated from cuttings. However, our friends in the DNA lab determined that Norton is a hybrid variety whose ancestry “includes V. aestivalis and V. vinifera,” and excludes the Pinot Meunier theory. What they did come up with is that it could be a seedling of Enfariné Noir, a now almost extinct red variety from France, not known to be in North America. Only about one hectare (2.5 acres) currently exists in the Jura region of France. I scratch my head and wonder, where did that Enfariné Noir come from? Dr. Norton’s story is complicated, but this just added more mystery!

The investigations into this variety’s origins are all from secondhand accounts of Dr. Norton’s work. The story as presented by John McGrew, retired from the United States Department of Agriculture, goes somewhat like this: Sometime around 1820, Dr. Norton cultivated a seed that produced the vine that bears his name. Then by the 1830s it was commercially available. What is so intriguing is that Dr. Norton kept no records and the origins of the seed can only be surmised. Oh my, Enfariné Noir? He did not produce any other commercial varieties other than Norton. And the best account is that Dr. Norton didn’t even intentionally crossbreed two varieties, rather that he collected seeds, cultivated them and found a suitable variety for making wine. Or possibly, he was visited by the native fauna around Richmond. Rather a bird or other animal consumed a grape in his garden and deposited the seed somewhere else in his garden where it sprouted and was discovered. Dr. Norton cultivated this “accidental” vine and after a few years, he realized that it had the desirable vigor characters, pest and disease resistance, and fruit quality to be a commercial variety.
What they did come up with, is that it could be a seedling of Enfariné Noir, a now almost extinct red variety from France, not known to be in North America.
It is not known how Norton, the vine, acquired its name from Norton, the person. The custom of the day was to name horticultural varieties after someone the discoverer held in high regard or another object of admiration. In the case of Norton, the wine, presumably Dr. Norton, the person, was a good winemaker, thus there was considerable demand for Dr. Norton’s claret.
With his discovery the good doctor likely had to find a way to produce the vines since the normal method of propagation was not successful. This could be the reason that it took many years for the vine to become available commercially. The normal methods of propagation of grapes were achieved by placing cuttings with exposed buds in a nutrient-rich soil, and allowing the buds to push, and then the roots follow. He likely experimented with different techniques and, having the green thumb he presumably had, he realized that the vines could produce roots by burying cuttings, which would sprout roots and then a shoot. Once the leaves are formed, he would dig up the now sprouting cane, isolate the new root and shoot growth, and presto, he had a vine genetically identical to the cutting he buried. This process came to be known as layering.
But this story as told is not without a controversy in itself. In 1861 an article was published in the Horticulturist by a writer who claimed that Norton, the grape, was discovered in 1835 by his father, Dr. F.A. Lemosy. The writer reports that it was found on a riverbank in the Richmond area and that Dr. Norton secured the variety from him. This controversy has been disproved based on a chronology of writings about Norton, the grape, at the time. It did seem to erase all the efforts that Dr. Norton had undertaken for the previous 40 years to promote the variety.

Regardless of the origins, the popularity of the vine increased with plantings expanding to Missouri and other areas of the East and South because of the plant’s hardiness and propensity for making good wine. With the onset of Prohibition, many vineyards were replaced and the popularity waned, only to find new resurgence in recent decades. Norton is now heralded in cult-like settings in the wine regions of Missouri, Virginia, and Arkansas. Norton accounts for almost 18% of Missouri’s red grape production and is esteemed as the state’s grape.
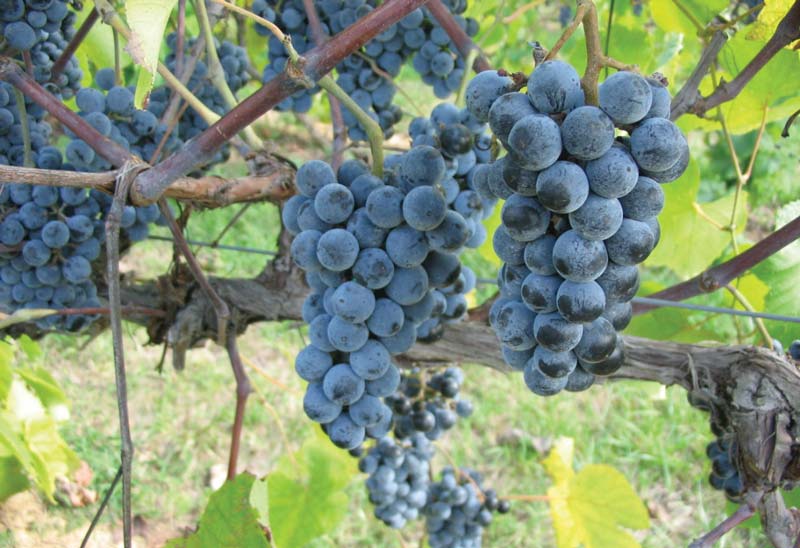
Norton Viticulturally
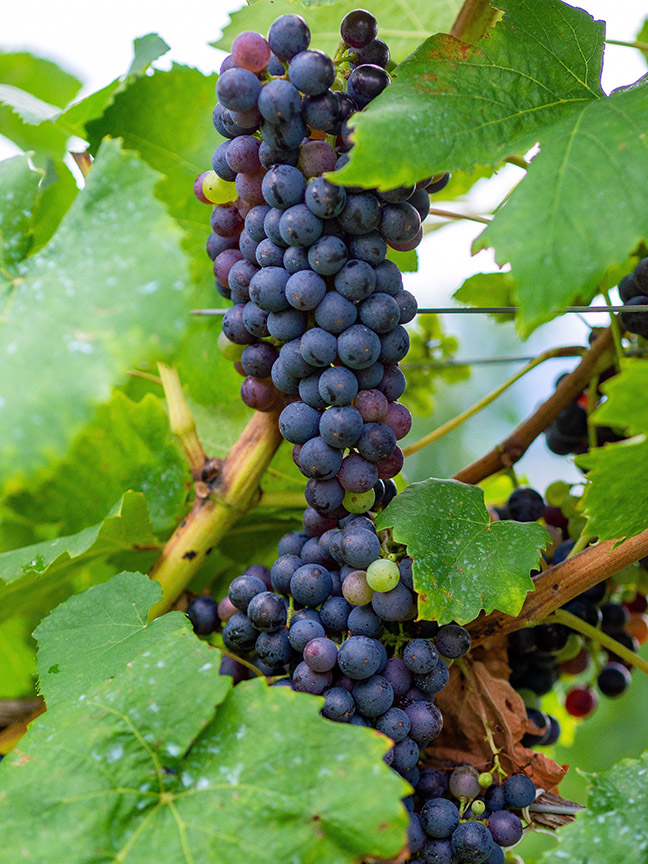
This variety has small- to medium-sized compact bunches, with small, thick-skinned berries. It is vigorous and best grown on well-drained sandy or gravel soils. It is moderately susceptible to Downey mildew, but resistant to many other fungal diseases. It is moderately cold-hardy, reported to survive to -10 to -15 °F (-23 to -26 °C).
The wines resulting from quality Norton grapes grown in the Midwest are in general characterized by high to very high acidity. The shorter growing seasons in the Midwest and East tend to force the grower’s hand in this arena, but in the finished wine often you’ll find it balances with the red and black fruit characters. One reference I found also described coffee, and bittersweet chocolate as flavor descriptors.
The distinctive “foxy” character present in other North American grape varieties is not as prominent in Norton, which was one of the reasons that it held great favor as commercially viable wine among its critics. The wines are of medium-weight color and tend to have more anthocyanin color than other North American native reds. It is also reported to have twice as much resveratrol as Cabernet Sauvignon. Resveratrol is one of the antioxidants in red wines that is correlated with a decrease in the incidence of coronary heart disease. The commercially available wines are either off-dry or made into a Port-style. In Arkansas, it is referred to as the “Cabernet of the Ozarks.”
Norton in the Winery
From a winemaking point of view, Norton presents little trouble but needs some attention when it comes to the fermentation stage. While sugars at harvest are generally in the 22–24 °Brix range, if any particular season was short with an early fall, then chaptalization is often utilized. Being from California, where chaptalization is illegal for commercial wines, I only utilized this technique for research wines that we knew would have low sugars. A calculator found on the Winebusiness.com website is helpful for this process: https://www.winebusiness.com/calculator/winemaking/. The finished wine should have a final alcohol of somewhere in the 13% range for proper balance.
Norton can also tend to have high malic acid levels. Adjusting acidity at this stage is tough without getting an accurate malic acid level from a commercial wine laboratory. Your pH and titratable acidity (TA) measurements are key to whether or not to add acid at the must stage. I focus more on the TA than the pH at this stage. Therefore, I would not add any acid if your TA measurement was greater than 7.0 g/L. Rather I would wait until the completion of the malolactic fermentation, remeasure the TA, and adjust based on bench trials. There is no set rule on acidity adjustment, it just comes with time and familiarity with that particular grape.
So ultimately I have not solved the Norton origins mystery, but I like this story because it gets one’s mind working in the complexity of the genetics of the various Vitis species in all its wonderful forms. Seems that every time I bring up grapes and their origins, it is not always cut and dry.
Norton Recipe
Yield 5 gallons (19 L)
Ingredients
- 125 pounds (57 kg) fresh Norton fruit
- Distilled water
- 10% potassium metabisulfite (KMBS) solution (Weigh 10 grams of KMBS, dissolve into about 50 mL of distilled water. When completely dissolved, make up to 100 mL total with distilled water.
- 5 g Lalvin ICV D80 yeast
- 5 g Diammonium phosphate (DAP)
- 5 g Go-Ferm
- 5 g Fermaid K (or equivalent yeast nutrient)
- Malolactic fermentation starter culture (CHR Hansen or equivalent)
Equipment
- 15-gallon (57-L) food-grade plastic bucket for fermentation
- 5-gallon (19-L) carboy
- (1–2) one-gallon (3.8-L) jugs
- Racking hoses
- Destemmer/Crusher
- Wine press
- Inert gas (nitrogen, argon, or carbon dioxide)
- Ability to maintain a fermentation temperature of 81–86 °F (27–30 °C)
- Thermometer capable of measuring between 40–110 °F (4–43 °C) in one-degree increments.
- Pipettes with the ability to add in increments of 1 mL
Step by step
- Clean and sanitize all your winemaking tools, supplies, and equipment.
- Crush and de-stem the grapes. Transfer the must to your fermenter. During the transfer, add 15 mL of 10% KMBS solution (This addition is the equivalent of 50 ppm SO2). Mix well.
- Layer the headspace with inert gas and keep covered. Keep in a cool place overnight.
- The next day sprinkle the Fermaid K directly onto the must and mix well.
- Prepare yeast. Heat about 50 mL distilled water to 108 °F (42 °C). Mix the Go-Ferm into the water to make a suspension. Take the temperature. Pitch the yeast when the suspension is 104 °F (40 °C). Sprinkle the yeast on the surface and gently mix so that no clumps exist. Let sit for 15 minutes undisturbed. Measure the temperature of the yeast suspension. Measure the temperature of the must. You do not want to add the yeast to your cool juice if the temperature of the yeast and the must temperature difference exceeds 15 °F (8 °C). To avoid temperature shock, you should acclimate your yeast by taking about 10 mL of the must juice and adding it to the yeast suspension. Wait 15 minutes and measure the temperature again. Do this until you are within the specified temperature range. Do not let the yeast sit in the original water suspension for longer than 20 minutes. When the yeast is ready, add it to the fermenter and mix.
- You should see signs of fermentation within about one to two days. This will appear as some foaming on the must surface and it will appear that the berries are rising out of the medium. This is referred to as the cap rise.
- You need to have on hand the ability to push the grapes back into the juice to promote color and tannin extraction. This is called punching down and this should be done three times per day. Use a clean utensil or your hand to mix.
- Monitor the Brix and temperature twice daily during peak fermentation (10–21 °Brix). Morning and evening is best and more often if the temperature shows any indication of exceeding 86 °F (30 °C), in which case add frozen water bottles to the fermenter. Mix the must. Wait 15 minutes, mix and check the temperature again. Do this as often as it takes to keep the temperature between 81–86 °F (27–30 °C). Do not cool off to less than 81 °F (27 °C). Alternatively, you may need to keep the must warm if you are in a colder climate.
- At about 19 °Brix, sprinkle in the DAP and punchdown.
- When the Brix reaches 0 (about 5–7 days), transfer the must to your press and press the cake dry. Keep the free run wine separate from the press portion for now. Be sure to label your vessels to keep the press portion separate.
- Transfer the wine to your carboys or one-gallon (3.8-L) jugs. Your press fraction may only be a gallon or two (3.8–7.6 L). Make sure you do not have any headspace. Place an airlock on the vessel(s). Label the vessels.
- Inoculate with your malolactic (ML) bacteria. Check the manufacturer’s instruction on how to prepare and inoculate. Cover each vessel with an airlock to allow CO2 to escape.
- Monitor the ML fermentation using a paper chromatography assay available from most home winemaking supply stores. Follow the instructions included in the kit.
- When the ML is complete, add 2 mL of fresh KMBS (10%) solution per gallon of wine (0.5 mL per L of wine). This is the equivalent to ~40 ppm addition. Place the wine in a cool place to settle.
- After two weeks, test for SO2, adjust the SO2 as necessary to attain 0.8 ppm molecular SO2. (There is a simple SO2 calculator at www.winemakermag.com/sulfitecalculator). Check the SO2 in another two weeks and adjust. Once the free SO2 is adjusted, maintain at this level. You’ll just need to check every two months or so and before racking.
- Rack the wine clean twice over a 6–8 month time frame to clarify.
- Once the wine is cleared, it is time to move it to the bottle. This would be about eight months after the completion of fermentation.
- Make the project fun by having a blending party to integrate the press fraction back into the free run. You may not need it all, use your judgment and make what you like. Fining with egg whites may be necessary to tame the tannins.
- Filtration is generally not needed if SO2 levels are maintained and there are no surface films or indications of subsequent fermentations. Consult www.winemakermag.com for tips on fining and filtration if problems are evident. If all has gone well to this point, given the quantity made, it can probably be bottled without filtration. That said, maintain sanitary conditions while bottling. Once bottled, you’ll need to periodically check your work by opening a bottle to enjoy with friends. Have fun!