Proper Equipment Storage
 If you make wine from fresh grapes, you know there are lots of supplies and equipment that come out at harvest time. Perhaps used just once a year, or sometimes once every few months, all these things need to be taken care of before you can start the cycle over again next year. To help you have a smoother launch next time, this column features tips on cleaning, servicing, and storing all those specialty winemaking supplies.
Different items will require different cleaning and storage protocols. Convenient categories for organizing your tasks include harvest/fermentation equipment, storage/aging containers, fermentation addition products, and lab supplies. For any or all of them, you may need to consider cleaning, assessment of their condition, and storage procedures. In some cases, cleaning may also include drying, lubrication, or sanitizing. Assessment may encompass testing or calibration. Storage considerations include shelf life of expendable products, organization of durable goods, inventory notes to help plan ahead, and recording any observations about future maintenance that will help with your next harvest.
Harvest/fermentation equipment
A complete home winery includes a crusher/destemmer, either manual or electric. This is one of the trickiest pieces to properly clean for storage. Take it outside or at least to a place with a floor drain. (WineMaker Editor Dawson Raspuzzi and I have become familiar with hotel docks and their wash-down areas over years of teaching winemaking from grapes at the annual WineMaker Magazine Conferences.) This is a very messy process. If there is a lid on the destemmer body, take it off (but put the wing nut in your pocket—they are tricky little devils). Remove the stemmer grate from the body, standing back as grape pulp is launched from both sides as it springs out. Fill a bucket with water, warm if available, and a good winery cleaning product like sodium percarbonate or Straight-A. If the crusher/destemmer is electric, protect the motor from getting wet by wrapping it in a plastic bag. Hose off all visible grape residue from the hopper, the body, and the grate and lid that you removed. Using a long-handled brush, brush down all grape-contact surfaces with your bucket of cleaner. Rinse again. Manually turn the stemmer shaft and hose out the grapes that now become visible that you did not see before. Be aware as you clean that most pieces of equipment have blind spots; inspect very carefully to find places debris may be hiding. Rinse again. Before storing it, you will want to let the machine completely air dry, so place it on a table, bench, or saw horses in a clean, dry area. If it must be outdoors, covering it with an old bed sheet will keep dust and debris off while allowing it to dry. After a couple of days of drying, lubricate the chain and gears with a food-grade grease like Petrol-gel or Sprayon LU210. Turn the gears manually or briefly run an electric machine to make sure grease is worked into the moving parts and everything is operating correctly. Not only will lubrication protect against corrosion while your machine is stored, it will help assure that small amounts of leftover sugars will not dry on the gears and make them seize up. To store this fairly large piece, consider standing it on end to reduce the amount of floor space needed. Wherever you put it, make sure the surroundings are clean and dry so it will be in perfect condition months later. If it is a dusty space like a garage, keep that bed sheet cover over it.
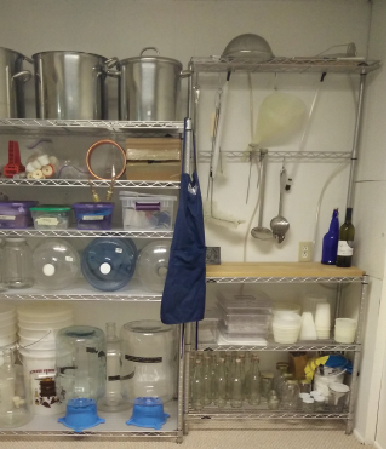
Another complex piece for cleaning is the common basket press. Once again outside or with a floor drain, remove the basket and clean it separately. Remove the cage pins and put them in a safe place; they can easily be misplaced in a lawn. Take the basket apart completely. Take the press head off and remove the ratchet handle. Carefully wash and dry the pins or pawls that make the ratchet work. These are usually non-stainless steel and will rust if left wet. For the big parts, hose off and brush with cleaner just as for the crusher/destemmer. For a wooden basket, you can remove wine stains and freshen the slats by making up a solution of sodium percarbonate cleaner such as Proxy-Clean in a plastic trash can or fermenter large enough to sink the basket. Put both halves in and let stand for several hours, up to 24. Rinse again, and allow to air-dry in a clean area. Be sure to properly lubricate the screw shaft, the moving parts of the head, and the sliding ends of the pawls. Reassemble the press completely before putting it away; misplaced parts can be a real problem when you return to it a few months later. If you have a room or area that you use for winemaking, consider installing shelves just above your press. That way, you will have a secure place to store it that is off the floor, but take advantage of the fact that presses are not very tall.

Fermentation vats (or food grade trash cans), tanks, and picking bins can all receive a similar cleaning routine. Hose off residue, then use a sponge, scrubby pad, or soft brush with your favorite cleaning product to scrub off residue. If white plastic is stained red, fill the container and add some sodium percarbonate (an Oxyclean™ laundry product will also work, but avoid those with fragrances). Let stand an hour or so and the stains should bleach out. Note that this is an oxygen-based bleaching product; do not use chlorine bleach as there is always risk of TCA (trichloroanisole, cork taint) contamination if you use chlorine in your home winery. Rinse containers with clean water until there is no visible residue. As a guideline, I like to keep in mind that containers that previously held hazardous materials are considered non-hazardous if triple rinsed. I rinse three times. You may also want to sanitize these containers before storing them. Use your favorite no-rinse solution. Common choices are iodophor (like BTF or Io-Star), phosphoric acid with detergent (Star San), or metabisulfite acidified with citric acid (although this last choice is more traditional than scientific; go with one of the others if you can). For any of these, drain the container and thoroughly air dry before putting them away. Picking bins or primary fermenters will usually stack nested, so less space is needed. I have found that I can put 1⁄2-inch (1-cm) plywood sheets in the garage rafters and store these items up there. Not convenient to put up or get down, but they are out of the way for the months between uses. Stainless steel tanks usually stand on the floor. To avoid a complete loss of that space, I put a fitted square wooden cover over a 200-L (53-gallon) tank and use it as a utility table the rest of the year.
Storage/aging containers
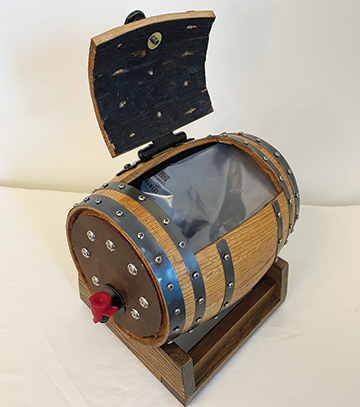
Barrels, carboys, and demijohns will all come to the end of their seasonal use at some point (see “Techniques”, December 2016/January 2017 for more details on selection, use, and care of these containers). Barrels are best cleaned by soaking with sodium percarbonate, followed by rinsing with clean water and a citric acid solution. They should be sanitized for storage with burning sulfur sticks or kept with an acidified sulfite solution. Dry storage is more convenient, as the barrel can be placed on end and take up less floor space, although the barrel will need to be soaked up with water before it can be used again. If storing full of sulfite solution, frequent freshening and sulfite additions will be needed since the sulfite will dissipate and things can begin growing. If you want to keep barrels hydrated, keep them full of wine! If you dry your barrels and you have another barrel the same size or smaller, put some clean wood strips across the upright end of the bottom one, and you can stack another one on top of it. Note that this applies only to dry, empty barrels.
Plastic and glass carboys and demijohns can be cleaned with the same products mentioned above, or a liquid detergent like TDC may be used. Rinse thoroughly and sanitize with iodophor, phosphoric acid sanitizer, or sulfites. Allow to air dry. At that point, you may want to cover the neck with clean aluminum foil to keep dust out. PET plastic carboys have an advantage in that they may be stacked on each other on their sides without risk of breakage. For glass carboys, I have found that a group of four of the same size can be stored upright topped with a 2-feet x 2-feet (0.6- x 0.6- M) piece of plywood. That makes a horizontal surface on which more carboys can be stacked, or something else can be stored. Wrap the stacked carboys with stretch wrap or put bungee cords around the group to prevent a collapsing stack of carboys.
Fermentation addition products
For fermentation products, the major considerations are to provide clean, dry storage and avoid exceeding useful shelf lives (always check manufacturer’s storage advice and expiration dates). Living materials like yeast and malolactic bacteria are best purchased new for every harvest, although suppliers may support shelf lives as long as four years under perfect conditions. Less active products that are nonetheless of organic origin, like enzymes and nutrients, are usually good for at least one year and possibly two or three. Simple, pure chemical compounds like citric acid and sodium percarbonate are usually stable for at least two years. At the end of your fermentation season, take an inventory of your supplies. Make note of it, to help with your shopping list next year without getting everything out again. Make sure containers are dry and sealed, and put away like items together. That is, store nutrients with other nutrients, acids with other acids, and so forth. I find that either a chest of drawers or a plastic storage tub works very well as a place to keep these products together to be there when I need them again.
Lab supplies
Lab supplies deserve similar consideration. Reagent chemicals will often have an expiration date or shelf life provided on the bottle. Always write the date you open a container on the label so you will know how old it is when you next assess the shelf life. If chemicals are out of date, follow suppliers’ guidelines on proper disposal. If not, store in a cool, dark place. Some reagents, such as pH buffers and 0.1 N sodium hydroxide for titratable acidity (TA) testing are subject to decay. Keeping them in a refrigerator will extend the shelf life. As with fermentation products, inventory your chemicals when you put them away to make replacement shopping more convenient.

Some pieces of laboratory equipment have special storage needs. For balances, pH meters, and similar instruments, just store clean and dry. For electrodes, follow manufacturers guidelines. pH electrodes must generally be stored wet, in electrode storage solution or colorless pH 4.0 buffer. On the other hand, platinum electrodes for amperometric measurement of sulfites may be stored dry. Empty, wash, and rinse with distilled water any burets, beakers, or pipets that you have used. Store your lab supplies in a separate tub or drawer so they will be conveniently at hand next time you need them. As with all the other fermentation supplies, a little attention paid to cleaning, assessment, and storage will pay big dividends in convenience and efficiency next time the grapes get ripe!