Small Space Viticulture
Although the best part of visiting a winery is the wine, I have to admit I love spending time in or near the actual vineyard. A vineyard in full leaf with beautiful juicy grapes hanging about can be a very cool place to relax. I am also intrigued by how vineyards develop, particularly when green-space is limited, as it is in my own backyard vineyard. Whether you are intimidated by the idea of growing grapes or believe you just don’t have the space, I hope to provide you with a new perspective allowing you to see your own personal grape growing in a whole new light.

Why You Should Dig In and Plant for Yourself
You may be asking yourself, why should I even bother if all I will have space for is just a few grapevines? Growing grapes all summer and harvesting them to turn into wine gives you the full experience from vine to bottle; few things are more fulfilling as a winemaker. I mean, sure you could buy grapes, but what better way to impress friends and family than to present a bottle of wine that you not only made, but that you also grew the fruit to make! Not only can you use the grapes you grow for wine, jelly, or fresh eating, they add a great vibe to any outdoor living space and can be trained to virtually any type of structure you can think of; all while growing your next vintage.
Where to Start
A great place to start is by reading a book or two on grape growing to become familiar with grape-growing vocabulary words, styles of trellising, vine training methods, and learn the different fungicides used to prevent disease. I will touch base on these here, but any in-depth discussion on these topics is beyond the scope of this article. There are several books out there such as From Vines to Wines by Jeff Cox, The Grape Grower: A Guide to Organic Viticulture by Lon Rombough, The Backyard Vintner by Jim Law, or WineMaker’s Guide to Growing Grapes by Wes Hagen. These books are a great place to start to lay the groundwork for you to build on.
An important thing to consider is what you plan to do with your grapes. For fresh eating and making jelly, only a vine or two may be needed. Some vines can produce up to 20 lbs. (9 kg) per vine, and it only takes approximately 12 lbs. (5.4 kg) to make a good-sized batch of jelly. If you plan to make wine you’ll need at least 80–100 lbs. (36–45 kg) of grapes to make 5 gallons (19 L) of finished wine, which translates into five to ten vines. The type of grape you choose to grow will influence these figures. Even with as few as three vines you could harvest enough fruit for a few gallons (~11 L) of wine. This could be bottled on its own, blended with other wines that you’ve made to create interesting new flavors and add diversity to your cellar, or combined with purchased grapes or juice to make a full batch of wine. Another way to use grapevines is for decorative purposes in your landscaped areas. What better backdrop for a wine tasting is there than a grapevine?
After you have gained some basic knowledge but before you start building a plan for trellising and placement of your vines you need to identify what types of vines are best suited for your hardiness zone. See what USDA hardiness zone you are in, or find out what commercial wineries in your area are growing to see what they’ve found works best. This quickly narrows down the vines you can grow in your area. I know it’s tempting to grow what you like to drink, but it helps to be realistic and grow what will ripen in time in your locale. For example, I live in western Pennsylvania, which is in zone 6. I prefer to grow varietals that are designated zone 4 and 5 because things happen and Mother Nature can be ever so cruel. These vines sustain minimal damage in the winter and I can have a crop well ripened before the first frost. For me it’s hybrids and native varietals such as Frontenac, Leon Millot, Niagara, Concord, and Catawba, just to name a few. These grapes can be dry oaked reds, crisp whites, or dessert-style rosé! Once you’ve decided on a type of grapevine, you can develop your plan for placement and planting. You can either purchase your grapevine from a reputable vine distributor or do the grass-roots method and take cuttings from a vine you like and propagate new vines from those cuttings. Please be advised that some vines are protected under copyright by the breeder, so do your research before you make that cut. To find out if a grapevine is patented by a breeder, visit Doubleavineyards.com and do a search for your potential vine. If it states “Royalty- In and out of New York State,” it means that particular vine is patented and is illegal to propagate unless consent is given by the grower.
Finding a Location
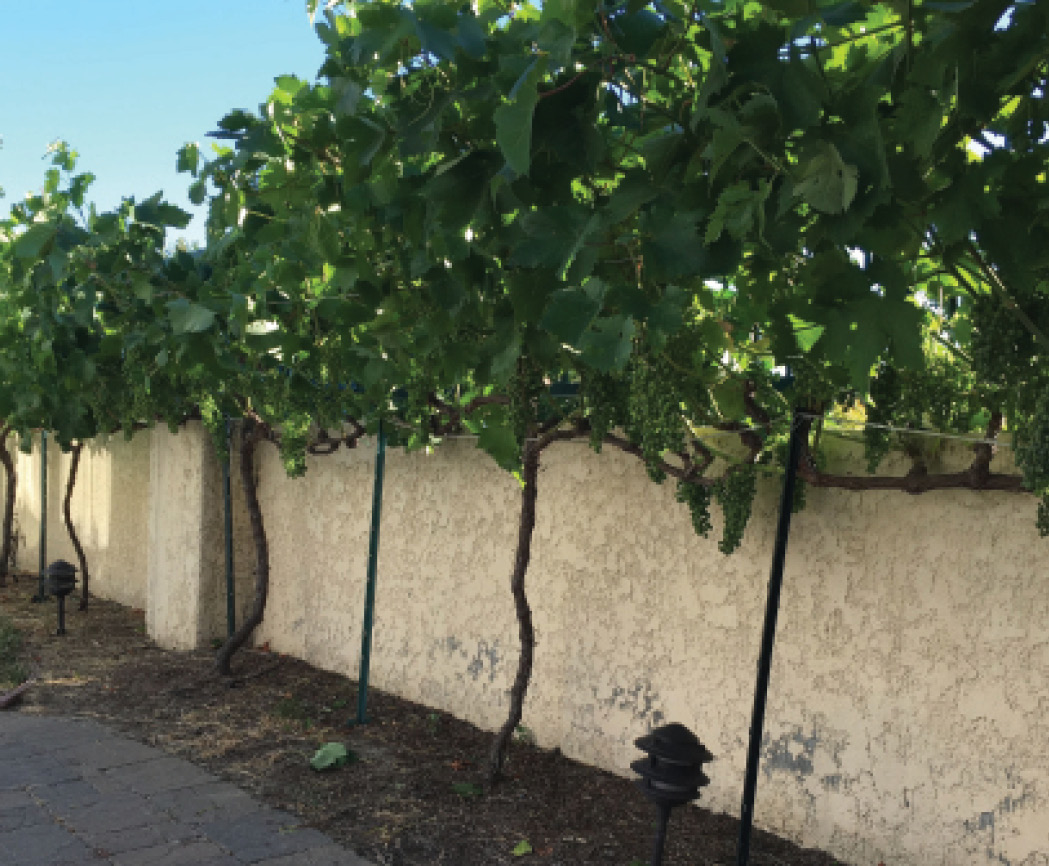
You now need to figure out where to put some roots down. This can be virtually anywhere such as a pergola over a sidewalk for a decorative effect, on a trellis along a driveway or walkway, along a house wall, even growing up posts on your porch or gazebo. If you’re fortunate enough to have the space for a few short rows, you could build a trellis that fits the grapevine’s growing style; the possibilities are limitless. In my vineyard the rows are 30 feet (9 m) long, which allows me to have four vines per row. I then planted 13 rows, which allowed me to take advantage of a piece of my lawn that didn’t get much use while keeping the rest of the yard free for my son to drive his Power Wheels around on.
When choosing a site, there are a few things to keep in mind when it comes to growing grapes such as:
Will they get enough sunlight?
Grapevines need full sun throughout the day to ensure a fully ripened crop at the end of the growing season. This means at least 6 hours a day. More would be better, but anything under 6 hours a day is not optimal. Even if you perform leaf pulling to get the sun’s rays into the canopy (you’ll be doing this anyway), it still isn’t enough. Once you have a couple ideas of where you’d like to plant, watch these sites on a sunny day and time how much sun the potential site receives.
What about my soil?
When planting a large vineyard, a lot goes into the site prior to planting. Soil testing and amendments to fix any deficiencies are just a couple preparations that are needed to ensure the vines stay healthy and live long and fruitful lives. Normally, soil testing is recommended prior to planting a vineyard; but in this case we’re dealing with such a small area and limited amount of vines that I suggest forgoing extensive soil testing. But, to ensure success (because this will be a small monetary investment, after all), you may want to know what’s going on down in the dirt. An internet search will bring up plenty of labs you can send a soil sample to, which will give you recommendations on the proper soil amendments. Soil tests will also help you determine if your soil is a high- or low-vigor site.
Will they have the space to grow?
One grapevine (depending on the training style you’ve chosen, grapevine varietal, and site vigor) will take up a 6’ x 4’ space (1.2 m x 1.8 m) on a typical top wire cordon-style trellis. Or the vine can take up more like a 5’ x 5’ (1.5 m x 1.5 m) space if it is trained up a pole in the umbrella-kniffin fashion or if it’s head-trained. No matter what the training method is, the vines will need to be able spread their wings to some degree.
New shoots can grow up to 12 feet (3.7 m) in one season. Once they reach the ground they will start to creep into the walkway or make yard maintenance difficult, which is the benefit of top wire cordon training. In this situation you can skirt the new shoots by nipping off the ends above the ground. But keep in mind you need to retain at least 15 leaves per cluster to ensure ripening. Plus, cutting off the ends will force lateral shoots to emerge, which may tangle up your canopy a bit. An alternative to skirting is tucking the shoots under the vine. If you’ve chosen to do mid-wire cordon for an upright growing varietal, you’ll be doing some hedging once the vines grow up between the catch wires and start to bend down over the trellis, causing shading of the grapes. No matter which method you choose, the goal is to ensure the area around your vine(s) remains neat and tidy.
Will my vine turn into an unmanageable monster?
The answer to this question is maybe. But there are things that can be done first to figure out just how big the vine will get. And as mentioned earlier, there are ways to tame the vine once the new shoots get growing.
Get a soil test done. Wait, didn’t I just say forget the soil test? For those of you who are the Inspector Gadget-type, a soil test would be valuable information to know for your specific site, and will allow you to have a better idea of the expected vigor of your future micro-vineyard. Sites high in nitrogen and other nutrients will encourage increased shoot growth turning your vine into a beast unless you’re prepared and know what to expect.
If you aren’t in a hurry, plant a test vine in your potential site and monitor its growth for a couple seasons. For a new and casual grower who just wants to plant a few vines to see what will happen (which is the main target of this article), this may be a better example of what to expect when growing your vines; rather than interpreting soil test results. For example, a vine with more than 10’–12’ (3–3.6 m) of new shoot growth in one season is considered highly vigorous. Medium-vigor is 6’–10’ (1.8–3 m) and low-vigor would be 3’–6’ (0.9–1.8 m).
With this information, whether it is from a soil test or a test vine, you can figure out your vine spacing and trellis type, along with what your expectations can be. When shopping for grapevines, the vigor of the grapevine and suggested planting distance should be provided in the vine desciption. Another thing to consider is what rootstock your potential vine(s) will be grafted on to. Native varieties such as Concord, Niagara, Catawba, and some French-American hybrid vines are typically grown on their own roots because they can tolerate phylloxera nipping at their roots, and overcome other shortcomings in the soil. If native varieties aren’t your jive and you would prefer to grow vinifera varietals such Cabernet Sauvignon or Pinot Noir, you will need to familiarize yourself with the different rootstocks vinifera vines are commonly grafted onto. Vinifera and some hybrids need to be grafted to various rootstocks to help them survive soil-born phylloxera or nematode infestations. Rootstocks can also assist in the survival of cold winters, overcome soil pH issues, or even moderate vigor. Since we are considering planting grapevines in a small space, vine and rootstock vigor should be highly considered prior to purchasing or planting your future vines. If you have a high-vigor site and a small space, maybe you can choose to have your vine grafted onto a low vigor rootstock such as Millardet et de Grasset 101-14 or Riparia Gloire (some nurseries will do custom grafting for you.) If all of this research of rootstocks and vine-vigor seems daunting to you, grapevine nurseries are able help you determine the best vine and rootstock for your site.
You can also plant fewer vines but allow them to spread out and produce more grapes, negating the need for more vines while still giving you your desired result. You may be thinking, “What if I plant my vines close together and let the roots compete for nutrients therefore reducing vigor to some degree while increasing yield?” (Or maybe you’re not asking yourself this question, but please do, so I can answer it.) Sounds like a good idea right? In reality the real competition would be topside with a tangle of shoots and foliage shading your fruit, increasing disease pressure and preventing sunlight from getting into the grape clusters. Give your vine its space, even if you have to plant fewer vines. In the long run you will be harvesting more grapes.
Trellis-Type and Training Method
Now that you’ve decided what vine to grow where, we need to support our grapevine with some sort of trellis. Depending on where you plan to grow these, a trellis may not be needed at all. Maybe you have an old clothesline pole for a vine to grow upon, or maybe along a fence or porch/deck railing. While these may have a few drawbacks like being close to the ground as a fence is, or lack of wires for support when using a pole — you can still manage to grow a vine or two and produce grapes even if the support system is less than optimal. But if you’re lucky enough to have a space in your yard that is about 13’ x 15’ (4 x 4.6-m), you can build a dedicated trellis for your vines and have two 15-foot (4.6-m) rows, 7 feet (2.1 m) apart (at least 8 feet/2.4 m would be better) with 3 feet (0.9 m) of space on either side of the rows to work with the vines. This spacing would allow four vines, two in each row. This particular spacing between rows allows sun into the rows, and the grass can be mowed with a common push-mower. Another example would be if you have a long and narrow space that measures 50’ x 7’ (15.2 x 2.1 m). This would allow one long row with space on both sides for canopy management and other vineyard work.
When tackling a vineyard project this size, just about everything you need is at your local hardware store. Small vineyards don’t necessarily need heavy gauge wire, or end post anchors like longer rows of vines would. The end posts can be pressure treated 4” x 4” x 8’ posts without an anchor (what is called a dead man). When you don’t have a lot of room to spread out, adding an additional 4 feet (1.2 m) out from each end-post to connect a wire to a ground-anchor may not be feasible. To install the end posts, you’ll use a manual post-hole digger to dig down 2 feet (0.6 m). When I did my end posts, I did not cement them in. If done improperly, water gets down under the cement, freezes, then pushes the post out of the ground! I prefer to insert the post into the hole, break up bricks or cement blocks into smaller pieces and put those in the hole, then dirt, and repeat, all while packing it down tightly with the flat end of a shovel handle or digging bar with each layer of rock or dirt. With each layer, I use a level to make sure the post is going in straight or angled away from the vines, which helps keep the post from being pulled inward. If your rows are short you can forgo a center post. My rows are 30 feet (9.1 m) so I have a post at the 15-foot (4.5-m) mark to take some of the weight off of the end posts, this could be a thinner metal post or just another 4” x 4” x 8’ post.
Now that your end-posts are in, you need to consider what the vines will hang on. High tensile galvanized steel wire is typically used for trellis projects. You could also use a 2” x 2” piece of wood and secure the vine’s arms (cordons) to that, but a center post would be needed to help support the middle depending on the length of the row. Whereas, using wire you could get away with no center post in short rows as mentioned above. When using wire you’ll need a way to attach it to the end posts. I like to use wire ratchets and Gripples, which can be found from retailers who sell fencing material. Use a wire ratchet at one end and a Gripple on the other. This gives you the ability to ratchet-tighten the wire very easily, which may be needed once the vines get heavier with fruit. You could use heavy staple-nails to secure the wire, but the wire will inevitably start to sag with no way of tightening the wire back up again.
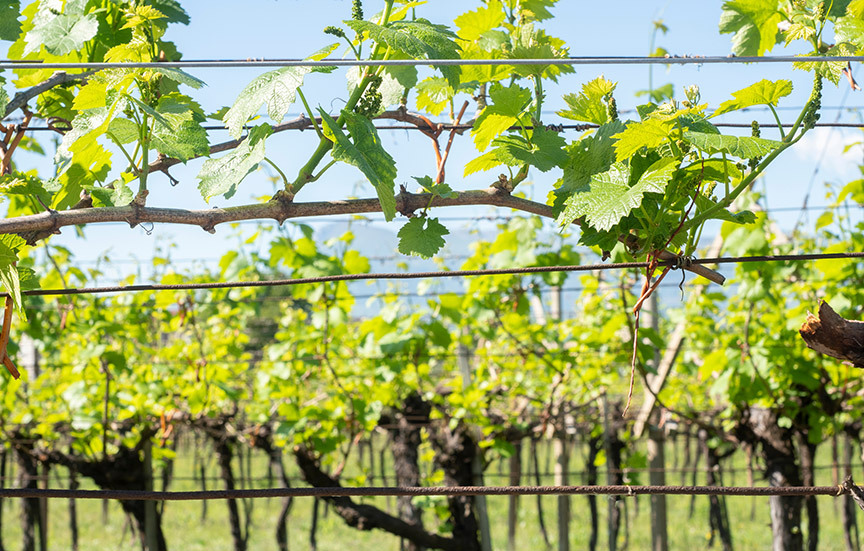
The vine you choose will determine what trellis you will build. Grapevines with an upright growth habit will prefer to grow on a mid-wire cordon trellis. This training method is by far more neat and tidy, and is best suited for along sidewalks and driveways. Whereas top wire cordon is more suited for vines with a trailing growth habit and will need more space and will require skirting and tucking of the new shoots. You could also plant a few posts and grow a vine up and either head-train it or use the umbrella kniffin system. No wires are needed and you train the vine in an umbrella shape.
The Tools of the Trade
No matter the size of your vineyard, you’ll need the right tools to maintain it. Proper care of the vines will help you consistently bring in a crop of grapes, keep it from going wild, and prevent or at least minimize diseases. Since we’re dealing with a smaller vineyard, there is no need for tractors, 100-gallon (380-L) sprayers, or hired help. Most of the tools you may already have laying around the garage.
Pruning shears are needed to prune the vine in the dormant season. Pruning is possibly the most important thing you do for your vines. It prevents over-cropping, excessive growth of foliage, etc. A quality pair of pruners is recommended. Take my earlier advice and read a book on grape growing. You will not only learn proper care, you’ll also learn common pruning techniques. Common gardening tools such as a hoe or garden claw are used for weeding. Another benefit of having only a few vines is you don’t have to use weed killer around your vines. Just use the garden claw or hoe to rip them out and it’s done. Or you could just remove them by hand.
A 1- or 2-gallon (4- or 8-L) sprayer will work great for up to 15 grapevines. A respirator, gloves, longsleeve shirt, and pants are also needed. You’ll also want to look into canopy management techniques that will help to keep fungus at bay. This will allow you to worry less about disease pressure and possibly spray less. In most cases you’ll need to spray pesticides at least to some degree. One drawback to having to use pesticides in a small vineyard is, some of the sprays available come by the pound (0.45 kg) or by the gallon (4 L), and they can be very expensive for the amount needed for just a few vines. Luckily, there are three sprays that come in smaller lots at a reasonable price, which can be used to treat the most common problems such as black rot, Phomopsis, downy mildew, and powdery mildew; which is perfect for the small vineyard owner:
Mancozeb:
This comes in a 1-pint (473-mL) container and is the base of most pesticide programs. It is good against black rot, Phomopsis, and downy mildew. This can only be sprayed up to 66 days before harvest. As you get closer to harvest you will need to switch to something else.
Captan:
This comes in a 1-oz. (30-mL) container. Once you’ve reached the 66 day pre-harvest interval for Mancozeb, you can switch to Captan, which is good against Phomopsis, downy mildew, and adequate for black rot.
Eagle 20 and Spectracide Immunox fungicide:
Eagle 20 comes in 16-oz. (473-mL) and Spectracide Immunox is sold in 12-oz. (355-mL) bottles. These both contain the active ingredient Myclobutanil. This is great for black rot, and powdery mildew. This particular pesticide should be rotated with another spray when spraying for powdery mildew, which can actually build a resistance to certain sprays.
For more information on developing a spray program and fungicide resistance, read the grape section of the Mid West Fruit Pest Management Guide.
If you are planting grapevines along a sidewalk or porch railing, you may decide to forgo the use of the above pesticides due to what is called the re-entry interval (REI.) The re-entry interval is the time frame before you can safely enter the area that was sprayed. Some are one day (Mancozeb) some are up to four days (Captan.) One to four days indeed may be a little much to ask family members to avoid high traffic areas, especially if the vines are just for looks, or for as little as a few gallons of wine. Organic sprays on the other hand have a shorter REI than the fungicides mentioned above; some as little as 4 hours. With such a short REI, you could spray in the evening when foot traffic is less and the REI can pass without possible exposure to family members or pets. Either way, when spraying, alert the family to steer clear of the area until it is safe to enter the area again.
Now Get Out There
With this information I hope you can now envision grapevines growing in different places in your outdoor living space. Use your imagination and let your creativity be your guide. The pictures provided should inspire ideas that will allow you to harvest a crop of grapes and turn them into something delicious. Even if it’s just for a little decoration or letting your little kiddos eat em’ up. Good Luck!


