 Budbreak is the opening sentence of a novel called Vintage 2019. It sets the tone, exposition, and expectations for the entire story. But better than writing a novel, our early-season work in the vineyard will save us dozens of hours fixing problems that could have been avoided by properly timing our early season canopy management, frost control, and assessing water/nutrients. With proper observation and labor at vintage’s beginning, the rest of the book almost writes itself. And that leaves more time for our family, our table, and more glasses of wine to empty with gusto. Let’s look at some advice on beginning the Vintage 2019 on the right foot.
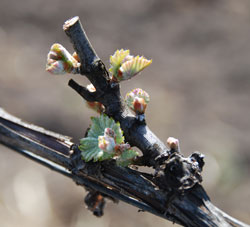
Budbreak is when green tissue begins to emerge from dormant grapevines. As a professional viticulturist, budbreak represents the end of my winter’s “vacation” and the beginning of a vitally important managerial period in the vineyard. By the time the vineyard is shoot/bud-thinned and the first few applications of fungicide are sprayed, it will be time to get back into the cellar and assess the 2018 wines.
Between budbreak and bloom, winegrowers are offered the chance to get a head start on the growing season, make decisions, and complete vineyard practices (pros call them “cultural practices”) that will dictate the relative ease or difficulty in finishing a year’s wine farming. The purpose of this article is to define and detail the practices that can be accomplished in the first few months of a vine’s growth cycle, why they are important to final wine quality, and how to assess your early season efforts in the vineyard.
The biggest change in my own vineyard management practices in the 20+ vintages that I’ve managed commercial vineyards has been how to handle the vineyard between budbreak and bloom. We send the crew into the vineyard much earlier now, and have found that the early work we finish is much more economical than coming back and trying to “fix” the canopy after it has filled the trellis. In this spirit, I hope to share some of our early-season “pro tricks” in vineyard management and describe how getting into the vineyard early can save you lots of hassles at the middle and end of the growing season.

Basics of Early-Season Viticulture
This is what we need to accomplish:
1. Make sure the vines have adequate water and nutrition.
2. Keep mildew and early season shoot blight from affecting the vines’ health and vigor.
3. Protect the vines from frost.
4. Control weeds.
5. Set a firm foundation for our 2019 canopy management through shoot removal and suckering (removal of unnecessary and basal shoots).
Now that we’ve identified the generalities, let’s discuss how to accomplish these tasks in your backyard vineyard.
I: Water and nutrition
As the vines wake up from dormancy and start to grow, they are wholly dependent on the water and nutrition that is available at root-level. It is vitally important that the soil be moist to saturated at budbreak. The vine will decide at budbreak just how vigorously to grow, based on nitrogen availability and water status. (Other macro- and micro-nutrients also impact this vigor issue, but nitrogen and water are the two main concerns.)
Water is a tool that can impact vigor both ways. If your vineyard grows too vigorously and rank, it would be better not to apply water in the early spring. If you can help your soil dry out early, this will retard overly vigorous growth and may help you produce better balance in the backyard vineyard. Inversely, if your vineyard is low-vigor or stunted, heavy applications of water (and some supplemental nitrogen) can help leach the salts from the roots and charge the vines up for a more vigorous growing cycle. In most areas of the U.S., winter rains and snows will saturate the soil profile so no supplemental irrigation will be needed for the first few months after budbreak. Many vineyards will never require supplemental irrigation, unless drought occurs. Vines like to have their roots dry out (either fully or partially) between watering, so by using a soil probe, an Irrometer, or a shovel, be aware of the water status of your soil at vine-root depth, or 2–5 ft. (0.61–1.5 m) down in the soil. Once the soil has dried out at 3 ft. (0.91 m), it’s a good time to start offering the vines some additional irrigation if vigor/growth needs to increase. Again: No irrigation is necessary if the soil gets about 25 in. (64 cm) of rainfall throughout the year, more in sandy soils, a bit less in clay/heavy soils.
Between budbreak and bloom, winegrowers are offered the chance to get a head start on the growing season . . .
As far as nutrients and fertilizer go, the beginning of the season is an excellent time to give the vines some NPK “breakfast” as they wake up, but only if your vineyard needs a little push in vigor. (NPK stands for: Nitrogen, phosphorous, potassium in order of the hyphenated numbers on the label of fertilizers. If a label reads 15–15–15, the product provides 15% of each of the three macronutrients by weight of the product.) As I’ve mentioned numerous times in my “Backyard Vines” columns: Never fertilize a vineyard if the leaves are green and healthy and the vines are growing with adequate vigor. Fertilization should be restricted only to vineyards that are struggling to produce uniform canes with moderate vigor. If your vineyard naturally produces a cluster of fruit for every 12–15 leaves, you are naturally balanced without fertilization and don’t need to add anything. If the vineyard is overly vigorous you may want to reduce any supplemental irrigation, making sure the soil dries in late spring and early summer, which will send a message to the vines; don’t get too big and bushy!
A good visual clue is leaf size and color in late spring. Once the soil warms up and your vineyard has produced a small canopy, the lower leaves should never get bigger than a large human hand, and should never be shiny green. A dusty, matte green is the perfect color of a vine in nutrient balance, and leaves smaller than a large hand.
II: Make a Spray Schedule and Make it Stick
I’ve said it before and it bears repeating: The #1 error in home viticulture is poor spray scheduling and coverage. Sulfur (preferably a wettable product such as Thiolux®) needs to be applied to the vines starting after budbreak (3–4 in./8–10 cm of new growth), and in areas where mildew pressure is high, it needs to be re-applied every week until bloom. In areas where mildew pressure is not as high, spray at 6-in. (15-cm) shoot length, 12-in. (30-cm), 18-in. (46-cm), then every 10–14 days. Adding copper to the mix will add a bit more protection, and I use a sulfur-copper mix for the first three or four sprays here at the vineyard. Powdery mildew is the enemy here, as well as Botrytis. Mildew/rot issues are likely the #1 culprit in lost crop and poor wine quality in home vineyards. If you have a serious early-season Botrytis shoot blight problem (brown rotting spots at the base of tender shoots, or the tips of the tendrils or shoot tips or turning black and dying), you may need to check about legal options for Botrytis control without a pesticide permit.
Another serious issue I’ve seen in a number of my home-vineyard consultations is the spray equipment used is vastly underpowered to get adequate coverage in a mature canopy. If you are stuck using a backpack sprayer, and continually have problems with mildew even when you stick to your spray schedule, the problem may well be spray penetration. To be effective, you need to get full coverage on the vine, including the interior of the canopy when the vines have filled in the trellis later in the season. If you have an ATV or a Gator-style ranch vehicle, you may want to look into a tow-behind sprayer that hooks up to the ATV/Gator’s battery for power. There are also gas-powered units that do not require an exterior power source. But if you are stuck with a backpack sprayer, make sure that the pressure is adequate when applying, and you may need to spend more time covering each vine, and spraying from both sides of the vine row. Inserting the spray gun into the canopy is another way to get better coverage deep inside the vine’s growth. Make sure to wear proper clothing and safety equipment during sprays to keep yourself healthy.
The first month or two after budbreak is absolutely critical for mildew control. Spores overwinter under the vines’ bud shields, and when those shields crack open to allow budbreak, the spores hungrily attack the new delicate shoots. In vineyards that had mildew issues the previous year, they will have massive amounts of dormant mildew spores ready to attack the vines as the weather warms. Mildew, much like many aspects of the grapevine, activates in two-year cycles. A heavy mildew infection in a vineyard may increase mildew pressure in subsequent years, and will worsen until effective control is accomplished.
III: Frost
Sustained temperatures below 30 °F (-1 °C) can cause damage to the green, growing parts of the vine, especially young shoots and fruit clusters. Maintaining a bare vineyard floor will help the cold air from “sticking” in your vineyard (it should move downhill like flowing water). Pay special attention to areas of your home vineyard that are located on low ground. When deciding on a location for your home vineyard, it is advisable in frost-prone climates to put the vineyard on a hillside where the cold air can flow away. Dormant vines are generally very tolerant (and even fond of) cold winter weather. But when the vines start growing again, frost can cause all green growth to burn and die. If this happens, don’t remove the burned/frosted material. The vine will likely recover and start growing again, and even produce a new (usually lighter) crop of fruit.
There are a few things you can do to help a vineyard through a potential frost episode. First thing is to watch the weather carefully and on potential frost nights, set your alarm for midnight to check the temperatures in the vineyard. Brrr . . . bring a glass of Scotch whisky, it helps me a lot. If temperatures do drop under 30 °F (-1 °C), turn on your drip system (it may produce enough warmth to keep the vineyard from frosting, or even better, turn on an overhead sprinkler system. Sprinklers will coat the young fruit and shoot tips with water, the water will freeze, and the ice will insulate the tissue like an igloo protects an Inuit. Copper spray products also break down ice-nucleating bacteria, which will protect young tissue down to around 28 to 29 °F (-2.2 to -1.7 °C). In a very small vineyard, you can use a hose and nozzle to soak the fruit zone and tender leaves of the vines, and as they freeze the tissue will be insulated at 32 °F (0 °C) . . . just enough protection.
Keep your vine rows and in-between rows clean from weed and cover crop growth. Bare, firm, moist soil is warmer and provides better frost control than a vineyard floor rank with plant growth. Putting on cloth wings and prancing through the vineyard ala Keanu Reeves in A Walk in the Clouds will do nothing for the vines, and may land you in a local loony-bin. Setting fires in the vineyard is not recommended either. I’ve heard of smudge-pots used in conjunction with large fans, but this does not seem to be a solution suitable to most home vineyards.
IV: Control Weeds
There are only a few ways to control weeds in the vine row:
Hand removal/hoeing — best exercise and best for the vineyard and the environment.
Contact herbicides — do not use at a time when green vine tissue may be contacted, as products like Roundup® can cause permanent vine injury. Use pre-budbreak herbicide according to the label.
Residual herbicides — pre-emergence, apply before winter rains.
Mechanical cultivation — tractor or ATV-mounted devices such as Weed Badger, Pellenc or Kimco. In our world, though, it’s called a hoe.
Using sheep, goats, cows, etc. to graze in the dormant vineyard. This is gaining a foothold in Napa, where a person charges hundreds of dollars a day to run their sheep/goats through your dormant vineyard with a border collie. Warning: These animals WILL eat leaves, shoots and grapes if given the opportunity. My idea is to genetically engineer tiny sheep that can’t reach the fruiting wire. Anyone with genetic engineering experience is welcome to contact me about this project. I would prefer if they tasted delicious as well in case they are naughty.
Weed removal and a clean vine row is absolutely vital to a young vineyard, but a bit less vital as the vineyard matures and the vines stop competing at the same level as weeds for water and nutrients. Weeds will absorb a good deal of the irrigation/rain water if allowed, and can also rob the topsoil of nutrients that may eventually work down to vine-root level. My usual recommendation: Keep the vine row weed-free for the first 3–5 years of a vineyard’s life, and then keep the weeds in check, and never let them interfere with the growing canopy of the vine. The less vigorous the vineyard, the more important it is to keep weeds in check. It is also advisable to get the weeds while they are young, easily destroyed, and before they go to seed.
V: Early Canopy Management: Shoot Removal and Suckering
I’ve saved two of the most crucial cultural practices for early season vineyard management until last.
Shoot removal — will space out the growing shoots and canes on the fruiting wire, will produce a uniform crop, a uniform niche space for each cluster, will increase the effectiveness of sprays and leaf removal, and will balance the fruit to leaf ratio.
Suckering — will focus all of the vine’s energy to grow in the proper space.
Shoot removal is a fairly expert operation, but with a little training I can get you out in the vineyard and within a few hours, your post-budbreak vineyard will be dialed in and you will be saving lots of future work. The best time to engage in shoot thinning/removal is when the vines have an average shoot length of about 6 in. (15 cm). Some shoots will be just emerging, but already you should be able to discern which shoots are healthy and growing fast, and which may be stunted and will never catch up. The idea is to retain a certain number of healthy shoots per side of the canopy.
• Low-vigor vines: Retain 16–20 shoots per vine or 8–9 shoots per side.
• Medium-vigor vines: Retain 20–25 shoots per vine or 10–12 per side.
• High-vigor vines: Retain up to 30 shoots per vine or 15 per side.
• Retain the healthiest shoots and remove the stunted shoots, or shoots without crop.
• The MOST IMPORTANT element of this practice: Try to space each shoot out at least 3–4 in. (8–10 cm), so that each shoot has its own space. You can use the width of a slender hand as a guide. There should be about a HAND’S SPACE between each shoot.
• Remove any double shoots. If a single bud is supporting a double shoot (2 separate shoots with 2 growing tips coming from the same bud position) pinch off the extra shoot. Retain the longer of the two shoots if it is in a good position.
• Remove all shoots that are pointing down. They will be difficult to position up into the catch wires.
• Also be sure to remove excess shoot growth from the head of the vine, but you always want to retain a few good shoots for next year’s fruiting wood if you are using a cane-pruned system.
• In spur-trained, cordon systems, remove every shoot/sucker that it not coming out of a spur position retained at pruning, no exceptions. You can also shoot-thin spurs that have more shoots than necessary. In other words, if you have a 2-bud spur, that spur should only have two shoots.
When done carefully, shoot thinning will help each vine produce canes/shoots of uniform length and vigor, which will help produce a crop of uniform ripeness. Each shoot will have its own space in the canopy, which will reduce crowding and mildew/rot/insect pressure and open the fruit up to more wind and sun exposure.
Suckering is easy stuff. If the vine trunk has anything growing out of it, grab it and pull it sharply down. If you see any red buds on the trunk (future shoots), rub them off with a gloved thumb. Suckering has a single focus and a single goal: Remove any green growth or buds from the vine that do not originate from budwood that was retained during pruning for fruit production. That means any growth not on the retained canes is removed, focusing the vine’s growth and nutrients on ripening the crop. All growth from under the head of the vine is always removed, buds or shoots.
How I sucker: Wearing sturdy leather gloves I walk between two rows looking for emerging green or red buds on the trunk or near the base of the vine, and also on the head of the vine, and I knock the sucker off with a downward rubbing motion. If the vine has a number of emerging suckers, I may grasp the trunk firmly and run my closed hand firmly up and down the length of the trunk, which will remove all suckers and future ones. Some suckers near the base of the vine tend to be tough, and sometimes woody at the base. I carry a pair of bypass pruners and snip those off as close to the trunk as I can.
Finally, don’t forget rootstock suckers. Sometimes rootstock will decide it wants to grow above ground, and you may see shoots coming out of the ground with strange looking leaves or colors. These are often woody and tough to remove, so use the pruners to cut them back to or below soil level.

Fall is the most critical time in the vineyard. Preparing for and executing harvest are paramount. So is the cleanup and vineyard care afterwards. Wes Hagen lays out his advice for fall and winter care in a mature vineyard.
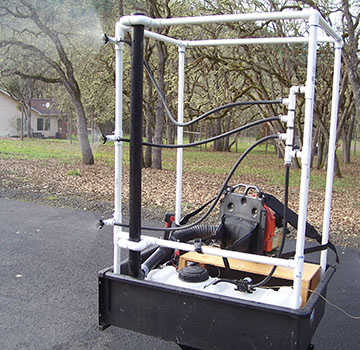
When your home vineyard grows to a certain size a hand-held or backpack sprayer just won't cut it. Use these plans to build a tow-behind sprayer to save time and effort while executing your spray program.

