 When the harvest season rolls around each year, and winemakers gear up for the busy season, a winemaker’s plans to improve on the previous vintage should have already started in spring and early summer. Perhaps we want to be better at keeping records, or just didn’t like the way a certain batch turned out the previous vintage and we’re looking for new techniques or equipment to purchase. Regardless of what you want to improve, it is best to plan ahead.
Much of home winemaking can be looked at as “chemistry oriented,” such as analyzing your juice and making adjustments with sugar or acid. In those cases, your equipment is a secondary concern. (If you’re adding acid to juice, it doesn’t matter if the juice is in a plastic bucket, a glass carboy or a stainless vessel. The acid addition is the same.) However, two aspects of winemaking — crushing and pressing — are a combination of technique and equipment. In this article, we will explore some options that will serve as a foundation of knowledge to lead you to a great crush and press. We will address theoretical as well as some practical applications in the cellar. The focus of this article is geared toward the winemaker who sources fresh fruit, but for those winemakers working with concentrate or kits, by all means read on. There’s valuable information that is important for both disciplines.
The Importance of Planning and Preparedness
One of the most important keys to a successful crush and press is preparedness. Crush is a time of the year in which your schedule is dictated to your passion to make the best wine. There’s no doubt about it that the best wines are made from the best grapes. Mother Nature takes the driver’s seat as the season progresses. When the fruit is ready to go, you must be able to spring into action and be ready when the grower calls and says they’re picking tomorrow. It’s easy to say that preparedness is the key step, but there are several different levels of preparedness that need to be addressed.
The first key to preparedness is planning and that begins with reviewing your notes. Throughout harvest, detailed notes about what you did, and how the wine developed through fermentation are the key to building on producing great wines each harvest. If you do not have good notes, but a string of non-relevant Twitter and Facebook feeds, then there is a problem and you should re-focus your priorities. Write your notes like a diary. These notes should include comments on successes, near successes or downright failures within each vintage. At a minimum they should include harvest data, fermentation data, Brix, pressing information, free-run and press fraction yields, tank types and volumes that you pressed into, and any additions like nutrients, enzymes and sulfur dioxide. Every detail is critical and the most important thing to do is write them down, no matter how insignificant they seem. For instance, you added something late or early, forgot to punch down for a cycle, the press operation that went smoothly and you didn’t spill a drop. Good or bad, your notes are your own and if you’ve made an apparent mistake, you are the best person to admit it to. The mistake quite possibly may be a key to the success of the batch. Your notes also help you keep on track with the fermentation monitoring. Pretty much anything you do to chronicle the life of that given batch is important. After harvest, review the notes once you’ve put the wine to bed for the winter. It is at this point that the best decisions to improve your next crush and press are made. Write down what you would like to make changes in for the next year and begin to do the research to determine its feasibility. This is essentially the beginnings of a pre-harvest checklist. It’s never too early to start this list in any given season and the best time to generate it is when the current harvest is drawing to a close.

The checklist should also set deadlines. If you are planning to upgrade equipment, this should take place in December or January in case it must be ordered. Items such as yeast and nutrients can wait until a month or so before crush. But just remember, you’ve got a finite amount of time to get it done. The grapes shouldn’t wait if you are going to make great wine. Being prepared for the expected — and more importantly, the unexpected — is the main key to success during crushing and pressing, but what does it take to be prepared? What do you do when the grapes are “in the house?”
Preparedness also involves being able to handle the volumes you’ve outlined in your crush plan. In any given season, do not bring in any more grapes than you can safely and effectively process. Not just from the crushing aspect, but pressing as well. And let’s take it a step further; once the wine is bottled, will you have a location to store all those case goods? It is really tempting to take advantage of offers for free or inexpensive grapes. But that does not come without some drawbacks. When you get too much fruit in the cellar, the task can be daunting and difficult to keep everything straight. You want to be able to process any batch in a timely manner. This is your hobby and the last thing you want to do is make it difficult. You want the process to go smoothly and you do that by choosing equipment that will handle your expected grape load and juice yields. If you’re working with a ton of grapes do not have a bunch of 5-gallon (19-L) buckets to distribute the must to. From this perspective, you should feel comfortable with the volume of must and wine; choose your equipment that best processes the volume. Even though we’re talking about a successful crush, it is equally important in sizing to make sure that you have the capacity to store the case goods that will eventually be bottled.
Prepare for harvest by making sure that all your equipment is cleaned, your tanks are sanitized, and any hoses that are a little ratty, have been replaced. Plug in each piece of equipment and run it for a few minutes. Check the lube points, chain tensions and belts if so equipped and adjust as necessary. Replace these if there is any doubt of their integrity. I recall a few years back, my supervisor showing me a link for a chain on our press that appeared to be failing. He had the replacement, but it was Friday afternoon and the cold beer was calling. His last words to me before leaving were to the effect that it should be fine over the weekend; however that was not the case. A case of bad luck ensued and the link failed under a full load of fruit in the press. The normal replacement time of about an hour was complicated by the fruit load and stretched through the afternoon. The take home message is when in doubt; replace it while you have the time, because it will fail and you won’t have the time to fix it without compromising something else in the process.
Cleanliness and sanitation is something that should be ongoing in your cellar. When putting your crush equipment away for the season, make sure it’s clean and covered. Come summertime, it only needs to be sanitized and after you’ve checked out the operation, you’re ready to go. I like cleaning with sodium percarbonate, which is also sold under the trade name ProxyClean®. Make sure your hoses, tanks, carboys, clamps and gaskets have been pulled out and organized. You do not want to have to scramble at the last minute. During the crush and press, make sure that you promptly clean your equipment after use. Wash down with water and then use your cleaner. This also applies to your tanks, carboys, buckets, hoses and airlocks. The idea here is to be ready to go on a moment’s notice. In general, cleaning at the end of a process sets the tone for the next process.
Crushing
We’ve reviewed some basic paperwork and cellar practices that are keys to success, but what about the winemaking process itself? There are many philosophies of the crush process and one must evaluate the fruit to determine best practices. This is what I meant above by reading the fruit and then determining best practices for that given lot. For example, some fruit is excessively tannic on the vine and the winemaker would want to minimize extraction of those phenolics to avoid wines that are astringent and bitter. Conversely, if the fruit is low in astringency and you want to produce a very soft, fruit forward wine.

It is no secret that the best wines are made from the best fruit. But as a home winemaker, sometimes the best sources are not attainable, either financially or just by limited availability. In some cases, you generally have good fruit but want to enhance something in the fermentation process, or limit extraction of excessive phenolics. In recent years there has been a movement towards more kinder and gentler treatment of the fruit, which produces softer tannins and enhances the fruitier characters. Most large scale commercial equipment manufacturers are producing equipment that will de-stem only. Thus moving away from the traditional practices of crush and de-stem, or vice versa. The equipment manufacturers that cater to the home winemaker are also following suit, but this equipment comes at a price much higher than the standard de-stemmer/crusher.
De-stemming leaves the berries generally intact. This practice of processing of the fruit in a gentler manner, leads to a subtle extraction of phenolics. The incidental fractures of the berries during punch downs, pumping, and pressing slowly release the phenolics into the fermentation. Depending on how long the berry had been intact, the berries undergo a bit of glycolytic respiration. The process akin to carbonic maceration, a technique used in the Beaujolais Nouveaux styles of France. The respiration process is the normal process of respiration in the berry as a result of its own metabolism. This process produces higher alcohols and acids, which result in increased ester production. When the berry eventually fractures, these esters are released to the wine, and impart more fruity characters. This technique is good for fruit that is very astringent
To crush and then de-stem, more common and an affordable alternative to home winemakers, moves the fruit through the rollers, with the possibility of damage to the stems and some juice contact which may impart some green or bitter characters. This may be good for a Cabernet Sauvignon, but is not a desired trait in the more delicate varieties such as Pinot Noir or Sangiovese. The converse, that being to de-stem and then crush is the most desirable approach, especially if you have the ability to move the rollers apart somewhat to allow some berries to remain intact. This is sort of the compromise. It comes at a price point somewhere in the middle of de-stemming only and crushing first. When de-stemming/crushing, examine your berry size and adjust the gap between your rollers accordingly. Attempt to get a minimum of 25% of the berries left intact.
Pressing
The pressing operation is critical to red wine production and the winemaker must consider three key factors — the type of press, how to press and when to press. The types of presses available to home winemakers are the basket type, bladder press or a combination of the two, which is essentially a bladder inside of a basket. Those with deep pockets can splurge and purchase a membrane press. There are small versions of these highly sophisticated presses that are available in capacities as low as a half ton. The limiting factors here are that they generally require 3-phase power and they cost tens of thousands of dollars.
Basket and bladder presses are more affordable, but are not as efficient. In the case of the former, the basket is filled with must or pomace and a ram is lowered, pushing the juice/wine out through slats or holes in the basket. The inefficiency lies in that there is liquid trapped in the center of the basket which is not expressed. The bladder press was a solution to this problem in that within the center of the basket is a bladder which is inflated, with air or water and pushes the must against the outside of the basket. Depending on the basket diameter, this gives a better extraction compared to the basket type.
With respect to how to press, there are modern philosophies to pressing. The old school method was for a physical, mechanical separation of the liquid portion. Quite successful, and this has been the norm for many wine styles through the millennia of winemaking. Recently the concept of de-juicing has been introduced by the commercial press manufacturers. De-juicing involves a process of press, express and crumble, repeating many times over the pressing cycle. In the modern membrane presses, this is controlled by the computer and custom programmed by the winemaker. In the home cellar, given our equipment, you become the programmer. Keys to achieving the de-juice principle of pressing using basket or bladder presses is to not overload your basket. Perform several small press operations by keeping the cake small. Not all basket presses will permit this, so you would need to add blocks between the press head and the ram. What this does is reduce the amount of trapped liquid in the center of the cake. After the free run has been drained out of the pan, then you can bring down the ram slowly and express the press fraction. I find that the press operation takes a little longer, but I’m not disappointed when I breakdown the basket and find more wine in the center. As with any press operation, keep your free run and fractions separate to blend back at a later date.
When to press is the third aspect of the pressing process for red wines. In general, this is on the order of 7–10 days after the onset of fermentation and in the neighborhood of zero °Brix. Pressing sooner could result in some color not being extracted. Pressing later, would result in more seed tannin being extracted. While seed tannin has been shown to help stabilize color, excessive extraction can lead to more bitterness or astringency in the wine. Research indicates most extractable color is achieved within ten days. Thus, through the course of a normal fermentation cycle, pressing at around zero °Brix would be on order. If the fermentation sticks or becomes sluggish, you should still press.
To have the must sitting open and exposed is dangerous and can lead to aldehyde formation. Some argue that if a fermentation is sluggish, but still progressing and you press, that the yeast can be overwhelmed by the additional sugars in the berry when pressed, thus halting the fermentation. That is certainly possible, but my counter to that is that the risk is too high for excessive tannin extraction, formation of aldehyde because of decreased carbon dioxide evolution and you’re likely going to have to perform a restart procedure anyway.
With respect to red wine fermentation and product transfers, the winemaker must be able to react to the fermentation kinetics. Should the yeast begin to develop a little hydrogen sulfide, more commonly referred to as the rotten egg smell, you must be able to react by aerating the must. In commercial practice, this is done by performing a splash and rack. In the home cellar, this is a bit more difficult, but can be achieved. If you own a pump that is designed to pump must, with minimal damage to the berries, you would pump the must over. You would plunge a hose to the bottom of the fermenters, or if in a tank, attaching the hose to the bottom valve and pumping the medium over the top and breaking the cap up. In the absence of a must pump, the same affect can be achieved by vigorous punching down the medium. Consult your local home winemaking shop for the best choices of pumps. Unfortunately, must pumps may not be the best for wine or juice transfers and vice versa.
Other notable keys to a successful crush and press are having other appropriate pieces of equipment in place. If you are to ferment in plastic fermenters, ensure that they are food grade. Your hoses for product transfers should also be food grade, and clean and smooth on the inside. In addition, your hoses, buckets, funnels, spoons, thiefs should be kept clean and hanging in a place where they drain completely and do not pool any water. You must have the ability to control your fermentation temperatures, must additions, and yeast choices based on best practices and product knowledge. All combine to give you a successful outcome to your endeavor.
Given the scope of winemaking science and equipment technology that’s available to us today, it’s hard to imagine anything less, but alas, there was a time when crushed grapes just spontaneously fermented, and through the process, folks were left with something that was appealing as a beverage. You could successfully argue that the keys to a great crush and press go back to those early days. Given the equipment available to them; the winemakers were trying to find ways to make the process easier, which is akin to what we do today. Each season brings another level to the knowledge base and the desire to make the next vintage even better than the last. The moral of this story is that you should be working throughout the year to perfect any imperfections you and your team experienced. There’s no time like the present to tackle this, rather than scramble at the end with late night cleaning and repairs while the fruit misses its magical moment to be harvested.

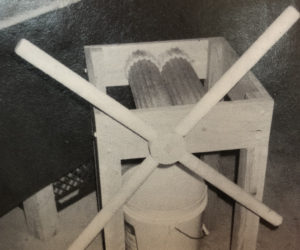
Don't want to fork over the money it costs to buy a destemmer-crusher? Good with your hands? Try building this!

