Kegging Wine
Sparkling wine usually comes packaged in either standard-sized wine bottles (750 mL), half-bottle-sized splits or Magnums, which hold the equivalent of two standard wine bottles. However, less common, larger bottle sizes include Jeroboams (which hold 4 standard bottles of wine), Methuselahs (8 bottles), Balthazars (16 bottles) Nebuchadnezzars (20 bottles), Melchiors (24 bottles) and Sovereigns (34 bottles). There is also a size between Melchior (18 L) and Sovereign (25.5 L) that you may never have heard of — the Cornelius (18.9 L).
The Cornelius isn’t a bottle, however, it’s a keg — specifically, a 5-gallon (19 L) stainless steel keg originally employed in the soft drink industry. The name Cornelius comes from the best-known manufacturer of these kegs, the Cornelius Company (of Anoka, Minnesota). Spartan-burg Steel Products (of Spartanburg, South Carolina) also made these type kegs. Cornelius kegs have been phased out of the soda industry in favor of a disposable “bag in a box” setup. However, the kegs remaining in circulation are a favorite of home beer brewers and they have several potential uses in home winemaking as well.
Kegs in home winemaking
First of all, a Cornelius (or “Corny”) keg can serve as both a storage vessel and serving container for wine (sparkling or still). Serving wine from a beer tap may lack the romance of pulling a cork, but filling one Cornelius keg is much easier than filling and corking twenty-five standard (750 mL) wine bottles. Also, you won’t need to worry about leaking corks or off aromas from corked wine.
Like glass, stainless steel is an inert surface and won’t alter the taste of your wine. In addition, since the headspace can be purged with an inert gas — such as nitrogen or carbon dioxide — oxidation is minimized in your kegged wine.

With your wine in a keg, you can have a single glass without opening a whole bottle. And, if you do need a bottle to take to a friend’s house, you can easily fill one right from the keg.
Cornelius kegs can be used as holding tanks for wine reserved for topping up barrels or other fermenters. They can also be used as holding tanks for wines destined to be blended. Since the wine is pushed from the keg using gas pressure, you don’t have to worry about lifting carboys or getting a siphon started. And — unlike blending from a barrel or carboys — the leftover wine is protected from oxygen, even if there is only a small amount left in the keg.
Finally, Corny kegs can also be used as pressure vessels for carbonating sparkling wines.
Meet the Cornelius keg
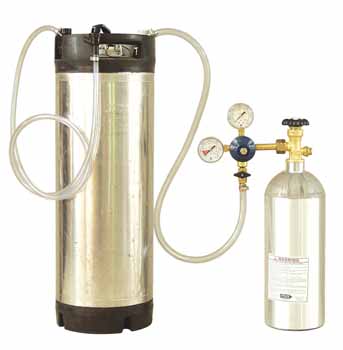
A Cornelius keg is a stainless steel cylinder with an access hatch, which is usually oval, on top. Most Corny kegs have formed rubber pieces at their top and bottom. The rubber keeps the keg from scratching the surface it sits on and handles are molded into the rubber on top for easy handling. The lid almost always has a pressure relief built into it.
There are two posts on the top of each keg — a “gas in” post and a “liquid out” post. The “liquid out” post connects to a thin, stainless steel tube — called the spear — that reaches to the bottom of the keg. The “gas in” fitting is connected to a short tube that extends only into the headspace of the keg. Gas pressure on the top of the keg pushes liquid up the spear and out the “liquid out” post.

The posts are connected to your gas source and dispensing equipment via quick disconnect fittings. Often, 5/16” ID tubing is used to connect the regulator to the “gas in” fitting. The tubing should be clamped to the regulator and gas in fitting, as the pressures on the gas side can be sufficient to blow the tubing off. (Any shop that sells kegging equipment will carry the circular tubing clamps required.) For the dispensing side, 3/16” ID tubing is common. Unless you are planning on carbonating your wine, there is no reason to use clamps on this side.
There are two different types of posts found on Cornelius kegs. Kegs of the type used by Pepsi and other soda makers have ball lock posts and require ball lock connectors. The type of kegs used by Coca-Cola have pin lock posts and require pin lock connectors. The two are not interchangeable. Ball lock (Pepsi) kegs are more common these days, but both types can usually be found in most homebrew shops. If you get more than one Corny keg, it pays to keep them all of the same type.
The most common size of Cornelius keg is 5 gallons (19 L), although other sizes — including 2.5 gallon (9.5 L), 3 gallon (11.4 L), 10 gallon (38 L) and 15 gallon (58 L) — exist. The odd sizes are harder to find and usually cost $20 or more than a standard 5-gallon (19-L) keg. (Larger keg sizes make nice fermenters.)
You can buy a new Cornelius keg for around $100, but used kegs are available for much less. How much less depends on their condition.
Reconditioned kegs usually go for less than $50 (although prices have been rising as the supply is limited). Reconditioned kegs will have the rubber O-ring that seals the lid — as well as the little O-rings that seal the posts — replaced. These gaskets will smell like soda syrup if they have not been replaced. (They may also be brittle and prone to cracking.)
Reconditioned kegs may also have the spring-loaded valves within the posts, called poppet valves, replaced. Reconditioned kegs should hold pressure and are often shipped pressurized. A quick pull of the pressure-relief valve should yield a blast of gas from the keg. Reconditioned kegs are usually cleaned inside and can be quickly cleaned and made ready to use.
Non-reconditioned kegs cost less, sometimes as low as $40, but will need new gaskets and perhaps new poppet valves. They will also need to be disassembled and given a thorough cleaning prior to their first use.
Care and cleaning
To clean a Cornelius keg, you need to first open the hatch on top. Before attempting to open a Corny keg, always pull on the pressure release valve on the lid.
A favorite cleaner for home beer makers is PBW (powdered brewery wash). When cleaning kegs, I put 2.5 oz. (71 g) of PBW in 5 gallons (19 L) of water, heat it to 160 °F (71 °C) and siphon the hot cleaning solution into the keg. Then, I close the keg and let it sit for 15 minutes before transferring the solution to another keg. (Note that the outside of the keg will be hot enough to cause burns if you clean your kegs this way.) I find this process easier than using a “cold” cleaning solution and scrubbing the inside of the keg with a brush, although either way works. After rinsing with hot water, the keg is ready to be sanitized.
The keg can be sanitized with an iodophor solution or any other sanitizer that works on stainless steel. (I use a product called Star San, available — along with PBW — at most homebrewing shops.) Do not, however, use bleach as this can pit stainless steel. (The contact time required to do this is fairly long, but why risk it?)
Occasionally, you will want to disassemble the keg completely and clean it. To do this, you will need a deep socket that fits your keg’s posts. For ball lock (“Pepsi”) kegs, you will need either a 7/8” or 11/16” socket, depending on your posts. (Hint: take your keg with you to the hardware store when buying your deep socket.) Note that posts may have either a 6-point or 12-point base, so always get a 12-point socket so you can deal with both. Pin lock kegs require a special slotted 13/16” socket. (The slots accommodate the pins. These can be found at some homebrew shops or you can notch the socket yourself if you have the proper tools.)
Got gas?
Cornelius kegs were manufactured to be used as a pressure vessel for carbonated soda (i.e. a liquid with lots of carbon dioxide (CO2) gas dissolved in it). However, as a home winemaker, you do not want to carbonate your wine (unless you are making sparkling wine). So, a home winemaking setup will differ in one key respect from a soda or beer dispensing setup — a wine keg will use nitrogen gas to dispense the wine.
Tanks of nitrogen gas can be found at any store that sells compressed gas. You will need a nitrogen regulator to control the flow of gas to the keg. The regulators sold at homebrew shops — designed to work with CO2 tanks — will not work on nitrogen tanks, so you will need to buy (or rent) one from the gas supplier. All the other hardware — plastic tubing, gas in and liquid out disconnects and beer faucet or “cobra tap” — are the same and can be found at a homebrewing shop.
Using your kegging system
Connect the nitrogen tank to your keg via 5/16” ID tubing plastic tubing with a “gas in” fitting on the one end. (1/4” ID tubing can also be used.) Attach the “gas in” fitting to the keg.
For the dispensing side, you have several options. The simplest is plastic tubing with a liquid out fitting on one end and a “cobra tap” on the other. Beer setups usually use around 4–5 feet (1.2–1.5 m) of 3/16” ID tubing. For a wine setup, the length of the line can be much shorter, around 6 inches (15 cm). You can also dispense your wine through a beer faucet on a draft tower if you’re installing your wine kegging system in a home bar. When dealing with a keg that contains wine, always make sure the tap is shut when affixing the “liquid out” fitting to the keg. If not, you may spill some wine.
To fill your keg with wine, affix the lid on the (empty) keg and open the valve on the top of the nitrogen tank. Let the keg fill with nitrogen and look at the gauge pressure. If the pressure is below 3–4 PSI, turn the regulator valve until the pressure increases to this value. If it is above 3–4 PSI, turn the gas valve off, release the pressure on the keg and adjust the pressure regulating screw on the regulator. Next, open the valve and let the keg fill with gas again. Repeat the process until the gauge pressure reads around 3–4 PSI.
You can adjust the gas pressure up or down to make the wine flow faster or slower, according to your wishes.
Siphon your wine into the keg and replace the lid. (If you do this before the nitrogen disperses, the wine will be mostly protected from oxygen during the transfer.) Turn on the gas again and let the keg pressurize. Pull the pressure relief valve on the lid a couple times to blow off any oxygen in the headspace. Now, you’re ready to serve your wine.
Carbon dioxide option
If you like, you can also go with a standard CO2 setup. If you turn the gas off and pull the pressure relief valve each time you serve wine, it will only absorb a small amount of CO2 — enough that you might occasionally see a lone bubble when you pour, but far from enough to make the wine seem fizzy or gassy. A CO2 setup will also allow you to also use your keg for sparkling wine production as well as beer brewing and soda making. Various sparkling wine making methods — including using a Cornelius keg as a pressure vessel, known as the Charmat method — can be found on a search at Winemakermag.com. You can start here though.
Serving kegged wine is convenient and easy; no need to fumble with pulling a cork –just open the tap and let it flow.