Preparing Your Winery for Harvest
The opportunity to make wine from fresh grapes comes just once (or twice) a year. Sure, you can make wines from kits, concentrates, and frozen juices at any time, but the fall harvest (and spring if you get grapes from the Southern Hemisphere) is when the majority of us home winemakers have the most on the line. It’s make or break time, and that means you need to start preparing well before the grapes arrive.
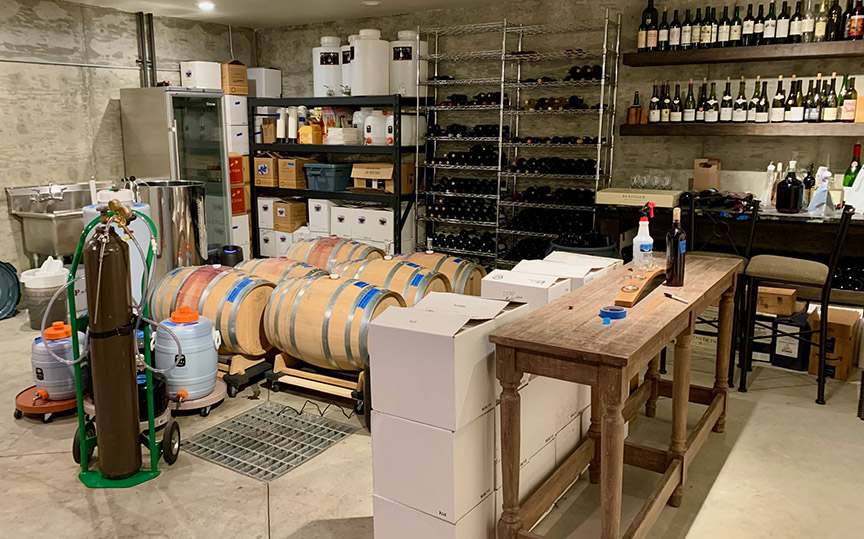
Much of the efforts in the winery are best done in a proactive manner. Knowing what is needed ahead of time will reduce frustration and help you produce the best wine possible. It’s all about planning — as the saying goes, “If you fail to plan, you are planning to fail.”
This article is based on what we do in our home winery. We have a dedicated space and equipment for winery operations, plus our own small hobby vineyard. However, nearly all of the planning and preparations apply no matter how much wine you make and the space being used. With that being said, I will still try and cover variants of this that might apply more broadly to those with less dedicated spaces.
You will be ahead of the curve if you start thinking about winery preparations sometime in the middle of the growing season when you get a fairly solid idea of what varieties you will be working with and in what volume. The middle of the growing season is probably 8–12 weeks prior to harvest, when vineyard production level is pretty well known. Why?

This gives you time to make arrangements with a grower, establishing what is going to be available and when.
If you get your grapes from a wine broker, shipping and onsite delivery will need to be determined.
Grape growers/suppliers will assess their expected harvest volumes during the course of the growing season. You should have a pretty solid idea of what varieties you want and in what volume 2–3 months prior to harvest and communicate that to your supplier. Just remember, different varieties (and red/white differences) and growing regions will have different harvest dates. Your supplier should give you an approximate timeframe when to expect harvest.
Knowing what varieties are in your winemaking plans ahead of time will allow you to purchase the right yeasts that will complement each variety. Some yeasts may not be available from a local supplier, so consider order availability, lead time, and ensure that the yeast is kept in a cool, dry place until harvest. Yeast stores best when refrigerated.
Some people like to stick with a single yeast for most (or all) of their fermentations. This is often for reasons of simplicity and cost. Yet, yeast choice can greatly influence the outcomes of a fermentation by bringing out specific varietal characteristics or adding desired nuances. Certain yeast strains might also be selected because of their ability to handle high-Brix (high-alcohol) fermentations or restarting a stuck fermentation. It is never a bad idea to prepare for the unexpected.

In addition to the varieties, you should have an idea of the volume you will be making. Volume will dictate how much fermentation materials (and subsequent containers, discussed in more detail later) to have on hand.
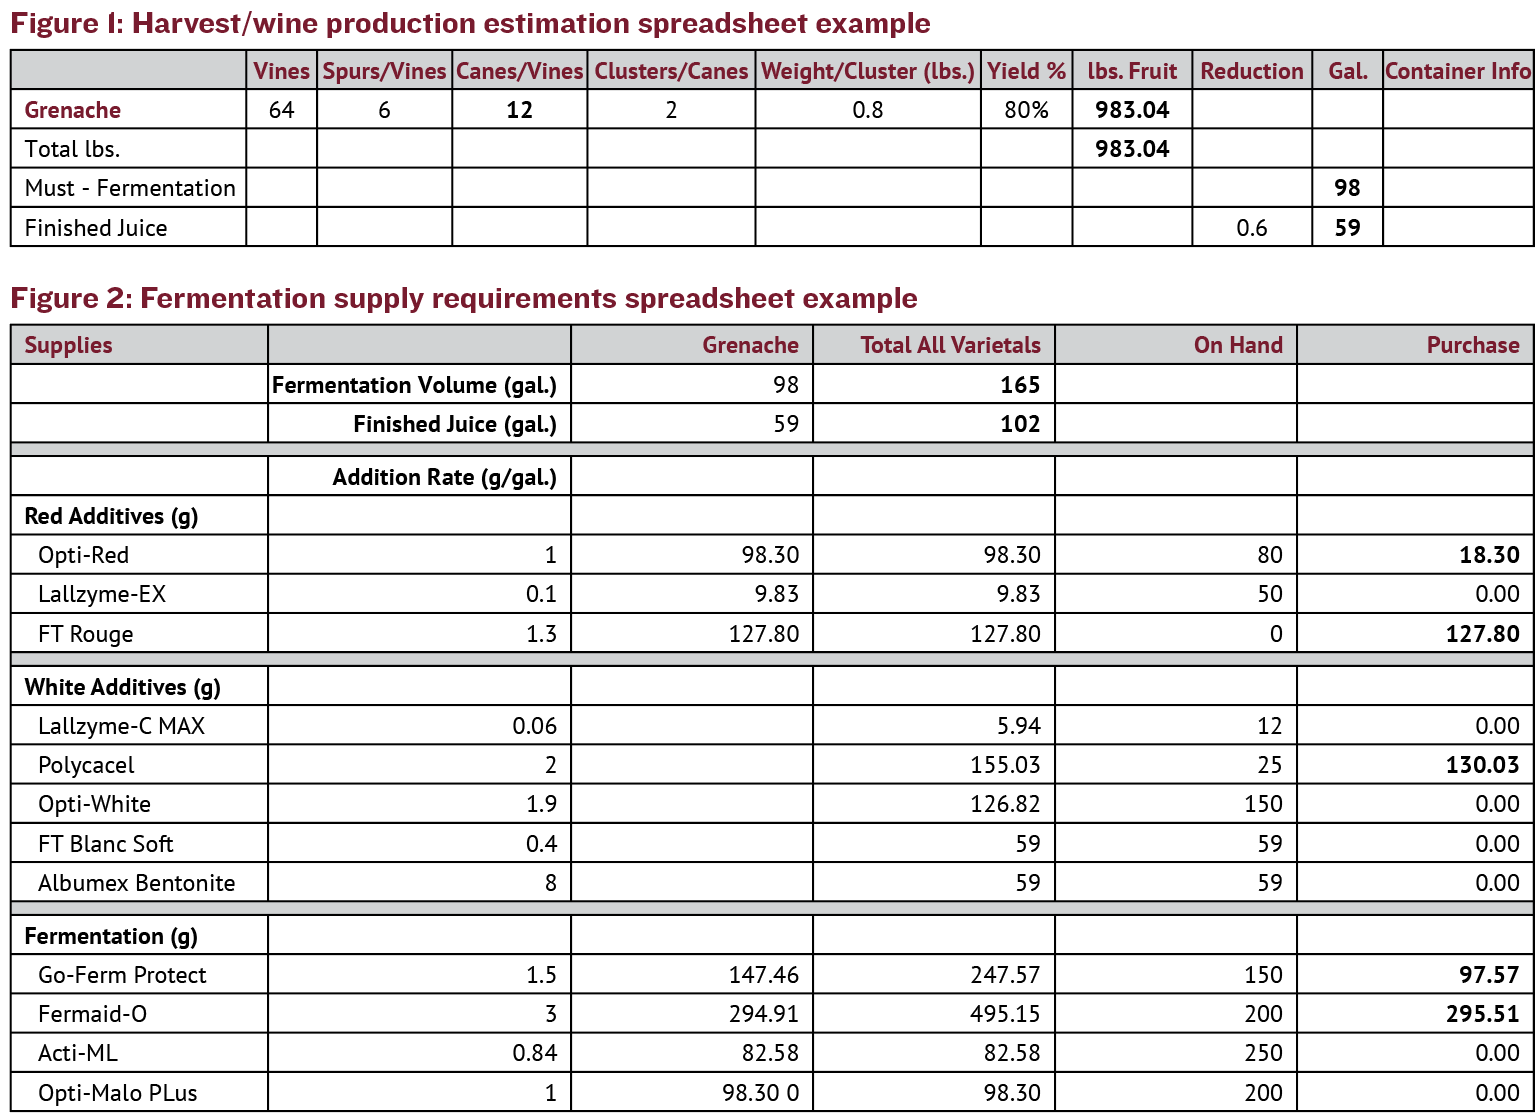
For planning purposes, it helps to know how much wine is produced from a volume of weight of grapes. A common rule of thumb is that 100 lbs. (45 kg) of harvested grapes will yield around 10 gallons (38 L) of crushed must. This would be the volume to use for your pre-fermentation and fermentation additions (S02, yeast, tannins, enzymes, etc.).
Based on my own experience, the conversion of must volume to finished wine after pressing, racking, and possible filtering is about a 60–70% yield. Therefore, 100 lbs. (45 kg) of fruit yields about 10 gallons (38 L) of must, which results in 6–7 gallons (23–26.5 L) of wine. The exact percentage of the finished wine calculation is going to be dependent upon the specific variety because of typical berry size, cluster size, etc. Figure 1, below, offers an example illustrating these calculations.
Packaging of the fermentation materials will typically provide information on how much of the product is to be added to a specific volume of must or wine.
In our case, because we produce wines from up to five different estate varieties, I have a spreadsheet that allows me to input harvest volumes of each variety, which provides me with fermentation (must) and post-fermentation (wine) volumes to aggregate container and fermentation material requirements. This way I can more accurately ensure I have all material on hand well before harvest. See an example of this in Figure 2, below.
These are important considerations when planning for containers:
• Account for what wine you currently have in containers from the previous vintage that will be retained for additional aging.
• Container use can be shared between bringing harvest grapes home and fermentation. These are typically open-top containers. Just recognize that you will need at least one additional container to allow you to move grapes or must into when you process grapes from crushing/destemming.
• You will need enclosed containers to hold juice after pressing, which allows you to manage headspace for the prevention of oxidation. At low volumes, these are typically glass or plastic carboys that can hold up to 6.5 gallons (24.5 L). There are many other options for larger volumes of wine that are used for malolactic fermentation and long-term storage/aging. You will always need at least one extra container that allows you to move or rack wine from one container to another.
• Determine where you are going to store both full and empty containers.
• All containers that hold grapes coming from the vineyard all of the way to bottling should be of food-grade material. Food-grade containers, primarily High-Density Polyethylene (HDPE) or Polyethylene Terephthalate (PET), are essential in winemaking to prevent chemical leaching, off-flavors, and bacterial contamination.
Keep it Clean (and Sanitized)
A very important part of the winemaking process involves cleaning and sanitizing. All equipment/material that comes into contact with grapes in any form (clusters, crushed must, grape juice, wine) needs to be cleaned and sanitized. Why? Contact with bacteria, yeast, or other spoilage organisms left on equipment can ruin your wine. Cleaning involves removing visible grime, dirt, dried grape skins, etc. so that your equipment looks clean. Sanitizing takes it a step further and kills yeast, bacteria, and other microorganisms that escape detection from the naked eye. Without proper cleaning, sanitizers do not work as they require direct contact with the equipment surface.
Most equipment in the winery can be cleaned easily with nothing more than hot water and a scrub brush if done immediately after being used and emptied. Using standard cleaning detergents for winemaking equipment is generally discouraged because it is difficult to rinse off and can leave residues that ruin wine flavor. For cleaning more difficult grime and stains, use a non-hazardous, buffered alkaline cleaner like Powdered Brewery Wash (PBW). You would be amazed how well these products lift off organic deposits from surfaces. Avoid using abrasive scrub pads that can scratch the surface and create grooves that can harbor spoilage organisms.
What’s the difference between cleaning and sanitizing? Cleaning does not remove/kill bacteria. Sanitizing does. Historically, one of the most popular methods of sanitizing is the use of a SO2/citric acid solution. A major downside of using a SO2 solution is that it can leave an SO2 residue behind, which might affect fermentation and your desire to manage SO2 additions. The SO2/acid combination can also corrode stainless steel. There are newer products on the market (such as Saniclean or StarSan) that are much safer to work with, do not impact wine, and are not detrimental to equipment. NEVER use chlorine bleach in the winery or on winery equipment! Bleach can cause TCA (cork taint), is highly reactive with phenols causing spoilage, can corrode and cause pitting in stainless steel, and can be absorbed by plastic materials leading to off-odors and flavors.
Equipment Needs
To process your grapes into wine you will need a crusher/destemmer and a press, either purchased, rented, or borrowed. Regardless of the source, make sure they are cleaned and sanitized before AND after use. Dried grape skins and other sugary material is very difficult to remove after it has dried. Any moving parts of the equipment should be lubricated with a food-grade lubricant/grease — not an oil-based product that will impart off-flavors.
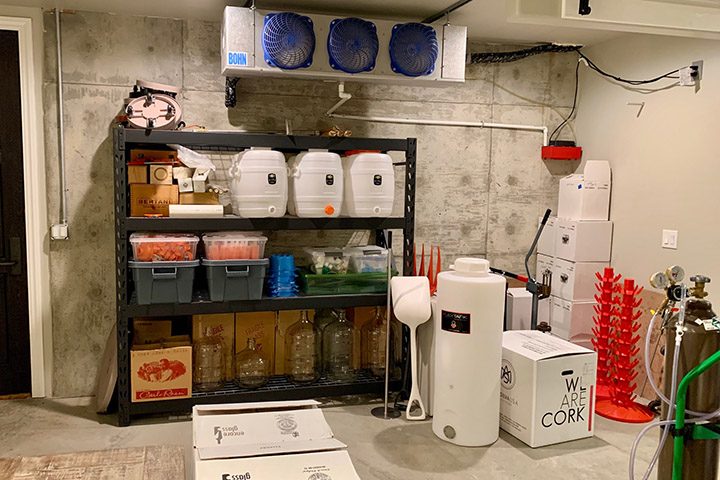
In addition to the crusher/destemmer, there is other equipment you will need or should consider having to process your wine. Some of these are must-have purchases, while others are desirable to make your winemaking more efficient. In some cases, you can defer test equipment purchases by sending your must or wine samples to a lab for testing. Make sure you have these on hand, and they are working and clean as you won’t want to be searching for them when the grapes come in and you need them quickly:
• Racking pump or siphon with hoses. (must-have)
• Small (1-, 2-, 5-gallon / 3.8-, 7.5-, 19-L) food-grade buckets to create fermentation starter, hold cleaner and sanitizer solutions, use as a dump bucket for racking and cleaning, etc. (must-have)
• ½- and 1-gallon (1.9- and 3.8-L) glass jugs to store SO2 solution, sanitizing solution, or topping wine. (must-have)
• A kitchen strainer to press out juice from the must to take samples for Brix testing. (desirable)
• Spray bottle for sanitizer solution. (desirable)
• An assortment of soft bristle brushes, cleaning pads, and rags for cleaning. (must-have)
• Hydrometer to check Brix or your grapes or must. (must-have) *It will be important to know Brix and expected alcohol level in order to make sure your yeast can handle the alcohol to ferment dry and also to make proper additions for your yeast starter.
• pH meter to do TA titrations and adjust SO2 additions. (desirable, or use a lab resource).
• Chromatography kit to check malolactic fermentation completion. (desirable, or use lab resource)
• Thermometer to check yeast hydration temperatures and yeast pitch readiness. (must-have)
It would be beneficial to give thought in advance of harvest to material flow into and out of your winery space. If you’ve been making wine for a while you’ve likely already made tweaks along the way. Whatever your history is of making wine in your current space, now would be a good time to re-evaluate material movement.
Setting up the Space
There are a lot more things to consider in setting up a winery space than what I’ll present here, but these may help initiate some new thinking to make improvements:
If you are going to crush (and press) your grapes onsite, where will the equipment be located that allows you to move bins of grapes to your crushpad? Do you have a good way to move bins to that area? Maybe invest in carts or dollies as needed to roll things around instead of lifting and carrying a long distance.
The same goes for moving your bins with the crushed must for fermentation and pressed juice into the winery for aging. Filled containers more than about 6 gallons (23 L) are extremely heavy for one person to move around. Keep in mind a gallon (3.8 L) of water weighs 8.3 lbs. (3.8 kg).
Do you have water nearby to easily clean bins and equipment?
Do you have adequate electrical power nearby to run a crusher and pumps? And what about lighting in case your winemaking/cleanup stretch past sundown?
Processing grapes to wine takes a finite amount of space and as I’ve learned over the years, finding ways to store your equipment that is not in use as well as aging wine should be a consideration. I always like to try and use vertical space that often goes unused.
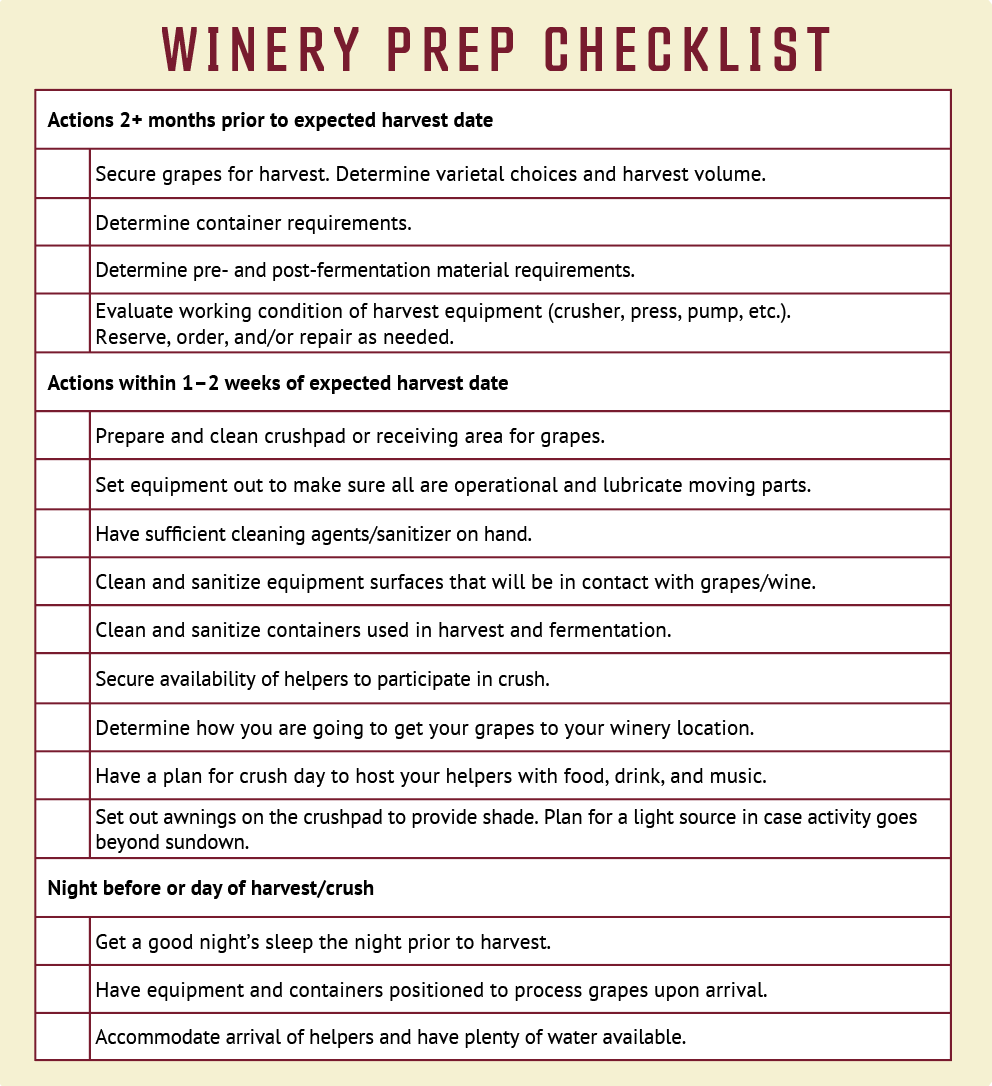
To wrap up your winery preparations for harvest it may be beneficial to create a checklist of things to do or consider, such as the example below. In addition, take notes along the way so you can add to the checklist and customize it to your needs in future years. And finally, make sure you have a way of tracking your winemaking steps and recording notes so you can refer to them in future years.
Further Reading . . .
• Clean and sanitized winemaking equipment is critical to avoid spoiling your wine. Learn more about the products and techniques for cleaning and sanitizing.