What Two Jars Taught Me About Wine
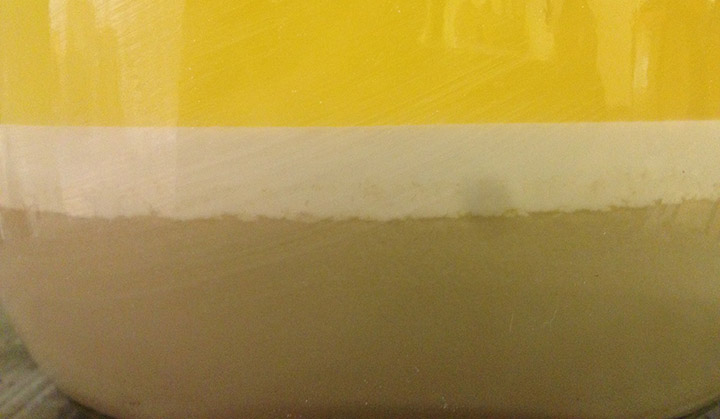
The differences between the two jars were clear when I set them side by side on my workbench on June 4. One had thickened to the color and consistency of weak tea and even had sediment swirling about the jar when it was tilted. The jar’s contents smelled oxidized, like an old, uncorked bottle of Sherry. The other jar was a straw-bright color with a more compacted sediment at the bottom. Both jars contained wine samples from the same batch and had been filled six weeks earlier. The only real difference was where they were kept. I wrote down a quick note that morning: “Big difference. This one is clearly winning” and attached it to the jar that had been kept in the back of a cabinet. The other jar had spent the past six weeks on a shelf near a window that allowed direct sunlight on the jar many hours throughout the day.
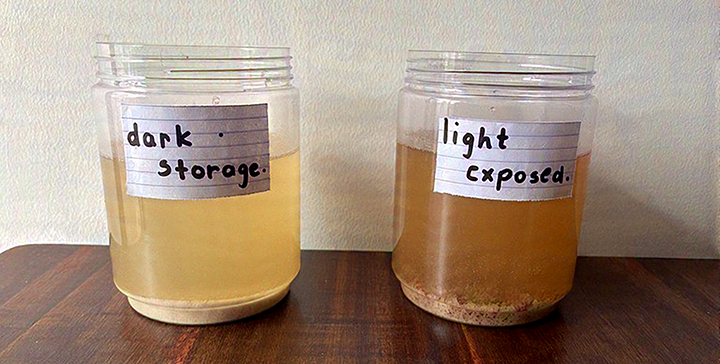
The two jars were part of a series of tests I conducted over several weeks in my garage around factors including light, vibration, oxygen levels during racking, and even the water used for rinsing equipment that came in contact with the wine. I found each to have an impact, some more subtle than others.
I evaluated all samples with full knowledge of the tests and which samples were which during each assessment. A proper scientific study would use multiple blind testers, though that was not the goal with my experiments. What these logs offer instead is consistent, dated, written observations taken over several weeks that show a clear direction of change even without statistical controls.
The wine in question was a white wine made from wine concentrate. Each experiment began approximately three to four weeks after the completion of primary fermentation. The wine was racked off the gross lees for the first time, though it was not fined nor filtered.

The Light Test
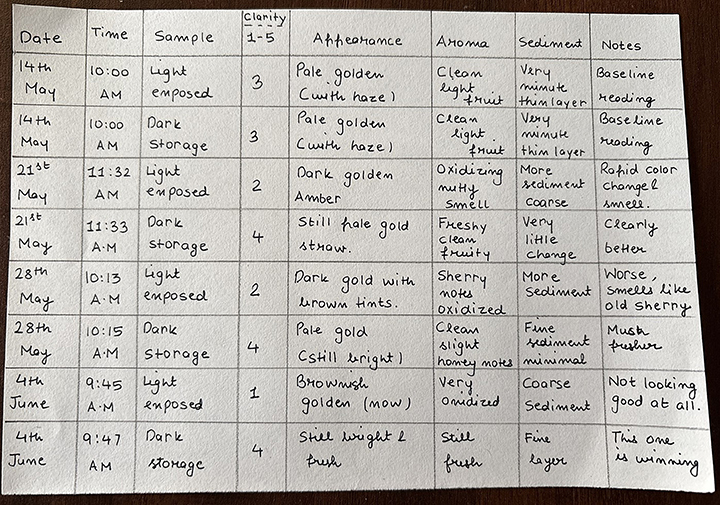
For the extent of this experiment, I kept a very simple observation log. It was straightforward to make. I just put the dates, clarity of the sample, its appearance, the aroma, and sediment in the columns. The purpose was to do a one-page-per-week side-by-side light exposure test. The pages illustrated that light did significant damage rapidly.
On May 14, I began a test with two identical samples of young white wine that both rated a 3 on a simple personal visual scale I used throughout all four tests, where 1 is nearly opaque, and 5 is completely clear. This was not a laboratory measurement, such as the NTU scale professionals use, but a consistent visual reference I applied the same way at every check. At the start, the identical wine inside each jar was slightly hazy, light golden in color, had light stone fruit on the nose, and contained a very thin layer of sediment. I recorded my observations and placed one sample in the sunlight while the other was placed inside a dark cabinet. Aside from my weekly checks, I left them as they were.
By May 21, just one week after the experiment began, the sample in the light had changed. Not only had its clarity decreased to a 2 but also its color had darkened to a golden amber. The particles inside the sample also looked bigger and coarser. The aroma had shifted as well, turning oxidized and nutty. I documented that the light sample had the faster changing color and smell compared to the other.
The sample kept in the dark had actually moved up to a clarity of 4. Undisturbed settling in the dark appeared to be allowing the fine sediment to drop out cleanly on its own, improving the visual clarity from where the sample had started. It was still a pale, gold-straw color, and still fresh and clean on the nose. The sediment itself had changed very little, and I recorded it as “clearly better than the light-
exposed sample.”
By May 28, the sample exposed to light continued to darken and develop a more concentrated sediment layer. I observed that the sample continued to deteriorate, noting that it “smelled like old Sherry.” The cabinet sample remained stable, and I noted it was “much fresher and stable.”

By June 4, the sample exposed to light had a clarity of 1, had turned brown, was very oxidized, and contained coarse sediment. I simply noted, “Not looking good at all.” The sample kept in the dark continued to be clarity 4, still bright and clear, with a fine compact layer of sediment settled neatly at the bottom, and still fresh on the nose. I underlined my most recent note, “Big difference. This one is clearly winning.”
Light starts off photochemical oxidation reactions that break down the delicate aroma compounds and speed up the browning. In a small batch, you notice it more rapidly because there is less wine to buffer the change. For anyone working at a small scale, that kind of uncontrolled oxidation can turn a promising young wine into something you will be pouring down the drain. The fix is simple once you see it happen in your own jars: Keep the wine in the dark. It can be a cardboard box in a closet or a cabinet with the door closed or even wrapping clear fermenters in brown paper works. I have started treating light exposure as non-negotiable now.
Vibration Test
Cellaring wine in a location where it won’t be moved or subjected to vibration is another often repeated recommendation when cellaring wine. But just how impactful minor vibrations could be was something I wanted to test for myself.
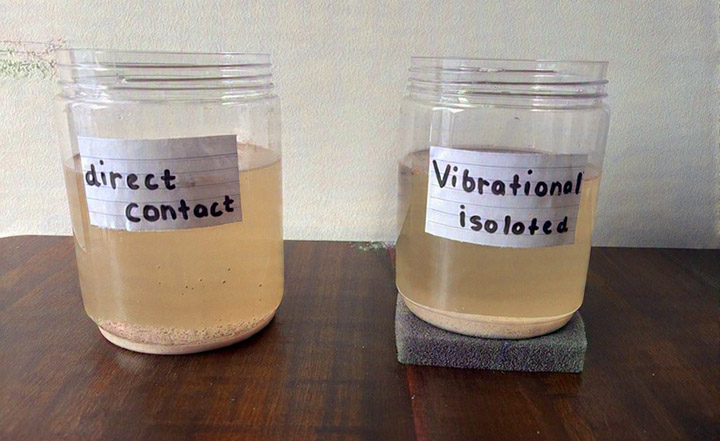
I filled two identical jars in the same way, keeping one directly on my wooden workbench and the other on a dish sponge. I didn’t want to exaggerate vibrations by putting a jar on the laundry dryer or anything. Instead, I was curious whether common household activities like walking about the garage, reorganizing, and even slamming a door would prevent sediment from settling.
Unlike the light test, the changes weren’t as immediate. Though, after a few weeks, I looked again at the jars. The one without the sponge support had noticeably more disturbed sediment. Every time I lifted it, the layer looked stirred, as if something had given the bench a bump recently. The jar on the sponge stayed cleaner at the bottom as the sediment settled in a tighter, more compact line. The difference was small enough that I might have missed it if I had not been looking for it. Once I saw it, however, the difference was clear.
For wine that will be left to age for months or years, keeping it off of hard surfaces or in a location with minimal traffic is an easy fix to a long-term problem. A sponge, piece of foam, or even an old mouse pad will be beneficial to your carboy.
Oxygen During Racking
The next oxygen-related test was about what happens during racking rather than during storage. I did two gentle transfers using the same basic siphon setup, one jar higher than the other with a thin tube running between them. In the control, I kept the end of the tube below the surface of the wine in the lower jar and moved slowly so the stream of wine stayed quiet. In the other, I let the wine splash a little more than usual, the way it sometimes does when you are in a hurry or the tube slips.
Immediately after racking, the splashed version smelled a little brighter, almost fresher. But over the next couple of weeks that brightness faded, and the softer fruit character dropped away faster than in the gentler transfer sample. The color of each remained similar, though the impact splash racking had seemed to impact the aroma. The carefully racked version stayed more stable; the aroma held together longer. It was not night and day, but it was enough that I now pay extra caution to how I handle transfers when I am trying to preserve delicate aromas.
Delicate whites and aromatic varieties suffer first because their lighter structure and volatile compounds are more easily stripped or altered by oxygen. Bigger, tannic reds can sometimes handle a little more exposure without showing it as quickly, but even they lose nuance over time. Splashing introduces oxygen at exactly the moment the wine is most exposed. A little can sometimes help a stuck fermentation or brighten a reductive note, but too much too early can strip the very compounds you are trying to keep. For small batches, the margin is narrow. Slowing down and keeping the siphon end submerged costs nothing and protects what you have already built.
Rinse Water Test
The water quality test resulted in the most subtle difference of the four, yet it was still significant. I rinsed two sets of equipment, the glass jars, siphon tube, and funnel, one set with regular tap water and one set with filtered water. After rinsing, I drained each set thoroughly but did not dry them before filling, so a small but real amount of rinse water came into contact with the wine in each case. I then filled each set of equipment with roughly 500 mL of the same young white wine and placed the jars side by side.
The batch that used filtered water fermented more cleanly and finished noticeably brighter in appearance with less residual haze, whereas the batch that used tap water was slightly hazier and took longer to lose the haze. The difference was subtle and while I can’t say it would be noticeable even in a 5-gallon (19-L) setup, it was noticeable enough that whenever the opportunity arises, I now always use filtered water.
The transfer volume of water from damp equipment alone is small, a thin film across the jar and tubing surface. Readers who want a more pronounced version of this test should consider their water source when adding water directly in volume, during yeast rehydration or must dilution, where the chlorine contact is far more significant. The rinse test simply shows that even at trace levels, the direct effect
is measurable.
Any small volume of residual water runs the risk of adding tap water that still has trace chlorine or other minerals. This can affect the yeast and impact the final clarity and stability of a batch. For those that bottle by hand, a batch that is a little clearer and more stable means less frustrating work down the line. It is a very easy thing to control and is one less thing you must think about when bottling.
In Conclusion
I started experimenting and conducting these tests because I had heard that the factors I tested can negatively impact wines, but opinions seemed to vary on the actual impact they may have. I learned with the side-by-side jars that many things we do or we do not do will show up in the final product, even if they seem minor. Light, vibration, how we move the wine with our equipment, or the water used to clean or rinse the equipment — each consideration may seem small, but everything adds up in the end.
I am not going to start obsessing over every variable now. But I have stopped treating the result as mostly a matter of luck. When a wine lacks a character or has a minor flaw, I will have a shorter list of usual suspects to check first. When something turns out well, I will have a clearer sense of which small habits likely contributed.
A winemaker I know who puts out a few hundred bottles a year from a small urban facility, mostly for local restaurants and friends, told me something that stuck after we compared notes on storage and transfers. He lost an entire lot of Pinot Gris one year because a carboy sat near a sunny window for three weeks during a busy stretch. “I thought it would be fine for a little while,” he said. “By the time I moved it the color had already turned, and the aroma was gone. Now nothing sees daylight until it is in the bottle, and I am twice as careful with the siphon on anything aromatic.”
He was not talking about fancy equipment or perfect conditions. He was talking about paying attention to the same small variables I had been testing in my own garage. Once you see the difference in your own glass, it stops feeling optional.
If you like to tinker, and most home winemakers I know do, these kinds of simple side-by-side tests are worth running so you can see the impact for yourself. You do not need lab equipment or a lot of space. Just a couple of jars, a notebook, some patience, and the willingness to observe what is in front of you.
Further Reading . . .
This article discusses the harm direct sunlight can have on wine, but what about indirect light? The Wine Wizard shares what happens to wine in a carboy when left in a lit room.