Racking Wine
The “rack” most wine lovers associate with their favorite fermented beverage is a piece of hardware for storing wine. It may be the familiar wine rack for finished bottles or maybe even a barrel rack that they have seen on a winery cellar tour. If it’s a sparkling wine tour, you may even see a riddling rack for manually rotating bottles of wine to settle the yeast lees into the neck for disgorging.
But those venerable objects are not the focus of today’s column. Instead, we will consider the act of racking wine as a home winemaker. In this usage, Merriam-Webster succinctly defines the verb “rack” as “to draw off (wine) from the lees.” Let’s look at when, how, and why you are racking your homemade wine.
When to Rack Wine
As in the dictionary definition, just about every racking is intended to remove clear wine from unwanted sediment with the goal of producing a clear finished wine. For most wines, several successive rackings will be needed at different stages of the wine’s development. For white wines, the first of these comes up after juice from the wine press has been allowed to cold-settle, usually overnight. In the morning, relatively clearer juice is siphoned or pumped off of the pulpy fruit lees that passed through the press on the way to the settling tank or carboy. The juice is relatively clearer, but it is often still noticeably green and cloudy with remaining suspended grape particles. That’s not a concern, though — it’s part of racking a few more times down the production timeline. After racking juice for white wine, inoculation with yeast and primary fermentation follow, usually in a carboy or a stainless steel tank with a fermentation airlock to protect the wine from excessive contact with air. When the wine is dry or nearly dry, it is time to rack again. This time, it may be to not-quite-full containers for malolactic fermentation (MLF), again under fermentation airlocks, or it may be to topped-up containers to begin aging if MLF is not intended. A fermentation airlock or breather bung should be fitted since a small amount of gas may yet be produced.
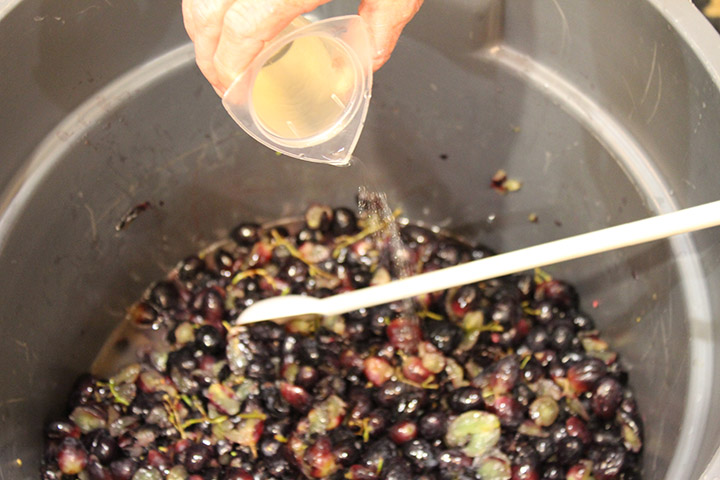
At this post-fermentation point, the racking sequence of red wine begins to catch up with the white wine program. Near the end of primary fermentation, as the cap softens and falls, the red must is pressed and the now nearly finished wine transferred to carboy, barrel, or tank. A pump may be employed, but this press-to-barrel stage is not considered a racking — and most home wine is bucketed to barrel or tank. Typically the solids content right out of the press is too high for small pumps. With or without ensuing MLF, as chosen by the winemaker, the wine will be racked in a few days or weeks to long-term bulk storage. Whether barrel, tank, or carboy, this container is topped up and sulfite additions commence for bulk aging.

In both reds and whites, the rackings before, during, and soon after fermentation progressively remove the wine from contact with heavy or gross lees, down to contact with only fine lees, and then into bulk aging with very little lees at all. Home winemakers sometimes ask if the wine is finished at this point, with little or no visible lees, and ready to bottle. Unfortunately, the answer is usually “no.” While all (or nearly all) of the original fruit solids, the dead yeast cells, and other fermentation matter may be gone, the wine is not yet stable against the production of more settled material as it ages. Cold stabilization may result in precipitation of potassium bitartrate crystals in the aging vessel that need to be left behind in another racking. For red wine, tannins continue to slowly polymerize with anthocyanin pigment molecules, forming longer molecular chains. Those that remain in solution lead to rounder, smoother mouthfeel and contribute to wine “body.” Some, though, reach a point of being insoluble in the water and alcohol solution that is wine and they drop out. With some red wines, this pigmented material forms a red varnish-like coating on the walls of a carboy or tank. They form on barrel walls, too, but those are much harder to see when cleaning later. If bottled before the cycle of precipitation is finished, the red coating may stick to the walls of the bottle. Harmless to drink and usually with a minimal decrease in the wine’s color, the stain on the glass is unfamiliar to most wine drinkers and is unattractive to potential consumers. Timely racking — two or three times over several months — is the preventive measure for avoiding a red coating on the walls of your finished bottles. White wine does not precipitate color and is more vulnerable than red wine to oxidation, so it is usually racked fewer times and is bottled earlier than red. Each variety, wine style, and growing region has its own cycle, but for many home winemakers the white wines are ready to bottle in the early spring and the reds just in time for a new harvest to free the cellar and equipment for a new crop.
After the intermediate bulk aging, check your wine for complete clarity and lack of sediment. If not completely free of sediment, it should be racked one more time prior to bottling, and filtered if needed. You may then want to rack to your bottling tank to blend multiple containers to achieve a single wine batch in bottle. After that, the final racking for any wine is from the carboy or tank that is serving as the “bottling tank” into individual bottles that can be corked, labeled, and laid down in that other kind of wine “rack.” The timeline of racking from fruit to bottle is finished, but if bottle aging a red wine produces more sediment, store the bottle upright for a few days before serving. Pull the cork and gently pour the wine off of the sediment into a nice serving container — we call that racking “decanting.”
Ways to Rack Wine
As for racking methods, the goal is to siphon or pump the wine off of the sediment. For quantities less than a barrel, siphoning is usually adequate and it is simple and convenient. A clear plastic food-grade racking cane is up to three feet (1 m) long with a right-angle bend included near one end. Tubing is usually clear vinyl hose with an inside diameter that fits snugly on the outside diameter of the racking cane at the curved end. About six feet (~2 m) of tubing is attached to the short arm of the cane and the long arm is inserted in the wine to be racked. To avoid drawing up sediment, the racking cane can be clipped in place or a racking tip can be added. The racking tip is a cup-like plastic piece on the lower end of the cane that draws wine down into the cup then up into the cane, avoiding a vacuum cleaner suction so as to leave sediment undisturbed. For gravity transfer, position the receiving bucket or carboy below the one being racked and fill the tube to begin the gravity flow. A large syringe can be used to start the flow or the tube can be filled from the lower end with the same or a similar wine and then lowered into the receiving vessel. Easier still, a simple piston pump auto-siphon racking cane is available that can begin the gravity flow with just one or two strokes. Several lengths and diameters are available in clear plastic and in stainless steel.
For racking larger volumes, a pump will prove much more convenient. A racking cane is still very useful, but the auto-siphon feature is not needed. Without a racking cane, hose may curl in the container being racked and make it difficult to draw up the wine all the way down to the sediment while not stirring up that same material. Once again, use a clip or racking cane tip to manage the clarity of the racked wine. Use a pump rated for beverage contact and sized to match your wine production volume. Diaphragm pumps, impeller pumps, and peristaltic pumps are all available from home wine equipment retailers. Most smaller pumps cannot handle significant solids and a prefilter screen should be installed inline just ahead of the pump to prevent damage to the mechanism. Hoses and fittings are the same or quite similar to those used in siphon transfers.
It may be convenient to combine gravity and pumped rackings. When I am using one of my hectoliter (26-gallon) barrels for aging wine, I usually have two or three carboys of the same wine on hand for topping. I use a small impeller pump to rack wine out of the barrel into my 200-L (53-gallon) stainless steel tank. I rinse the barrel and drain it, put it back in the cellar, then pump the reserved carboys into the barrel. My stainless steel tank is on an ATV lift (a hydraulic jack for servicing small utility vehicles) that can raise the full tank about 20 inches (50 cm). That allows me to siphon wine from the tank back into the barrel until it is full, then fill clean and sanitized carboys by gravity to be the new topping wine. Gravity flow is much easier to control without making a mess than the much faster pumped flow.

Avoid Racking Pitfalls
While proceeding with a racking schedule to improve your wine, you want to carefully avoid inadvertently making your wine worse. The two biggest risks in a racking program are oxidation and contamination. With white wine more susceptible to oxidation, you may want to take extra steps in that racking program to minimize air exposure. You can use an inert gas or carbon dioxide to flush the receiving container immediately before the transfer to minimize exposure to air as it fills. You can similarly use a carbon dioxide or inert gas bleed into the headspace of the carboy being racked to continuously replace air as the level drops during the transfer. Some bottle filling devices are equipped with a fitting to allow inert gas flushing. Avoid putting glass carboys under pressure — see my article “Inert Gases for Winemaking” in the April-May 2022 issue for details. Once wine has finished all fermentation, make sure each new container is fully topped up to avoid excessive air or headspace. Inert gas is excellent during racking, but will not stay in place for weeks or months of aging after racking day — always top up your aging wine! I usually use silicone breather bungs rather than solid bungs during aging as an added precaution. These breather bungs prevent the entry of air like a solid bung, but should a small amount of gas develop or even expansion from seasonal temperature changes, the bung will release pressure without blowing out and leaving the wine unprotected from air.
In the case of contamination, cellar sanitation is essential. Finished wine, properly sulfited, is fairly stable — but it is still at risk for bacterial spoilage. Indeed, when genus Acetobacter is added to wine on purpose, we are making vinegar. When it is in our homemade wine by mistake, it is spoilage. Keep all equipment clean and sanitize all tubing, racking canes, carboys, and bungs before beginning each new racking operation. Pay close attention to every step of your racking program as you make your wine to help you put bottles of clean, stable wine on that other kind of wine rack in your dining room or cellar.