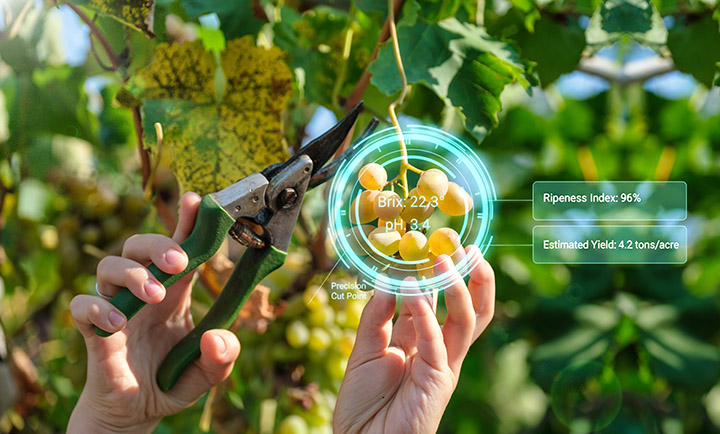
Field Grafting Grape Vines
If you want to grow a new varietal, you have the option of grafting cuttings onto your existing rootstock, saving you the time of establishing a new root system. Also, if your original vines were planted on grafted rootstock designed to resist phyloxera, or if your current rootstock is designed to grow well in your type of soil and climate, you may wish to keep those already established roots and graft onto them.
Keep in mind that grafting does not heal sick vines. If your vineyard is unhealthy, attaching new cuttings to your old rootstocks most likely will not heal it. Diseases such as leaf roll, fan leaf and crown gall, for example, cannot be cured by grafting. Whatever made your vines sick in the first place is still in the vine, and it will just make your new grafts sick as well. Likewise, grafting does not make old vines young. If your rootstock and trunk is very old, grafting young healthy new wood will not make the vine young again — it is only as young as the root.
Any graft is traumatic to a vine, and grafting only works when you bind healthy cuttings to healthy trunks and rootstocks. Make sure your reasons for grafting are sound before proceeding.
Desirable Conditions for Field Grafting
You will want to check that your rootstock is compatible with what you will be grafting. For example, Vitis vinifera grapes are especially susceptible to phyloxera. If you are going to graft cuttings from vinifera onto your current roots, ensure the roots are resistant to phyloxera.

In addition, the row and vine spacing you have already established for your current vines should also be compatible with the new fruiting variety you have planned.
Three Stages of Field Grafting
Field grafting is performed in three stages: Pre-grafting, grafting and post-grafting. All three stages may span an entire season or more.
Pre-grafting operations fall into two parts: preparing the new wood and preparing the trunk. Grafting is surgery. A successful surgeon does not cut until his operation is well-planned.
After deciding what varietal you want to graft, you can either buy the scion or cut it yourself from other vines. First, calculate how much you need. Each scion that you graft to the trunk should have two buds and each vine trunk will receive two new scions.
If you are buying scions for the graft, the logistics of cutting and storage will be out of your control. Make sure your source is reliable and that your scions are disease free. They should be healthy, have been treated with a fungicide and properly kept in cold storage until you pick them up.

If you plan to take cuttings from other vines, note that from the moment the scion is removed from the vine it is vulnerable to infection, injury or drying if not treated and stored properly. The safest way to store new wood is to leave it on the vine until as late as possible in the dormant season. Make the cuts before the dormancy period ends and the buds begin to swell.
Cutting Canes and Preparing Scions
With clean, sharp pruning shears, cut the healthiest, most mature canes from the vine. These are canes that have been exposed to good sun, and are at least 3/8 to just over 1/2 inch (0.9–1.5 cm) in diameter. Make a cut at the base of the cane to remove it from the vine. Here’s a tip: When cutting canes or scions, always make the bottom cut flat and the top cut angled. This will help you to keep the cane or cutting oriented properly. The angled cut is always the top cut. After the entire cane has been removed it can be sectioned into scions.
Cut the cane into several 2-bud pieces. Avoid using the ends of the cane, where the diameter is under 3/8 inch (0.9 cm). Choose healthy buds separated by at least 2 inches (5 cm).
Although a scion should be a length of cane containing two buds, the actual piece will also include some internodal wood over the top bud to prevent the bud from drying out and at least 2 inches (5 cm) of wood below the bottom bud to shape and fit into your graft cut. See the sidebar on page 44 for how to store scions prior to grafting.
Preparing the Trunk
The next step is to prepare the receiving trunk. “Prepare” is a rather gentle word as you are actually going to cut the entire canopy off. This should be done in spring, just as the vines are getting ready to come out of dormancy. If the trunk is small (1–2 inches/2.5–5 cm in diameter), you can use large tree pruning sheers to make a clean cut. For larger trunk diameters, a chain saw is more suitable.
Heading the Vine
Before removing the canopy, determine where you want your vine to be headed. If your first trellis wire is at 39 inches (1 meter) and you want to head your vine there, cut the canopy off about 4 inches (10 cm) below that. This allows for space for the new grafted wood to grow shoots up to the trellis wire.
Since grafting is done as the vines are coming out of dormancy, the sap is running and they will “bleed” when cut. This can create quite a lot of internal pressure in the vine. The pressure can be great enough to push the new graft out of its union. This sap pressure needs to be relieved before making the graft.
At the base of the vine — a few inches off the ground, on each side of the trunk — make an incision into the cambium layer. This is the layer of living tissue underneath the bark. These cuts will reduce the sap pressure at the top of the trunk, allowing the graft union to heal.
Making the Graft
Now that the scions and trunks are cut, the actual graft cuts will be made where the scions will bond with the trunk. You will need to cut the scions to get them to fit into your graft cut. The type of graft you choose determines how you cut your scions.
In order to make a good graft, it is good to know a bit of basic vine biology.
Grafting Biology 101
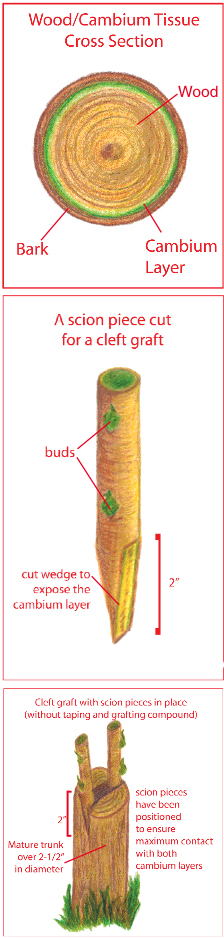
In grafting, the injured tissue of one vine heals to the injured tissue of another. However, just putting two cut vines together does not guarantee a graft. The healing only takes place if the cambium layers of both the trunk and the scion are in permanent contact with each other. The cambium layer is the layer of green living tissue that lies between the bark and the wood. Therefore, the incision you make on your trunk, and the shape you cut your scion must be tailored to allow as much of the cambium tissue on both pieces to contact each other.
Grafting involves wounding your vines, and working with open wounds on both the trunk and scion. Open wounds are susceptible to infection. Therefore, the cutting tools you use should be clean and sharp for the most precision and least potential for contamination.
Types of Graft
I will describe the two easiest grafts to make, cleft grafts and whip grafts. There are other types of grafts used in vineyards, but they are just variations on the following themes. Cleft grafting is used for thick trunks, 1–1/2 inches (3.8 cm) or more in diameter. For small diameter trunks — 1 inch (2.5 cm) or less — whip grafting is used. The type of graft cut you make will determine how to prepare your scion for the union.
Cleft grafting is the easiest kind of graft. After removing the top of the vine, simply split the top of the trunk about 2 inches (5 cm) down with a cold chisel or small axe. Make sure the split line follows the direction of your trellis line. Hold the split open and fit two pre-shaped scions into the cut — one on each side, ensuring the cambium layer of both the trunk and the scions are in contact with each other. The natural tension of the split wood wanting to close again should grip the scions and hold them in place while you work.
The scions for cleft grafting are cut into a two-sided taper, about 2 inches (5 cm) long from below the lower bud, down the trailing length of the cutting. It will look like a little wedge extending from the bottom bud. When inserting the scion into the cleft, make the intersection of the two cambium layers as long as possible to increase tissue contact and the odds of bonding.
Now that both scions are placed into the cut, the open wound must be protected against drying and infection.
Even if the natural jaw pressure of the cleft is enough to hold the scions in place, wrap the grafting area with raffia or 1 inch (2.54 cm) wide grafting tape to clamp the scions in the cleft.
After the graft is completed, the entire wound area needs to be completely sealed with grafting compound to prevent infection, and drying of tissue. There are a number of grafting compounds, which look like black asphalt paint, on the market. Tree Seal or Tree Heal are two examples. Apply the compound with a disposable 1 1/2-inch (4-cm) bristle brush. After applying the compound, the brush should be disposed of at the end of the day. Use a fresh brush if you continue making grafts on another session. Coat every portion of the top of the cut stump, the inside of the cleft as well as the scions that are in place. Also, seal the upper green tips of the scions with compound. After the compound is dry, paint the entire graft union and scions with white interior latex paint. This will ensure the graft heats up less in the sun and the graft is sealed to hold moisture inside.
Whip Grafting
Whip grafting is used when a trunk’s diameter is so small that it will only hold one scion. Make an angled cut at least 2 inches (5 cm) long, just above the ground. Cut the scion at a complementary angle. If you can find a scion that is the same diameter of the trunk, this is best. If not, then the cambium layer of the trunk and the cambium layer of the scion can only be matched on one side of the cut.
Place the scion on the trunk and wrap it in place with raffia, or 1-inch (2.5-cm) compound tape. As with cleft grafting, coat the entire union with grafting compound then white latex paint.
Post Graft
Graft unions are fragile and should not be touched again during the healing process.
Although trunk incisions were made before the graft, pressure may build up again and push the graft union, or prevent it from healing. Avoid this by confirming the incisions you made in the trunk earlier. Make new incisions just above the old ones and repeat at least every week, if needed.
As the vine heals, suckers will emerge out of, and at the base of, the trunk. All but one sucker should be removed. The remaining sucker has a dual purpose — it may divert sap and help reduce vine pressure, and, if the graft union does not take, the sucker can be cultivated into new growth to make another graft later. When it appears that the graft is growing healthy shoots up to 10 inches (25 cm) long, remove the sucker.
As soon as the shoot is at the wire, tie it on. The graft union is still very fragile, and even strong wind could break it off. Since the graft is supporting the weight of a 12-inch (30-cm) shoot, it should be gently tied.
What to Expect
You will, of course, be anxious to see positive results — but remember that you just performed major surgery on your vine. It will take time to heal and not every graft is successful. Some of your buds may begin to show growth within weeks. You may even see them emerge and then die. This does not necessarily mean the graft was unsuccessful. The primary buds may push out naturally, but die due to the trauma of surgery. Allow the secondary buds to emerge. They may take several more weeks or even months. In the meantime, you can keep a sucker alive as a standby.
Within a season or two, you can begin to see fruit. It will take a few years for your vine to mature, but you are still a few years, and a lot of labor, ahead of replanting the entire vineyard. You have a healthy root system, and the fruiting varietal you always wanted.
Congratulations. You have a new vineyard!
Tips for Cold Storage of vine cuttings
If you need to cut your new wood into scions well before grafting time, they can be stored. Cuttings need to be kept cool and damp during cold storage. With proper care, cuttings can be stored for several months.
Cuttings should not be frozen. The ideal storage temperature is between 34–36 °F (1–2 °C).
Before storing, organize the cuttings in bundles of 10 or 20, held together with small gauge wire. Be gentle with the buds while handling. Keep the cuttings oriented so that the tops and bottom cuts are all in the same direction. If you are grafting more than one type of varietal, make sure they are labelled as separate bundles.
Cuttings can be stored in three ways:
Refrigeration
If you have space in your refrigerator, bundle the cuttings in groups, and wrap them in moistened newspaper, wood shavings or peat moss. (Make sure it is not dripping wet.) Store the cuttings in well-sealed plastic bags. This is the simplest method of storage.
Bin Storage
If the temperature where you live is cold, but remains above freezing, or if you have a cold cellar where the temperature remains consistently below 36 °F (2 °C) and above freezing, you can store the vines in a plastic lined bin full of moist wood shavings. Rubbermaid containers will work if the lid can be sealed to hold in the moisture. The bin needs to keep the cuttings cool without allowing them to dry out. Check frequently to make sure the cuttings and shavings are damp.
Burial
Cuttings can also be buried in a shallow pit or trench in the ground, if the temperature is right. Ground temperatures are the most unstable since they react to weather, sun, rain, and snow.
Prepare a well-drained trench at least a foot deep (30 cm), in a location shaded from daytime sun to maintain the least amount of temperature fluctuation. Ensure that the hole is not a water trap in case of rain. A sandy pit is ideal. Heavy clay is high risk as it traps water.
Wet the cuttings first to make them damp. Wrap and package the cuttings as you would if storing in a refrigerator. Cover them with soil. Remember to mark the burial place to find them again.
Some have found success by simply burying the bundled vines in sand or soil, unwrapped — as long as they do not become saturated or dry.
Preparing Cuttings for Grafting
Vines should be removed from cold storage 24 hours before grafting, to allow them to warm to the ambient temperature. Do not allow them to dry out as they warm up. Only warm up cuttings you expect to use that day.