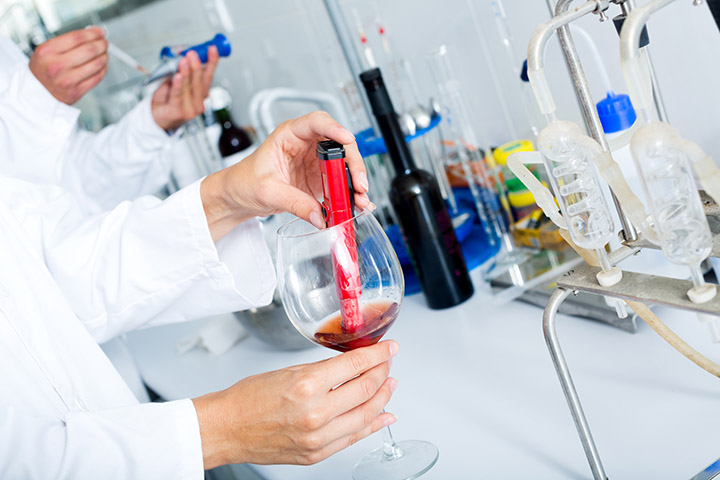
Moving Wine with Pumps
Throughout the winemaking process, the wine is transferred or “racked” into another vessel to leave the byproducts of the process (known as lees) behind. It makes sense to do this in the most efficient manner regardless of the size of your home operations. In this article we’ll explore the different ways to move wine around the winery while saving you time — and your back — in the process.
Gravity Racking
Gravity racking is the tried and true, simplest and least expensive way to rack your wine. All it takes is a food-grade hose and a little suction (usually with an auto-siphon attached to your hose) to prime it, and gravity of course. Once primed you quickly put the hose in the receiving carboy — easy. In order to start the process using an auto-siphon, you submerge the auto-siphon into the wine to be racked, and put the other end of the tubing into the receiving vessel, pull up the inner tube of the auto-siphon about 7 inches (18 cm) and pump it back down, and the siphoning process will begin. Once the transfer of the wine is finished you replace the airlock. This is where the disadvantage of gravity racking comes into play; you likely need to pick the heavy vessel up off the floor (lift with your knees!) and place it safely back on your work space. This is a convenient and affordable way to move smaller lots of wine around. For those who are working with 50 gallons (189 L) of wine or more, this method is an option, however there are more efficient techniques, saving time and avoiding strain on your back.
Diaphragm Pump
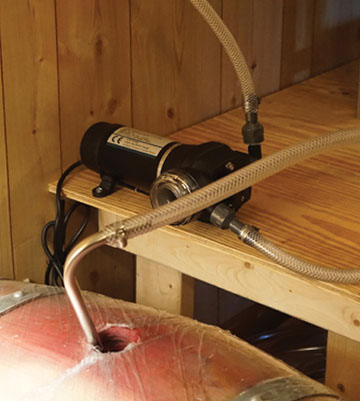
When processing larger lots of wine, whether it is in barrels, large capacity stainless steel tanks, or 15-gallon (57-L) demijohns, you may want to consider using a diaphragm pump. Diaphragm pumps are self-priming and will transfer up to 3 gallons (11 L) per minute. Self-priming means it will actually draw wine out of the vessel and transfer the wine without the need to have the pump and tubing filled with wine first. The diaphragm action is gentle on the wine and won’t unnecessarily beat it up, which makes for a smooth transfer. Although this method is a good option one caveat is the pumps’ sensitivity to sediment. An easy fix is use of a pre-filter.
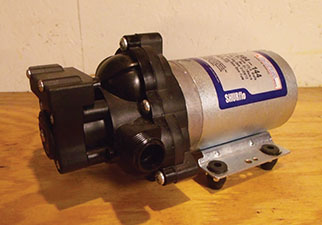
Diaphragm pumps come with built in valve adjustment allowing you to choose the speed of transfer from 0 to 3 gallons (0 to 11 L) per minute. Pumps without this feature, such as the SHURflo Model: 2088 available from Morewinemaking.com can have an inline valve installed on the out-flow side to adjust the speed of the transfer. This particular pump has a self-regulating motor designed to shut off when restriction exceeds pump capacity. The benefit of this is if you need to make an adjustment to the tubing, or interrupt the flow for other reasons, you can close the inline valve completely.

You can also build a switch into a heavy-duty extension cord to carry around as you monitor racking operations. This provides you the ability to shut the pump off as needed with the flip of a switch instead of having to go unplug it. This is easier than running across the room to the nearest outlet to stop the flow in time.
Buno Vino Mini-Jet and Super Jet
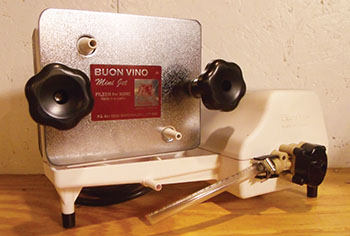
Another uncomplicated method of wine transfer are the Buon Vino Mini-Jet and the Super-Jet wine filters. These units are meant for filtration but can double as a tool for wine transfer. You have a filter and a wine transfer tool all in one! All you need to do is bypass the filtration part and direct the hose coming out of the pump-head into the receiving vessel. I recommend an in-line pre-filter be used in combination with a sediment tip on the siphon hose because these pump-heads are sensitive to sediment. This is another excellent way to save money and time when racking your wine.
Vacuum Pump
Vacuum pumps are an excellent tool to move your wine. One of the biggest reasons (like the methods mentioned earlier) is you can rack your wine with the donor and receiving carboy on the same plane. Since gravity is not necessary there is no more bending over to pick up a 40-lb. (18-kg) carboy off the floor. This is especially nice for those 15-gallon (57-L) demijohns or oak barrels that are usually at ground level due to their weight and therefore cannot be lifted onto a bench for gravity racking. Although the walls of the demijohn are thinner and more delicate than their 5-gallon (19-L) counterparts, they too can handle vacuum racking. When using the vacuum pump to move your wine you only need a small amount of vacuum to get the wine flowing, which isn’t enough to force the walls of the demijohn to break. Unfortunately this is not typically the case with PET or plastic vessels — however, Steve Helsper has developed a device that can be used with his All-in-One Pump so that you can vacuum rack into PET carboys (www.allinonewinepump.com). Otherwise, the walls of these vessels are far too thin to handle any sort of vacuum and therefore one of the other wine transfer methods should be used with these particular vessels (think of putting a paper bag up to your mouth and sucking in, the bag sucks in too). With some minor assembly you can build your own vacuum racking set up in no time and possibly for little cost. The setup I’m about to describe on the next page is just one example of a vacuum racking build (there are many.) Be sure to research a setup that works for you.
Vacuum Pump Setup
The Pump
In my home winery I use a 1.5 CFM (cubic feet per minute) vacuum pump. These pumps are designed to remove gas molecules from a sealed volume to create a partial vacuum. The pumps are available at various online outlets in a range of prices, depending on the model of pump you choose. Sometimes you can even find them used locally at a significantly reduced price. They come in two different styles — oil and oil-free, oil-free being the more costly of the two. Some winemakers prefer the oil-free due to concerns their final product will absorb oil fumes. I currently use an oil vacuum pump; I will explain later how to prevent oil fumes from getting into your wine. You can choose whichever one you feel comfortable with. I chose the one that suited my checkbook.
The Overflow Container
The vacuum pump is very sensitive to any liquid getting into the unit. In other words, don’t allow any wine to be sucked into the pump! In order to prevent this you’ll need to use an over-flow container. This will catch any wine in the event of an over-flow in the receiving carboy; therefore protecting the pump from being damaged. Any rigid container will do, whether it is a glass, wide-mouth 1-gallon (3.8-L) jug, a medical vacuum suction container, or even a large mason jar (more on these next). Whichever container you choose to employ as your over-flow vessel, some pieces will be needed be installed in order to use it.

One-Gallon (3.8-L) Jug
These vessels are easy to obtain, and maybe you have one already in your winery you can use. The wide-mouth version is preferable because the #8 rubber bung that fits in this particular vessel is large enough to accommodate two barbed, 90° elbows, as opposed to the smaller #6 rubber bung. Predrilled #8 bungs are available for purchase from various online laboratory outlets or you can drill your own. The rubber is not easy to drill, so you may want to freeze it prior to drilling giving the drill-bit a harder surface to drill against. The hole should be slightly smaller than the elbow for a tight fit. Once you’ve obtained your drilled rubber stopper or you have drilled your own, insert a barbed 90° elbow in to each hole. One side goes to the vacuum pump and the other side goes to the
carboy cap.
Mason Jar with Lid
Another easily obtainable vessel is a big Mason canning jar with a lid. Drill two holes in the lid large enough to be able to put a drilled #2 rubber stopper into each hole (available at any local homebrew store or online.) Ensure that a snug, airtight fit is achieved. Insert a 90° elbow into each stopper. Connect it as outlined in the 1-gallon (3.8-L) setup.
Medical Vacuum Canister
These canisters were actually built for use with a vacuum. I use these for my rig but they may be more difficult to get for free or at a low cost. If you have access to one of these, however, and this is what you choose, the set-up is the same as with the other two vessels and self-explanatory.
Once you have decided on a method, it is time to assemble your racking cane.
You Will Need:
• ½-inch racking cane x 2 (plastic or stainless steel)
• ~ 6 ft. (~2 m) ½-inch diameter food-grade tubing
• Orange universal carboy cap
• 3 inches (7.6 cm) long rigid tube (plastic or stainless steel)
• 4 hose clamps
See the photo on the facing page to see the build. First take one of two racking canes and insert it into the short side of the orange carboy cap all the way up to where the racking cane starts to curve (some drilling to widen the hole to accommodate the cane may be needed.) Take the racking cane/orange cap assembly and put it into a carboy. You will see the cane is 6–7 inches (15–18 cm) too long and will need to be cut so that the cane is at least a ½ inch (1.2 cm) from the bottom of the vessel (this is important as not to allow the wine to splash around in the receiving vessel,) and so the cap will fit snuggly onto the carboy. A hacksaw would be the best to use here for both plastic and stainless steel racking canes. The plastic is prone to cracking so be careful and take it slow. Cut the long part of the orange carboy cap shorter but leave enough room to allow a hose clamp to be installed; insert the 3-inch (7.6 cm) rigid tube. Secure with a hose clamp.
We can now connect our food-grade tubing to the racking cane in the carboy cap and the other end to the remaining racking cane. Hose clamps are also used here to secure the tubing. One thing that I have found helpful is a clip that can secure the racking cane to the neck of the carboy so you’re not stuck holding it.
In order to use the vacuum pump for a 54-L (14-gal.) demijohn, you will need a predrilled #11 rubber bung. Drill a hole off to the side of the existing hole allowing some space between the two and insert a 3-inch (7.6-cm) plastic tube for the vacuum pump. Then insert your racking cane into the predrilled hole and ensure a snug fit is achieved for both. This adapter is used just like the orange carboy cap. A similar adapter can be built for oak barrels and sanke kegs; but may require a different size rubber bung.
Vacuum Tubing and Flow Control
In order to control the flow and prevent oil fumes from creeping up the vacuum tubing and into the wine, an inline thumb valve needs to be installed between the overflow container and the carboy cap. This allows fresh air to be pulled into the vacuum preventing fumes from contaminating your wine. (Don’t worry; this fresh air does come not come into contact with your precious wine.) This thumb valve also allows you to control the flow rate of the wine; which is important once the receiving vessel starts to get full. Even when using an oil-free pump, the thumb valve should be employed to be able to adjust the flow rate.
Ttake a 1-inch (2.5 cm) piece of vinyl tubing and firmly slide it over the top of the barbed “T” fitting, and then slide your thumb valve into the other side of the vinyl tubing. Connect two, 6-ft. (1.8-m) pieces of tubing to both sides of the “T.” One goes to the overflow container and the other to the carboy cap. Hose clamps should be used at all tubing connections. In this picture you can see I use medical vacuum tubing with rigid walls. This is so the tubing does not collapse during the vacuum operation. This special medical tubing isn’t a must, just as long as you get at the very least, flexible rigid tubing that won’t collapse under a vacuum. The size of your vacuum tubing also does not matter. Just be sure to coordinate the size of the barbed fittings mentioned above to the size of your tubing to ensure an airtight fit.
Put it All Together
Now that your pieces are built, it is time to rack some wine. Connect your vacuum tubing to the inlet of the vacuum pump and the other end to the overflow container. Next, attach your tubing with the thumb valve to the other side of the overflow container the other end of that tubing to the carboy cap. Put the racking cane into the donor carboy and the orange carboy cap onto the receiving carboy. With the thumb valve open, turn on the vacuum pump and slowly turn the thumb valve to the get the wine flowing. You can make the wine move faster by further turning the valve but always allow air to be flowing through the valve and into the vacuum pump. Once the receiving carboy starts to get full, open the valve and slow the flow down. Once the vessel is full, remove the carboy cap and turn off the pump.
Inert Gas
Inert gas is another way to transfer wine. It is also very gentle and oxygen exposure is significantly reduced. Like the aforementioned methods, you can rack into vessels that are side by side. In this setup you will need a tank of inert gas and the proper regulator for which gas you choose. Your options are: CO2, nitrogen (N2), argon, or “beer gas,” which is a mix of CO2 and N2. I immediately dismiss argon in my own winery due to the expense, so I either go with nitrogen or CO2. At this point I want to comment on a few other uses of inert gases in the home winery such as: Purging receiving carboys and wine bottles of oxygen thus replacing it with inert gas to reduce oxygen exposure while racking or bottling.
You could also add inert gas to the headspace of a carboy before replacing the bung and airlock; along with blanketing a cold soaking must (CO2 or argon would be best for this due to their weight and the two are interchangeable in this application.) Nitrogen and argon can be used to temporarily keg topping wine for barrels to keep up with the angels share (they are quite thirsty, wouldn’t you say?) rather than buying topping wine or using last years’ vintage. A trend being seen today in the wine industry is wine on tap. Again, nitrogen or argon may be used for this application. In my opinion the tank and regulator is the expensive part. For just a little more money a Corny keg with at least a picnic tap like those homebrewers use can be had for wine on tap. How cool would that be? Folks will expect beer to come out but nope, it’s Zinfandel!
It is known CO2 introduced to wine under pressure will no doubt carbonate it like sparkling wine. But in this application, the wine’s exposure to CO2 is so minimal, carbonation is prevented from occurring. This is because the wine is displaced under low pressure, so CO2 doesn’t get much of a chance to become dissolved – the container would need to be maintained at high pressure for that to happen. In short; one can disregard this occurrence.
Click for more information on using inert gas in the home winery. Click for more info on kegging wine.
Get Moving
Regardless of your home winery set up one or more of these options should help you move your wine around your winemaking area. I prefer tools that do double duty but for those with more room and money to invest in their winery there are options identified for you as well. Be sure to consider your options and evaluate your needs and choose the option(s) best for you.