Performing Bench Trials
At first glance, bench trials for home winemaking may seem like more trouble than they’re worth. Variously called bench trials, bench tests, or even kitchen table trials, they are focused experiments targeted at answering specific questions.
Whatever they are called, the routine is pretty similar. A sample of wine is collected, divided into a number of treatment subsamples, and treated with different materials, doses, or conditions. After some period of waiting, they are tasted and, possibly, analyzed to determine effects of the treatment. Whether carried out on a wine laboratory bench, a garage workbench, or the kitchen table, they give you information about what is likely to happen to the main wine batch if treated in the same manner. Trial experiments can be a bit laborious, but I am convinced that they are not only valuable, but indispensible in some situations. With a little preparation and some basic know-how, any hobbyist can undertake bench trials. Use the trials to make decisions about blending, sweetening, fining, or other wine additions. The basic structure is the same for any of these and once you set it up, it gets easier to carry out.
The frequent use of bench trials is one of the biggest differences I have seen between commercial winemaking and hobby winemaking. The pros use bench trials all the time, but many home winemakers seem to avoid them. Before I became a fermentation shop owner, I managed a commercial wine-testing laboratory.
One of the very popular procedures we offered to wineries was a trial fining series. The client winery would deliver a sample of the wine to be evaluated. The client would specify what should be tried: a range of fining agents, one fining agent at more than one level, or a combination of factors. One of our laboratory enologists would divide the sample into measured amounts and apply the specified treatments. Generally, the treated portions would be held in the dark overnight and evaluated the next day. That is an important factor in trials: they can be done fairly quickly in most cases. Even if a fining agent specifies a three-week settling period before bottling, an overnight treatment will likely be good enough to answer the question, “is this better?”

After the treatment, the lab enologist might be the sole evaluator. More effectively, though, the client would arrange to have a member of their winemaking staff come to our laboratory and participate. In a quiet, odor-free room, the lab enologist and winery staffer would both observe, smell, and taste the treated wine samples. Taking notes and discussing the effects, they could narrow down the treatments to those that had the best effect with minimal intervention. That is the goal of bench trials — to determine the least intrusive treatment that will yield the best possible wine.
When performing bench trials at home, recognize that you do not need to pin down the “final answer” on your first attempt. Whether you are fining for clarity or adding a tannin product to improve mid-palate mouthfeel, the goal of your bench trial is to answer the question, “Is this better?” As we tried to do in the commercial lab, arrange your evaluation so you are joined by at least one other person who has a reliable palate for wine tasting. Take notes throughout your tasting session. One simple way to do this is to arrange the wine glasses on a sheet of paper serving as a placemat. Number circles on the mat one through four to test one control sample and three test conditions. Place a glass on each circle, pour the wine samples, and taste. Have each taster take notes directly on the placemat beside the wine glass. You then have a simple documented record of each taster’s impressions of each treatment. The specific method detailed below easily allows for up to three tasters and you can enlarge the sample sizes for a bigger group. In my experience, though, three tasters and three test conditions are about optimal for a good level of discussion while still also being able to reach a conclusion.
When you find a treatment that is a clear improvement over the control sample, make a note of it in your winemaking records. Now you need to decide if you have enough information to treat the whole batch of wine or if another bench trial will be needed to fine-tune the result. If you have tried one treatment at three levels, say deacidifying by 0.1, 0.15, and 0.2%, your trial may completely answer your question and you can treat the wine at the best level.
On the other hand, if you have been trying alternative products, like three different tannin additions all at mid-range treatment levels, you may need another trial to determine the dose. You may be able to tell that a French oak tannin product is more effective in your wine than, say, a gall nut tannin or a quebracho tannin, but you may still be uncertain as to how much to use. In that case, do another trial! Take another wine sample and treat with the selected product at three different doses—the low end of the manufacturer’s recommended range, the middle, and the maximum (always keeping a control sample untreated!). Taste again, and now you can decide the dose to go with the product choice when treating the wine.
You can approach the objectives of bench testing in many different ways. Here is a simple method that I have found reliable in answering many different questions. This setup anticipates three tasters evaluating three conditions and a control.
Materials:
• Several 375-mL bottles with screw caps or T-corks
• A wine thief
• (1) 100-mL graduated cylinder
• (1) 10-mL graduated pipet or syringe
• (1) 1-mL graduated pipet or syringe
• 100-mL, 400-mL, and 1-L plastic graduated beakers.
• A digital scale capable of measuring down to 0.1 g
• Kitchen measuring spoons
• Distilled or reverse osmosis purified water
• The wine to be tested
• Products for the experiment
• 12 wine glasses
Procedure:
Thief out one full 375-mL bottle of the target wine. Gas the headspace of the carboy or barrel with inert gas such as Private Preserve from an aerosol can or argon, nitrogen or carbon dioxide. You will want to top up later, but since you may be applying a treatment within a day or two, gassing is fine for the short term.
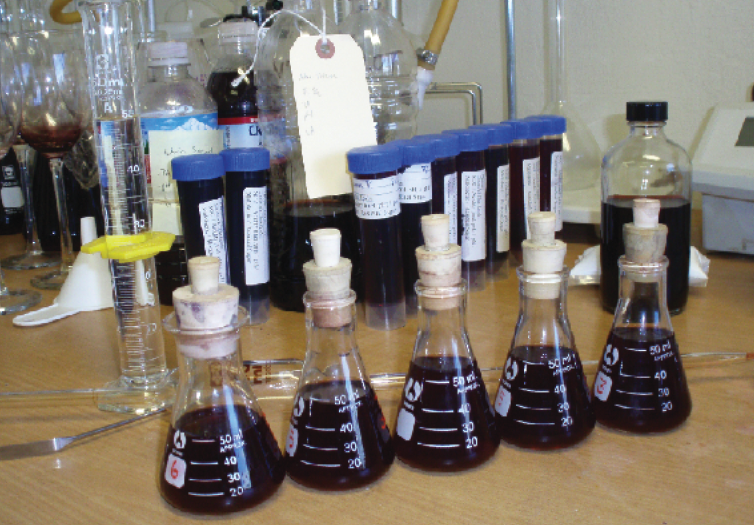
Take your wine sample to your laboratory (or garage or kitchen, wherever you can set up a workspace for measuring and mixing). Using the graduated cylinder, measure 100 mL of wine into each of the three bottles. That will leave you with 75 mL in the original bottle — label that one “control.” Label the three remaining bottles with the conditions or doses being tested. Apply your different treatments to one bottle at a time. Stopper or cap the bottles and shake to mix. Shake the control sample in exactly the same way. It is important to treat the control in the same manner as the samples to separate the incidental results of something like degassing or air exposure from the deliberate results of your trial treatments.
Put the control and the trial samples in a dark cabinet.
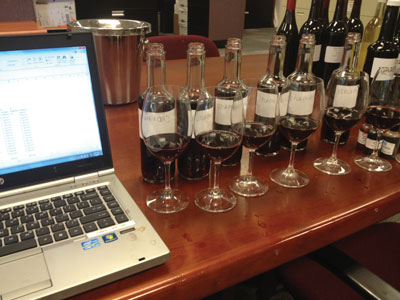
Allow the bottles to stand overnight. Get your one or two helpers together and set up your trial space. In a quiet, well-lit, odor-free room, arrange your placemats around a table or give each taster a scorecard identifying the samples. Also provide each taster with a glass of water. Some neutral crackers or bread can be helpful as well, to clear the palate between tastes.
There is no need to do this as a blind tasting. Go ahead and explain what the treatments are and what goals you have for the wine. While one or more of your tasters may be predisposed in favor or against a particular treatment, that is alright. You are not trying to solve some secret riddle, you are trying to make a wine that you like better. That is inherently a biased process and the only customer you need to satisfy is yourself. The more informed each participant is, the higher the likelihood of a sound discussion and useful consensus.
Pour the four samples into a set of wineglasses for each taster. One hundred mL is almost 4 ounces, so three tasters can get a nice one-ounce pour of each treatment (and a slightly short control, but then you can always get more of that). Taste the wines. It is useful to have each person taste the control and all three trials before beginning the discussion. Have everyone take notes on each. At this point, you are not trying to decide better or worse — that will come later. For now, concentrate on the overall character of the wine and take notes on your impressions. A useful group of topics may be gleaned from the UC-Davis 20-point scale used in many wine judgings: appearance, color, aroma and bouquet, volatile acidity, total acidity, sugar, body, flavor, astringency, and general quality. For a simpler score card, I ask my tasters to report in just five categories: appearance, aroma, mouthfeel, flavor and overall impression. However you do it, some guidance to your tasters will yield more usable results than just asking, “what do you think of this one?”
After everyone tastes, begin the discussion. Try not to drink all of a sample in your first run-through, because the discussion will almost certainly prompt you to re-taste a sample or two — or maybe all four. Some tasters are sensitive to spoilage character that escapes others. Some may note subtle positive components that others did not notice the first time. At any rate, as everyone talks and tastes again, you should be jotting additional notes to help work toward consensus and toward your final treatment decision. Even if two tasters completely disagree on some point, you can make an informed decision as a result. After all, it is your wine. Take their input, write your notes, then make the decision you want to carry out. Keep in mind that sometimes the control sample turns out to be the best wine. In that case, the trial outcome is easy to execute: do nothing.
Wine Treatments
One of the challenges of bench trials is measuring the very small amounts of treatment materials needed for the right dose. Since many recommendations for wine additions are measured for five gallons in a carboy, it is helpful to work out the arithmetic for a 100-mL treatment based on the 5-gallon (19-L) recommendation. Five gallons is equivalent to 19 liters, but the math is easier if we round that off to 20. (That lack of precision will have no significant effect on the outcome of a bench trial). Comparing 100 mL to 20 L gives us a factor of 100/20,000 = 0.005. That means that each treatment specified for 5 gallons can be multiplied by 0.005 for direct addition to a 100-mL sample. Looked at from the other end of the equation, you are using 1/200th part of a 5-gallon treatment to simulate the effects in a 100 mL sample.
For example, suppose you wish to add a tannin product like Tannin Riche French oak tannin that is recommended at 0.5 to 3 grams per five gallons of red wine. Taking a dose in the middle, we might decide to add at the 2-gram rate. Here we roll out the treatment ratio factor: 2 g x 0.005 = 0.01 g. Now, an expensive laboratory analytical balance could be used to measure that weight directly, but those are beyond the scope of most home wineries. Instead, we will turn to a common laboratory practice called serial dilution. The use of serial dilution allows the dispensing of much smaller measured quantities than your scale can measure directly.
In this case, use your graduated cylinder to measure 100 mL of distilled water into another 375-mL bottle. Weigh out 1.0 gram of Tannin Riche on your scale and add it to the distilled water. Shake to mix. Now, each mL of this solution contains the equivalent of 1/100 or 0.01 g of tannin product. Since you need 0.01 g for your target treatment, use a pipet or syringe to extract 1 mL of well-mixed solution and transfer that to the treatment wine sample. There! You have measured 0.01 g even though you have no such scale. You could even measure 0.001 g of something if you want to. You do that by continuing the “series” in your serial dilution. Place 90 mL of distilled water in another bottle. Add 10 mL of your first solution to it and mix. Now you have 0.01/10 or 0.001 g of tannin in each mL of the second solution.
In some cases, it will be easier to apply the “1/200th of a 5-gallon dose” approach. For instance, hot-mix Sparkolloid would be very tricky to prepare in a very small dose. Instead, you can simmer the recommended 5 g for 5 gallons in 2 cups of distilled water, just as though you were going to treat a 5-gallon carboy. Then, since 2 cups (16 oz.) is about 500 mL, it is easy to take a 1/200 portion for your 100-mL trial sample. Divide 500 by 200 = 2.5, so use 2.5 mL of the Sparkolloid slurry in your sample. Since 1 tsp. equals 5 mL, you may find it quicker and more effective to scoop out the 2.5 mL as a ½ tsp. measuring spoonful and pour that into your test bottle. For some common measurement equivalents, see the sidebar at right.
Bench Trial Examples
I have done many trials over my years of winemaking, accumulating experience with different treatments and effects. Here are some examples of blending, sweetening, fining, and other additions.
Blending: For a bride on her wedding day, my wife and I offered to bottle a special cuvée of white wine. We were making Chardonnay and Chenin Blanc that year. We invited the bride, groom, and the bride’s parents to a blending trial to select the best blend. In that case, I used a total of 5 glasses for each taster. A 100% Chardonnay control was at the left edge of the placemat and a 100% Chenin Blanc was on the right. For the samples in between, I mixed 75 mL of Chardonnay with 25 mL of Chenin Blanc, 50 mL with 50 mL, and 25 mL of Chardonnay with 75 mL of Chenin Blanc. We tasted the wines, talked them over, and settled on a 50/50 blend as the most pleasing. We blended and bottled a single case of that one on the same day we bottled the rest of the whites.
Sweetening: I love rosés, often sweetened just enough to be off-dry. For this trial, I measured out the usual 75-mL control and 3 100-mL trial samples. I used 1 g of sugar in the first one, 2 g in the second, and 3 g in the third: 1%, 2%, and 3%. (I used regular cane sugar — sucrose — because it tastes great and as a home winemaker I do not face the restrictions on adding sugar that are faced by commercial winemakers. If you want to stick with grape sugar, buy a can of white grape concentrate and use that instead.) My wife, Marty White, and my brother, John Peak, joined me at this tasting. We all liked 1% and thought it would make a good food-pairing rosé. The 2% was not good at all and we had low expectations for the 3%, but it turned out to be fruity and pleasant in an obviously sweet way. Wanting to make a table wine, we settled on the 1% addition.
Fining: For this, you may want to compare different fining agents. In addition to using Sparkolloid as described earlier, I have tested egg whites and skim milk. For egg whites, the recommended dose is 1⁄2 egg white in 5 gallons (19 L), whipped to a soft froth with some wine or water. For my trial, I separated an egg white into a 400-mL graduated plastic beaker. I added distilled water to 200 mL and gently beat the egg white into the water. I then applied the 1/200th rule: 100 mL of my solution contained 1⁄2 egg white, so 100/200, or 0.5 mL contained my dose for a 100-mL trial sample. I measured that with my little 1-mL syringe and squirted it into the egg white trial bottle.
For skim milk, the recommended dose is 100 to 250 mL in 5 gallons. Choosing the easy 200 mL dose, 1/200th is 1.0 mL. I just pulled up 1 mL of skim milk in my 1-mL syringe and squirted it into the skim milk trial bottle. After those three conditions sat overnight, a tasting allowed the choice of a best fining agent. In this case, I liked the control better than any of the treatments and made no corrections. If I chose one of the fining agents, I might go back and try different doses for the best effect.
Other Products
Whether solids or liquids, with or without preparation steps like boiling, you can use the methods I described in this article to trial anything. The same process can be used for tannin additions, liquid oak extract, gum Arabic, or any number of other wine enhancement products that you may want to try out on your wine. Just use the 5-gallon factor: multiply by 0.005 or take a 1/200th portion. You will be a lot happier with some trial results than just taking a shot in the dark on your entire production batch.